Technologist workflows
Administrator workflows
Exam Management User Guide
Overview
This guide covers the key exam management workflows available to Technologists and Administrators on the platform. These operations are essential for maintaining accurate imaging records, correcting data-entry errors, and ensuring exams are properly organized and attributed.
This guide covers four core workflows:
1 Splitting Exams | 2 Deleting Images | 3 Merging Exams | 4 Editing DICOM Metafiles |
Prerequisites
Before performing any of the operations in this guide, confirm the following:
Requirement | Details |
|---|---|
User Permissions | Each operation requires specific user privileges. Confirm you have the correct role before proceeding. |
Exam Status | Splitting, merging, and DICOM editing require the exam to be in Pending or Support Request status — not Completed. |
Accessing an Exam | Open the exam from the Pending or Support Request tab in the Exams worklist to display the Reporting Screen. |
Delete Permissions | Image deletion requires proper rights and the exam must not be in Completed status. |
Section 1: Splitting Exams
When to Split an Exam
Use the Split Exam function when a patient has images for multiple body regions that were all acquired in a single session but need to be associated with separate orders. Splitting copies all images from the primary exam into a recipient exam, after which you can delete unwanted images from each.
Note:
Example scenario: A patient has orders for both a CT NECK and a CT CHEST/ABDOMEN/PELVIS. The technologist acquires all images on a single scan and associates them all with the CT CHEST/ABDOMEN/PELVIS exam. This leaves the CT NECK as an Unmatched Order. Splitting the CT CHEST/ABDOMEN/PELVIS exam copies the neck images to the CT NECK order, after which irrelevant images can be deleted from each exam.
|
|---|
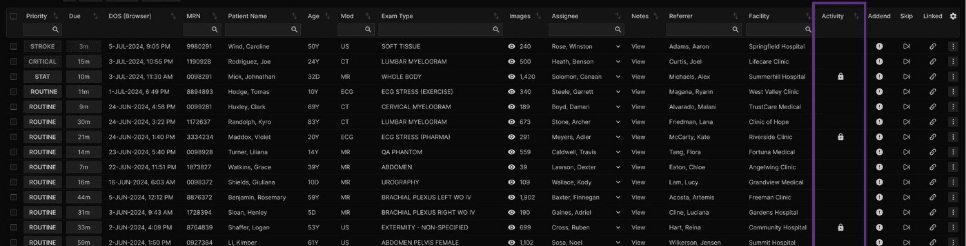
Navigate to the Pending or Support Request tab and select the primary exam (the one that contains all the images). This opens the Reporting screen. |
 |
TIP: The exam must not be in Completed status. Only Pending and Support Request exams can be split. |
|
|---|
In the top-right corner of the Reporting screen, locate the Split exam icon in the Exams panel toolbar. Hover over the icon to confirm the tooltip reads "Split exam." |
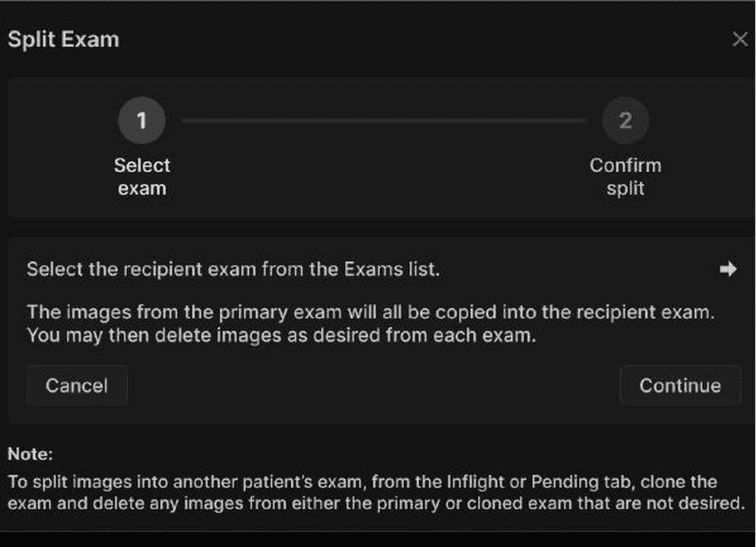 |
After clicking the icon, the Split Exam dialog opens at Step 1 with instructions and the Exams list. The dialog explains that all images from the primary exam will be copied into the recipient exam, and that you may delete images from each exam afterward. |
|
|---|
From the Exams list in the dialog, select the recipient exam — the exam that should receive the copied images. In the example scenario above, select the CT NECK Unmatched Order.
|
NOTE: When an exam is split, the forms, documents, and DICOM structured reports from the primary exam are also copied into the recipient exam. |
Click Continue to proceed to Step 2. Click Cancel to abort. |
|
|---|
After clicking Continue, the dialog advances to Step 2: Confirm Split. This screen shows:
|
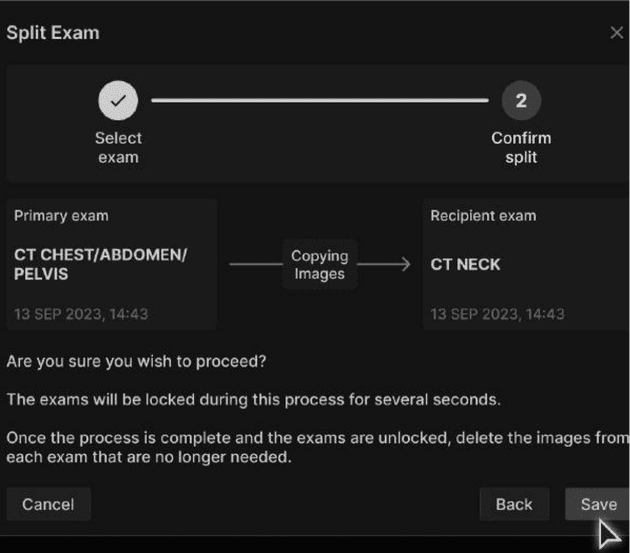 |
Click Save to execute the split. The system returns to the worklist and images are copied from the primary exam into the recipient exam. Both exams are locked during processing. Click Back to return to Step 1, or Cancel to abort. |
TIP: After saving, proceed to Section 2 (Deleting Images) to remove any images that no longer belong to each exam. |
Section 2: Deleting Images
When to Delete Images
After splitting an exam — or any time images are associated with the wrong exam — you can delete unwanted series or individual images. This is the step that permanently removes images that do not belong to a given exam.
Important: Image deletion is permanent and cannot be undone. Always verify you are deleting the correct images before confirming.
|
|---|
From the Reporting screen, open the image viewer for the exam. Ensure you have the necessary user permissions and that the exam is not in Completed status. |
|
|---|
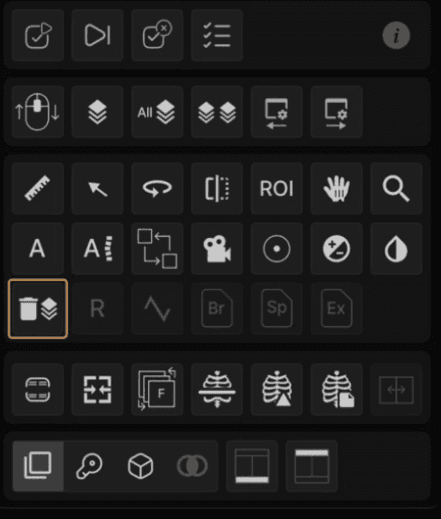
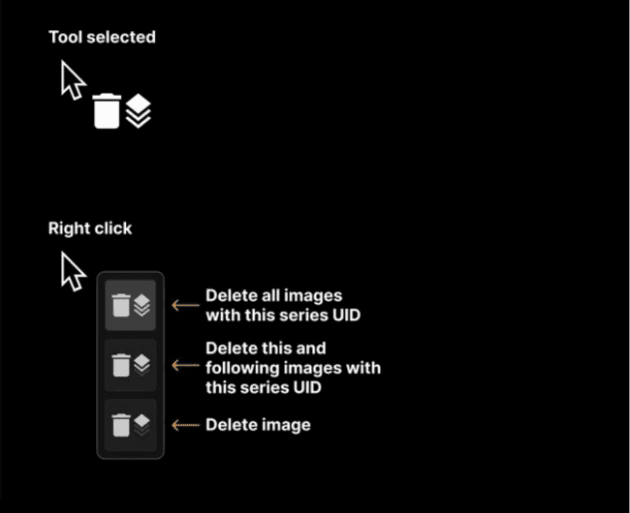
Open the viewer toolbar (press the letter T in the keyboard), locate and click the Delete tool (the trash-can-with-layers icon). The icon becomes highlighted when selected. |
 |
|
|---|
With the Delete tool active, right-click on the image or series you want to delete. A context menu appears with three options: |
 |
Option | What It Does |
|---|---|
Delete all images with this series UID | Removes every image in the entire series. Use when the whole series belongs to a different exam. |
Delete this and following images with this series UID | Removes the selected image and all subsequent images in the series. Useful for trimming a partial series. |
Delete image | Removes only the single selected image. |
|
|---|
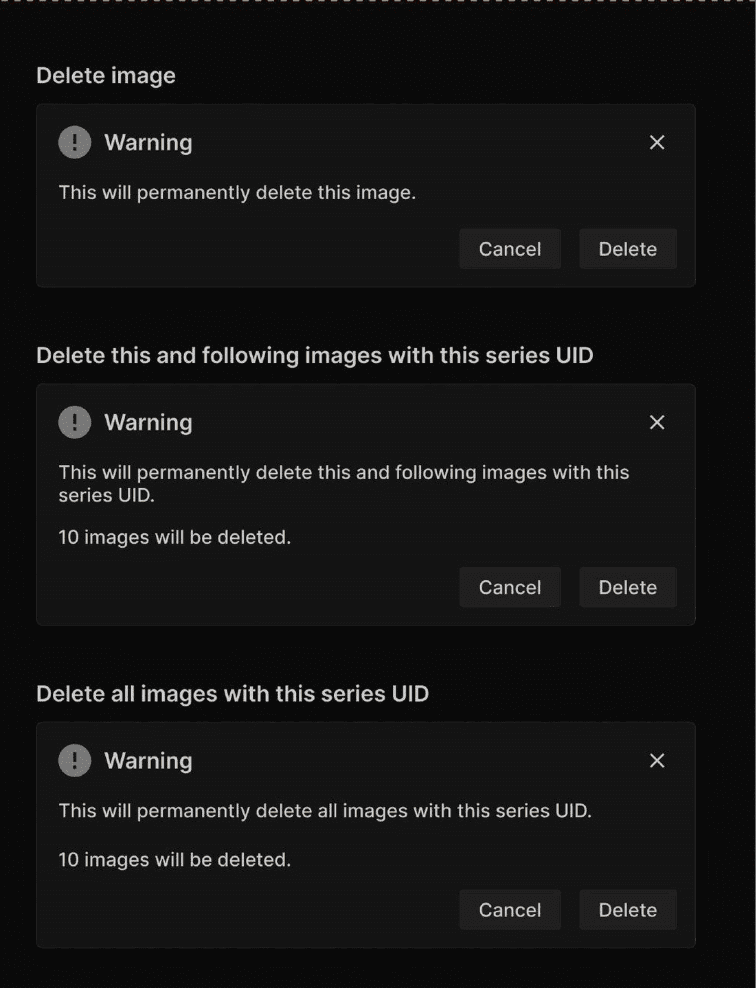
After selecting a delete option, a warning confirmation dialog appears. The dialog states that deletion is permanent and, for series deletions, shows how many images will be affected. |
 |
|
Section 3: Merging Exams
When to Merge Exams
Use the Merge Exams function when two separate exams need to be combined into one. For example, if images for a single exam were inadvertently split across two orders, they can be merged back together. The merge combines all images and data into a single surviving exam; the other exam is deleted.
Important: Neither exam can be in Completed status. Both exams must be in Pending or Support Request status. Both exams must have the same modality.
|
|---|
From the Pending or Support Request tab, select the primary exam to open its Reporting Screen. |
|
|---|
In the top-right area of the Reporting Screen, click the Merge exams icon in the Exams panel toolbar. The tooltip reads "Merge exams." The Merge Exams dialog opens. |
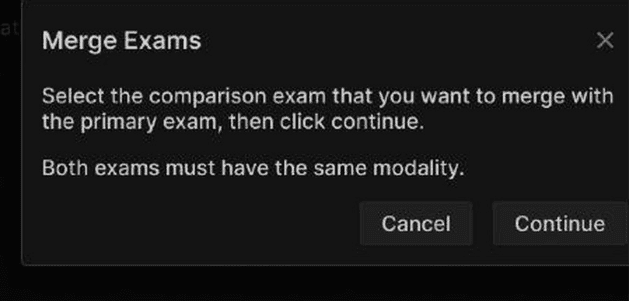 |
The dialog instructs you to: "Select the comparison exam that you want to merge with the primary exam, then click Continue. Both exams must have the same modality." |
|
|---|
From the Exams list, select the second exam to be merged into the primary exam, then click Continue. The dialog expands to show both exams side-by-side: |
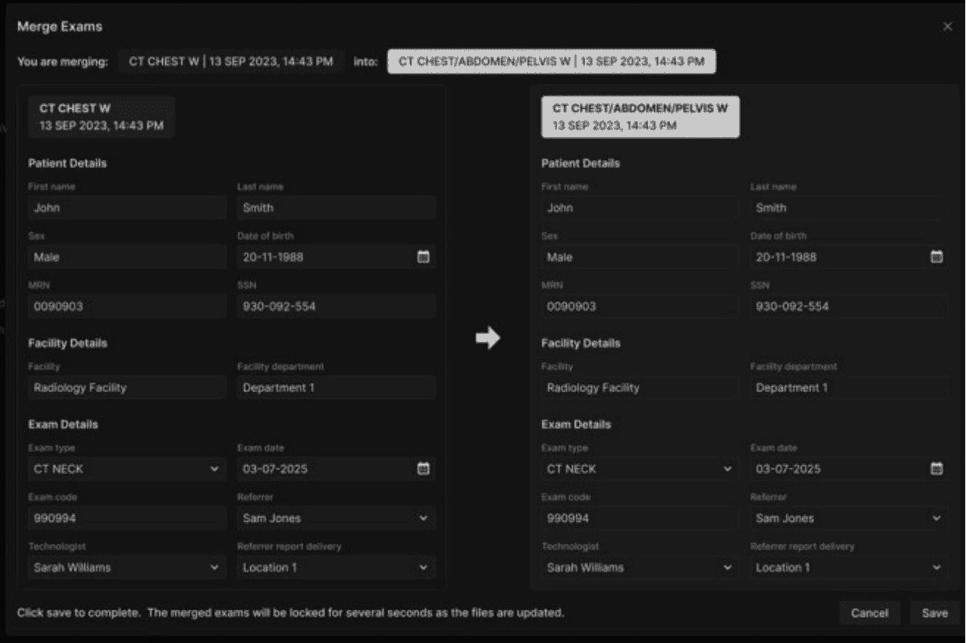 |
The top bar shows the merge direction: "You are merging [Exam A] into [Exam B]." Exam B is the surviving exam. Exam A will be deleted from the platform after the merge is complete. NOTE: When exams are merged, the forms, documents, and DICOM structured reports from both exams are included in the new surviving exam. |
|
|---|
The arrow icon between the two exam panels determines which exam survives. Click this arrow to reverse the merge direction — swapping which exam is deleted and which survives. |
 |
TIP: Think carefully about which exam should survive. The surviving exam retains its original exam number and metadata. The deleted exam is permanently removed from the platform. |
|
|---|
Click Save to complete the merge or Cancel to abort. After saving, the system returns to the worklist. Both exams are locked for several seconds while the system processes the merge. |
Section 4: Understanding Locked Exams
When to Merge Exams
While the system is processing a split or merge, both affected exams are temporarily locked. Locked exams cannot be opened or modified until processing completes.
The Activity column in the Exams worklist shows which exams are currently locked. A lock icon appears in this column next to any exam being processed.
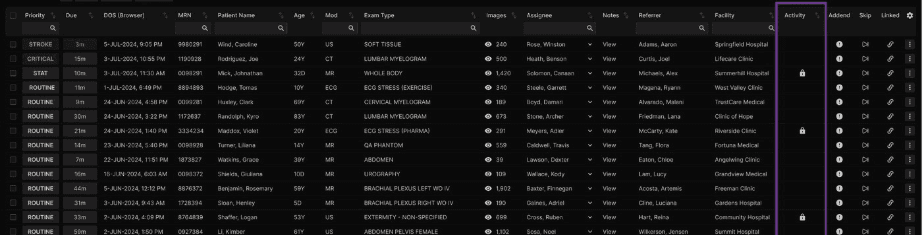 |
TIP: If you cannot open an exam you just split or merged, check the Activity column. The lock icon indicates the system is still processing. Refresh the worklist after a few seconds. |
Section 5: Editing DICOM Metafiles
When to Edit DICOM Metafiles
If the DICOM metadata embedded in an exam's images contains incorrect information — such as a wrong patient name, date of birth, or accession number — it can be corrected directly in the platform without needing to re-acquire images.
NOTE: Scope of changes: DICOM metafile edits apply only to the selected exam, not to all exams on the same patient.
Editable fields: Exam type, Accession Number, Laterality, Last Name, First Name, Date of Birth, Sex, MRN.
|
|---|
Navigate to the Pending or Inflight tab and select the exam you want to edit. The exam must not be in Completed status. |
|
|---|
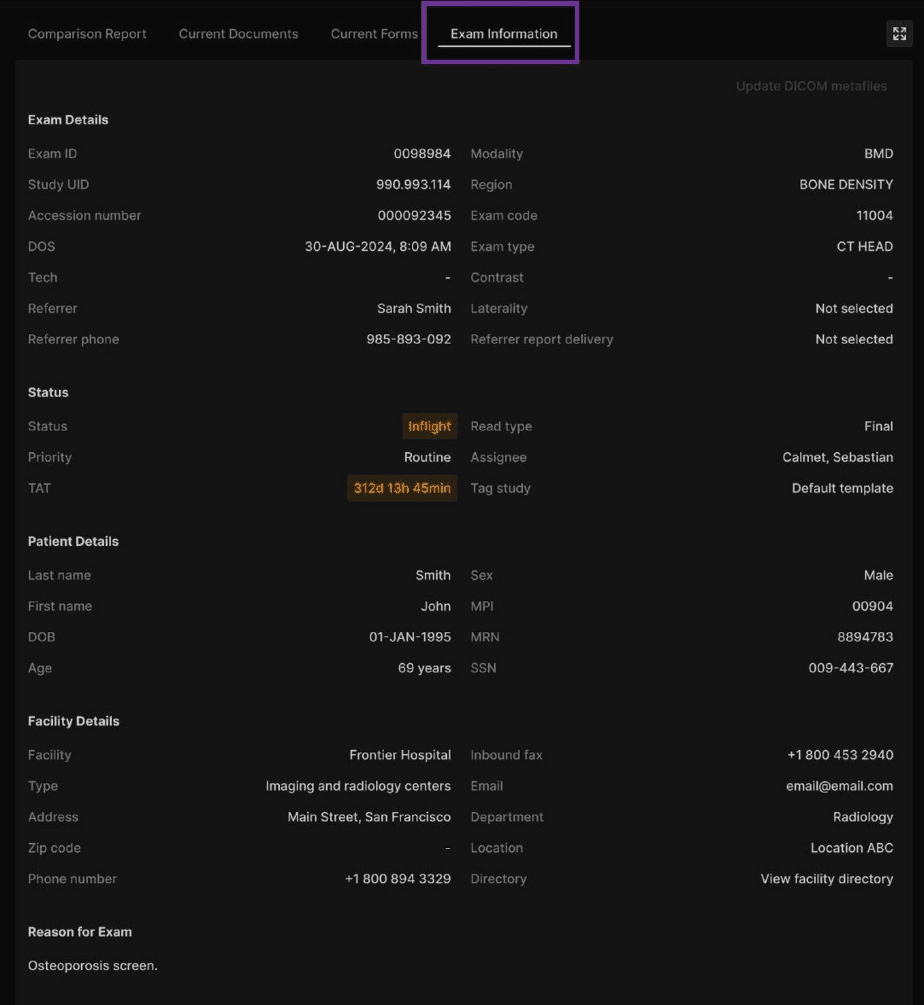
In the right-hand panel of the Reporting screen, click the Exam Information tab. This reveals the full exam metadata panel including patient details, facility details, and status information. |
 |
|
|---|
Click directly on any editable field within the Exam Information panel to modify it. Fields that can be edited include patient name, date of birth, sex, MRN, accession number, exam type, and laterality. |
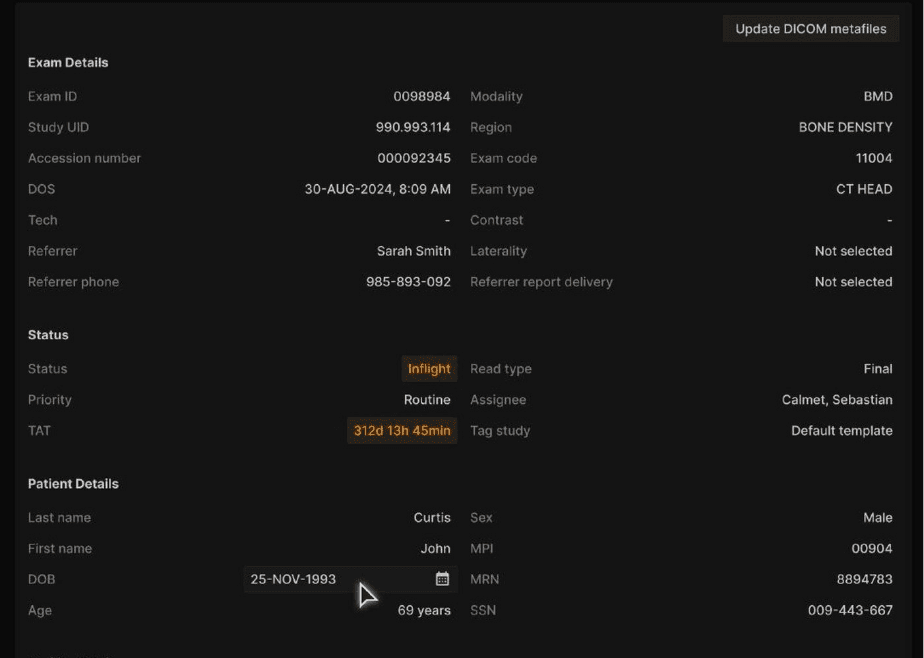 |
As you make changes, the Update DICOM metafiles button in the top-right of the panel becomes enabled. This button is only active when there are unsaved changes. |
TIP: Verify all changes carefully before saving. The confirmation dialog will show you a side-by-side comparison of prior and new values, but it is good practice to review fields as you edit them. |
|
|---|
Once your edits are complete, click the Update DICOM metafiles button at the top right of the Exam Information panel. |
 |
|
|---|
The Update DICOM Metafiles dialog appears, showing a side-by-side comparison of the prior information (left column) and the new information (right column) for each edited field. |
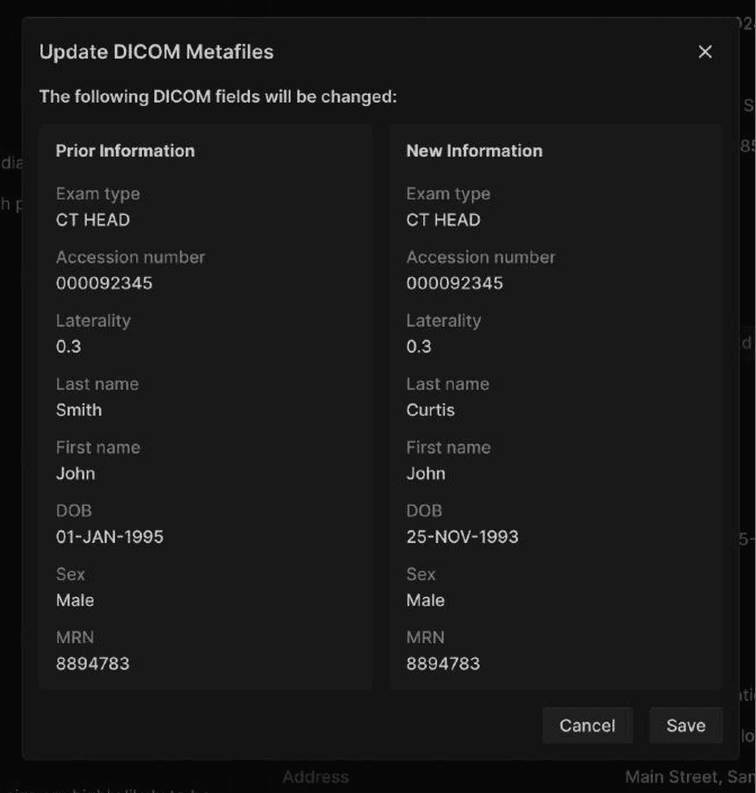 |
Review all changes carefully, then click Save to apply the updates to the DICOM metafiles, or Cancel to return without saving. IMPORTANT: DICOM metafile changes are applied immediately to the exam's images upon saving. This affects the embedded metadata in the images themselves, not just the platform display. Ensure accuracy before confirming. |
Quick Reference
Task | Access Point | Key Requirement |
|---|---|---|
Split an Exam | Reporting screen → Exams panel toolbar → Split exam icon | Exam must be Pending or Support Request; user must have split privileges |
Delete Images | Image viewer → Toolbar → Delete tool → Right-click | Exam must not be Completed; user must have delete rights; deletion is permanent |
Merge Exams | Reporting screen → Exams panel toolbar → Merge exams icon | Both exams must be Pending/Support Request with same modality; neither can be Completed |
Edit DICOM Metafiles | Reporting screen → Exam Information tab → Edit fields → Update DICOM metafiles | Exam must be Pending or Inflight; user must have edit permissions; changes apply to selected exam only |
Check Locked Exams | Exams worklist → Activity column | Lock icon appears during split/merge processing; wait for lock to clear before opening |