Efficient and accurate reading practices promote the job satisfaction and success of reading physicians.
Here are some tips to assist you.
Getting Ready: | |
|---|---|
Displays: Validate that your display set up matches our requirements. For users that wish to display images on two matching monitors, we provide a Chrome plug-in that sets the viewer position automatically. | |
Devices: Headset, desktop microphone, or properly configured handheld microphone from the approved list. | |
Competing technologies: If present on your computer, all other speech recognition programs must be completely turned off. Close other browsers and browser tabs. | |
Chromium browser: Settings must be confirmed by our service personnel for optimal results. For Google Chrome, turn off the Memory Saver feature. Bookmark the URL you use to access your account (which you can obtain from your system administrator). If pop-up blockers appear for your microphone or other parts of the application, click to allow. | |
Be aware that reading physicians can be configured to view all exams or only assigned exams. Check with your system administrator to verify your configuration matches your clinical needs. | |
Before you start professional interpreting medical imaging exams, carefully review the materials at the Learning Center and practice reading at least twenty practice exams on your hardware and within the network you intend to use in real practice. |
The Top Ribbon | |
|---|---|
From the Worklist Screen, the top ribbon shows the Dashboard, Exams tab, Patients tab, Notifications, HELP, and the Username (with additional options available in a dropdown menu). TIP: The Exams tab is used for reading workflow; the Patients tab is used to look up any patient and all associated exams in any status. | |
 |
Customizing Your Settings | |
|---|---|
To access your Profile screen, click on your name at the upper right of the Top Ribbon. Then select View Profile. | |
 | |
For most readers, the best experience is achieved with the settings shown here. | |
 | |
One of the dropdown menu options under your name at the right of the Top Ribbon is Save Preferences. The default option is to not save ad hoc changes you make in the column width, order, and sort order as new preferences. However, if you prefer to save these changes, Save Preferences provides options for doing so. | |
 |
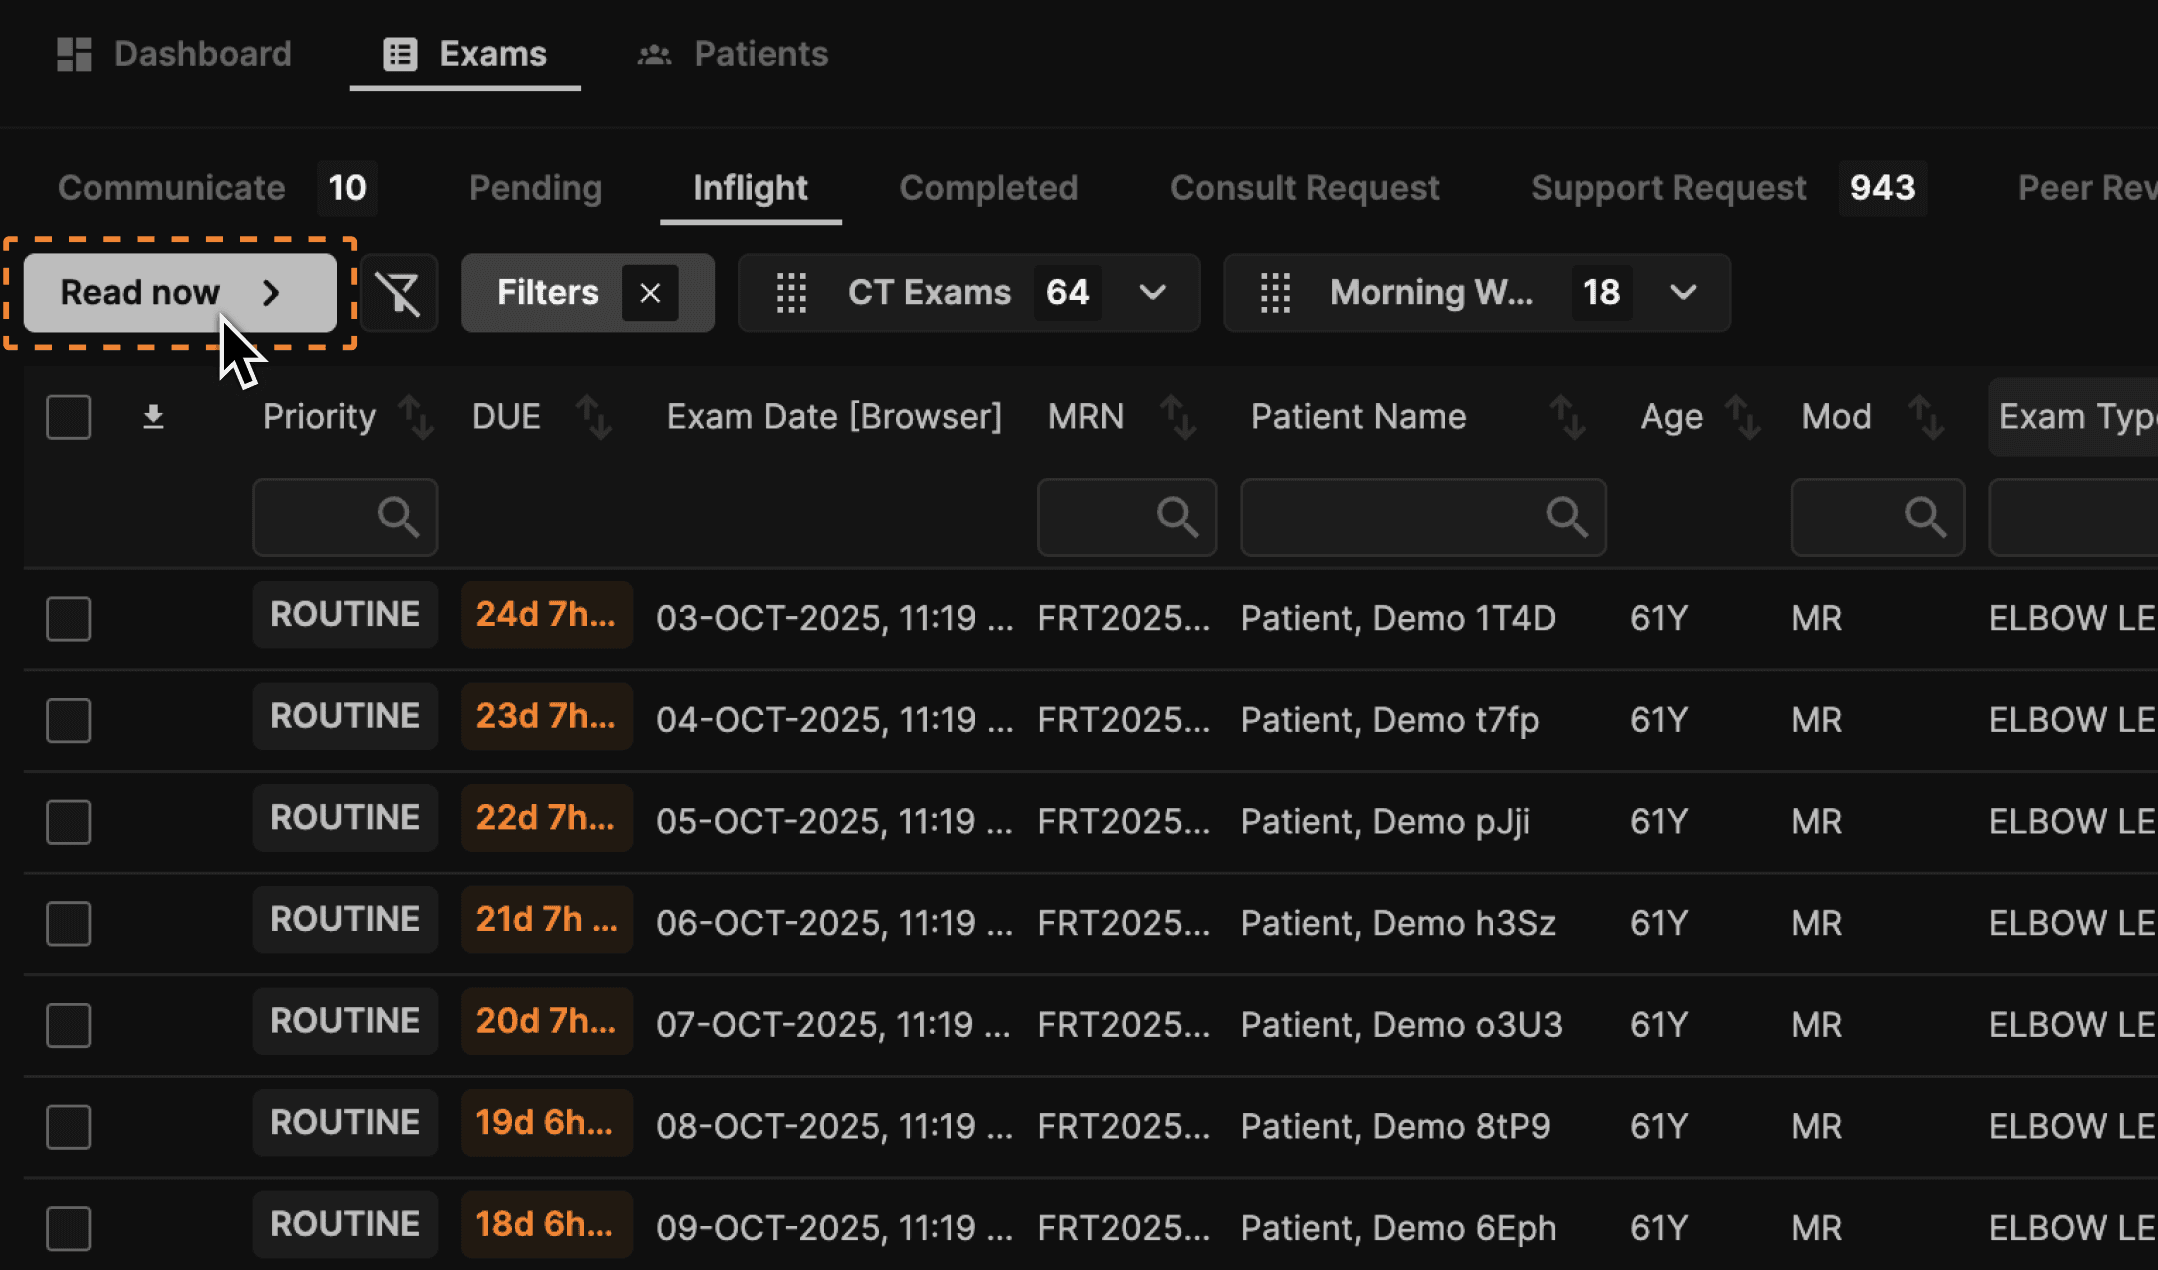
Configuring the Inflight Tab | |
|---|---|
Based on your Profile settings, the Inflight Tab will appear upon login. This list shows all exams that require reading, either because they have never been read or because they require addendums. | |
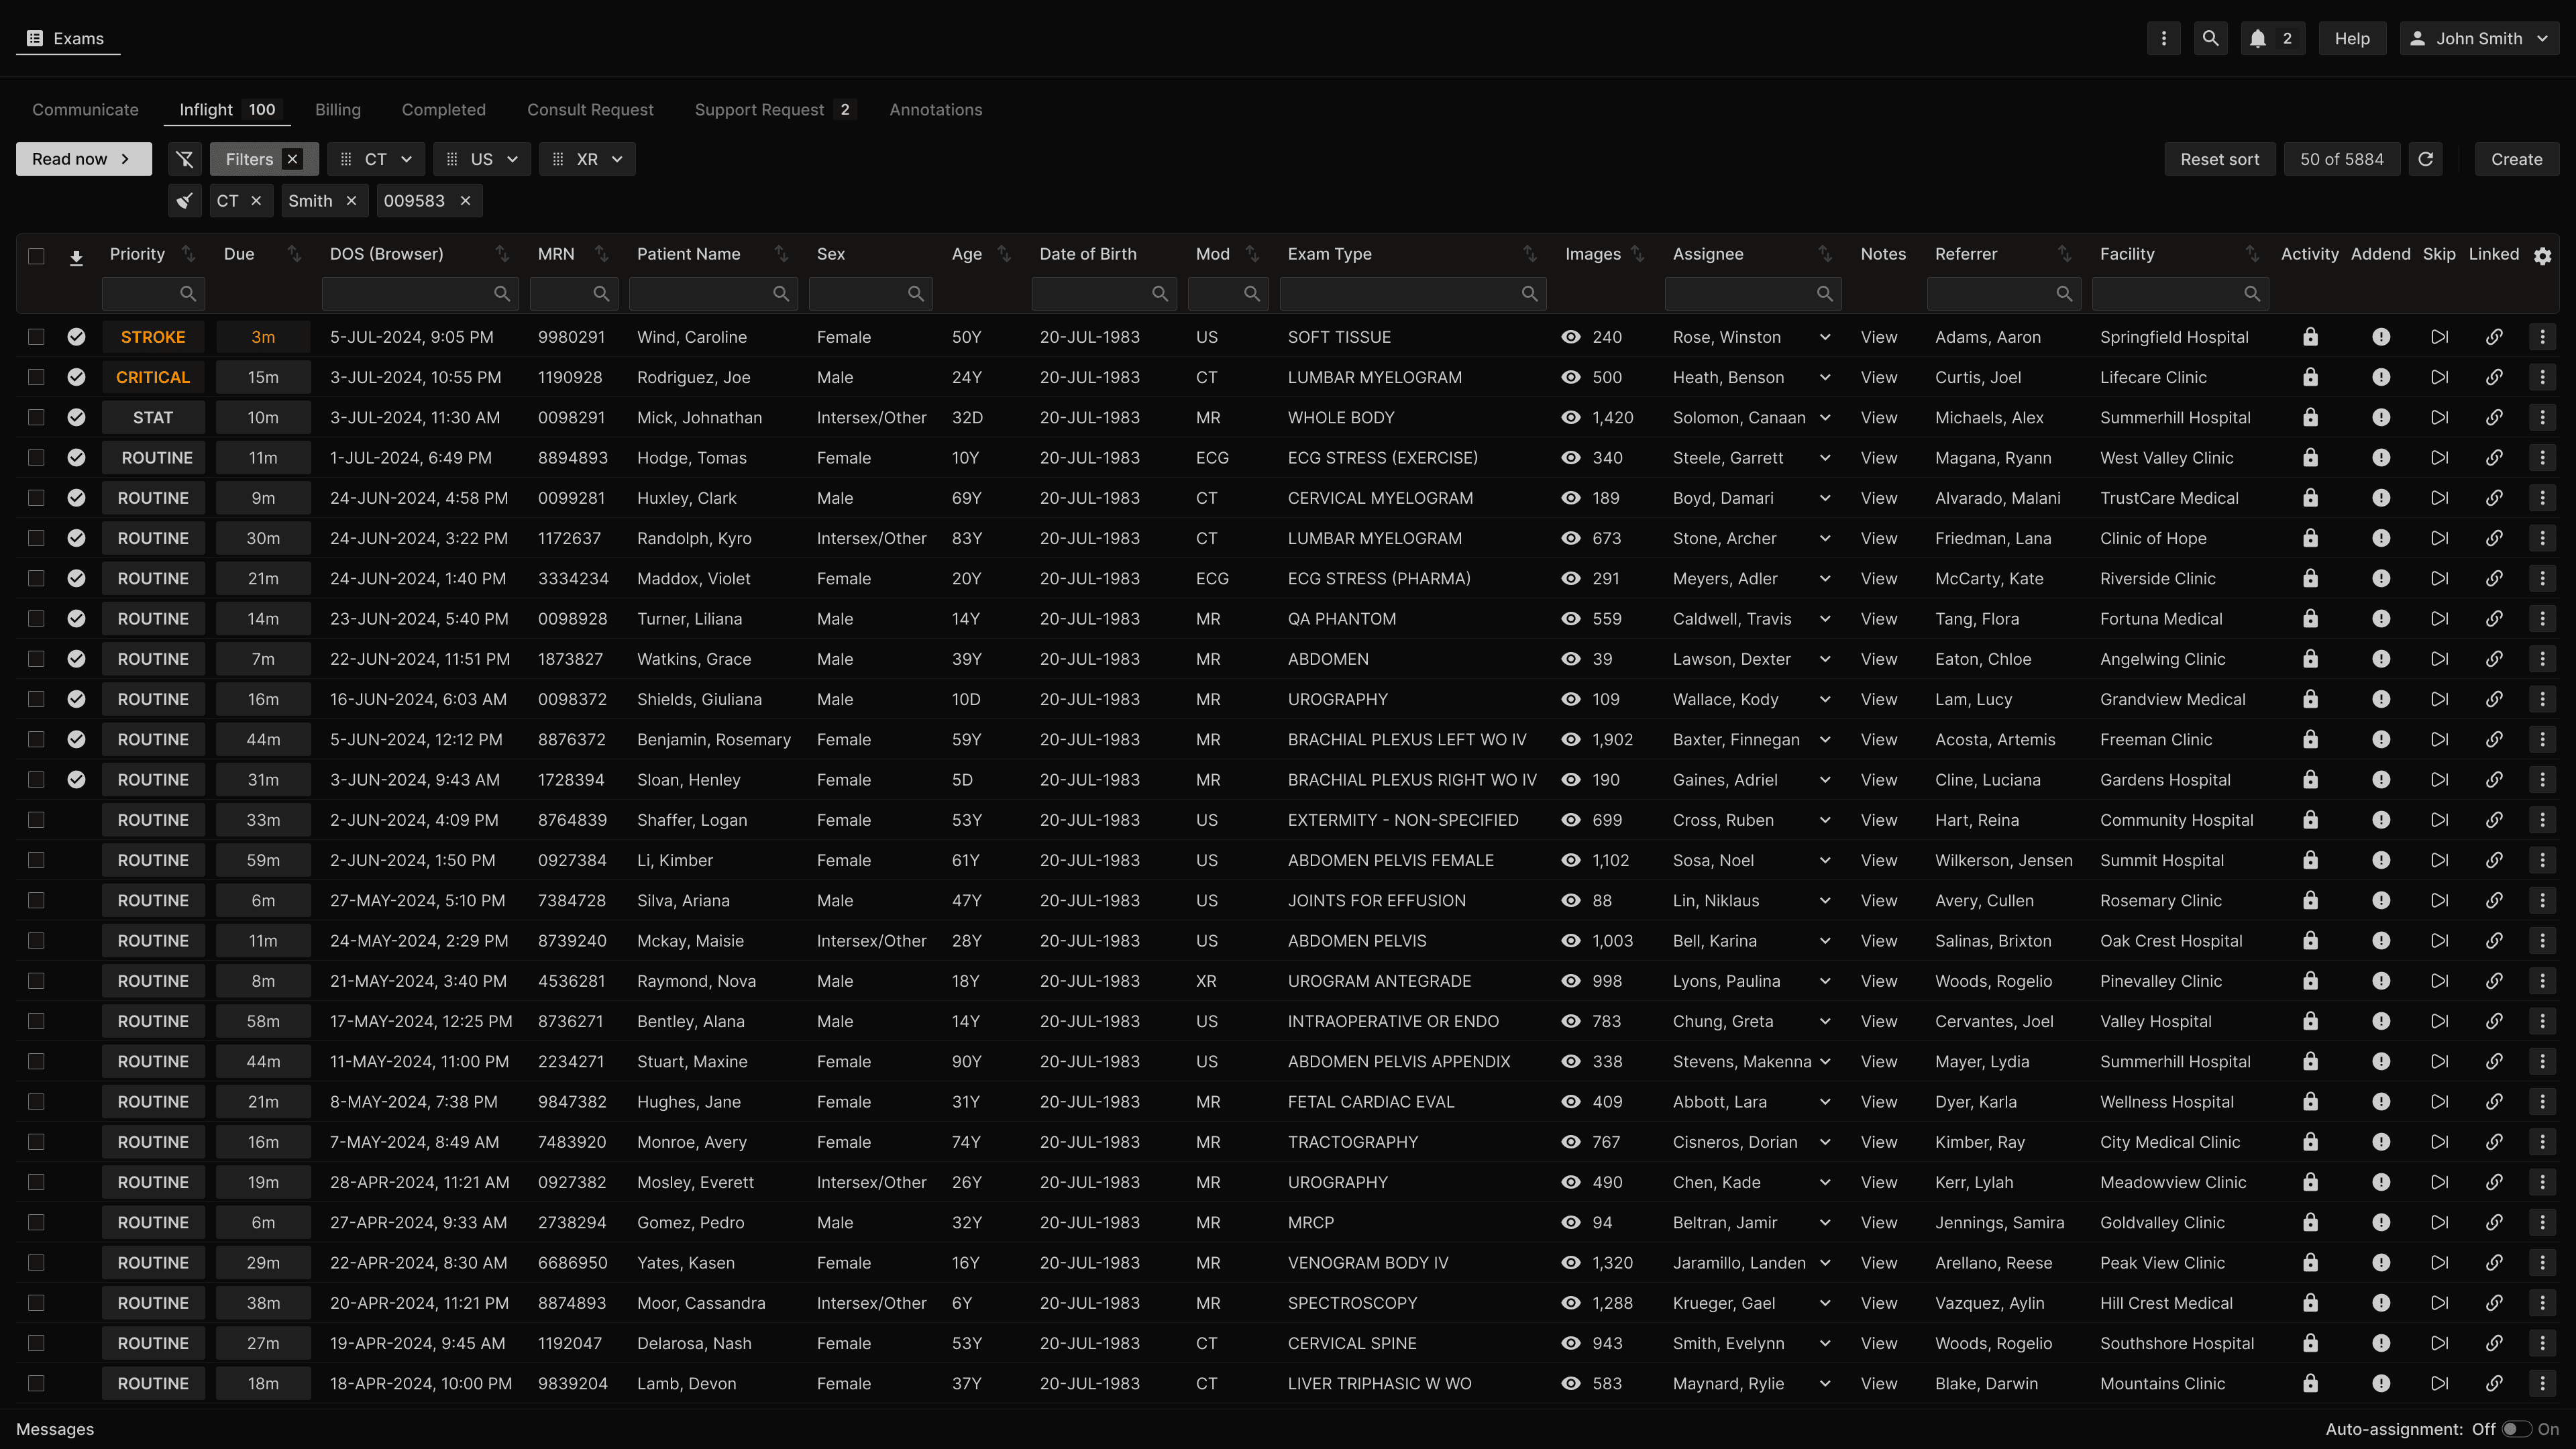 | |
The default primary sort order is the Priority (Critical/Stroke, then Trauma, Stat, and Routine). The secondary sort is the Due time. | |
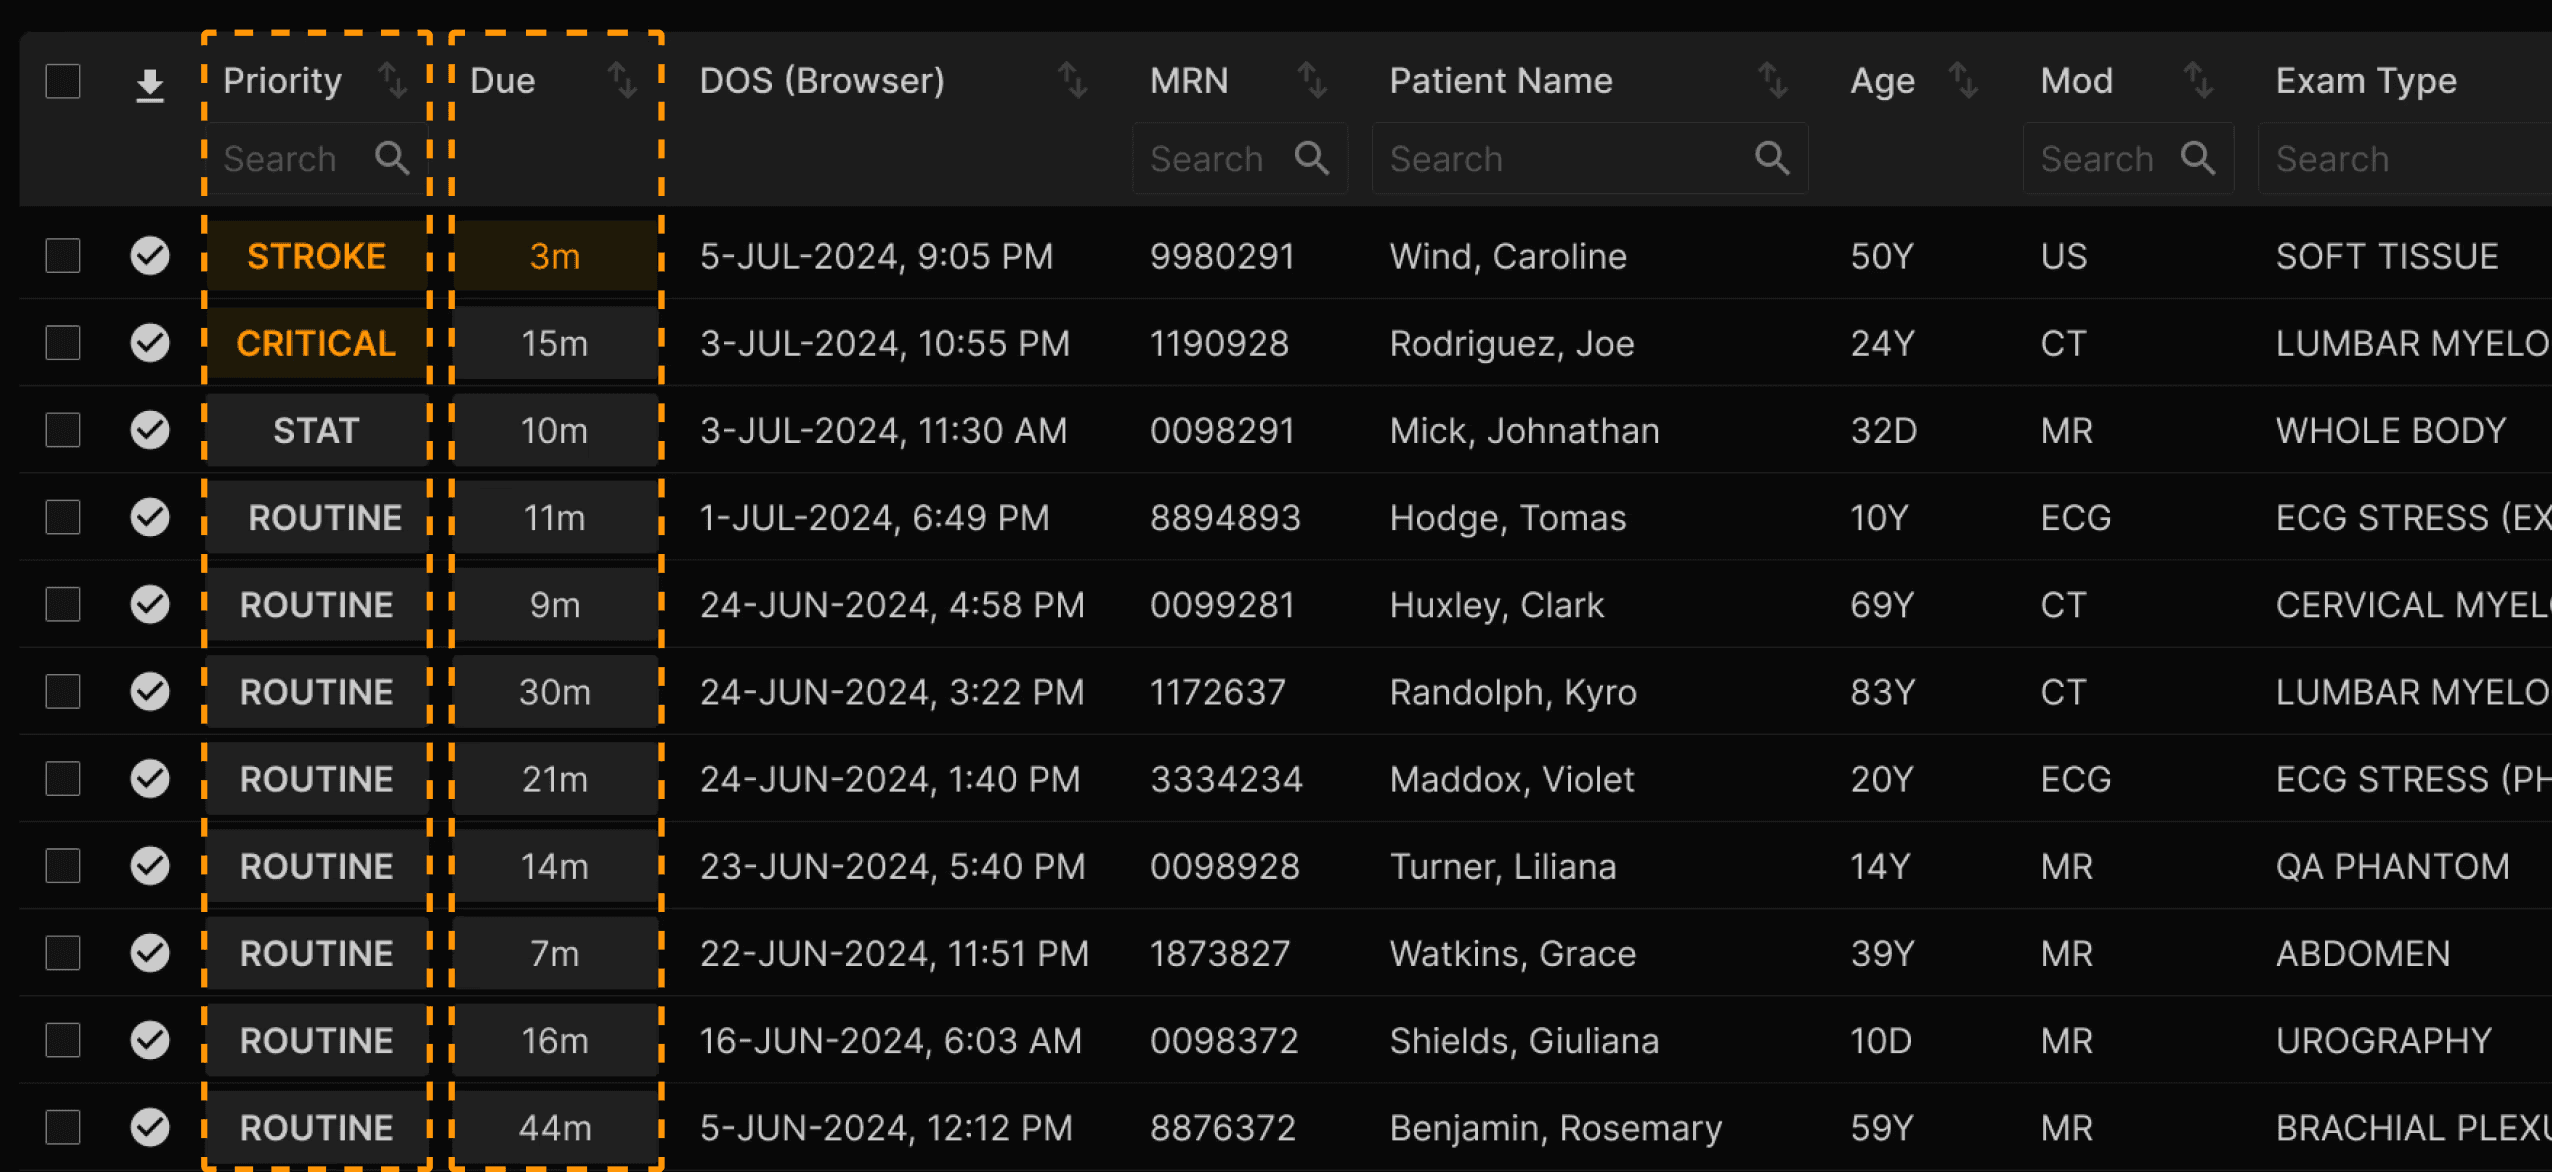 | |
The Inflight list may be customized, sorted, and filtered. To customize which columns appear, select the gear menu at the right side of the row that shows the column headings. Use the checkbox to select the desired columns. Drag the rows to rearrange the order of selected columns. | |
 | |
To sort by the criteria in a column, click the up or down arrow next to the desired column heading. | |
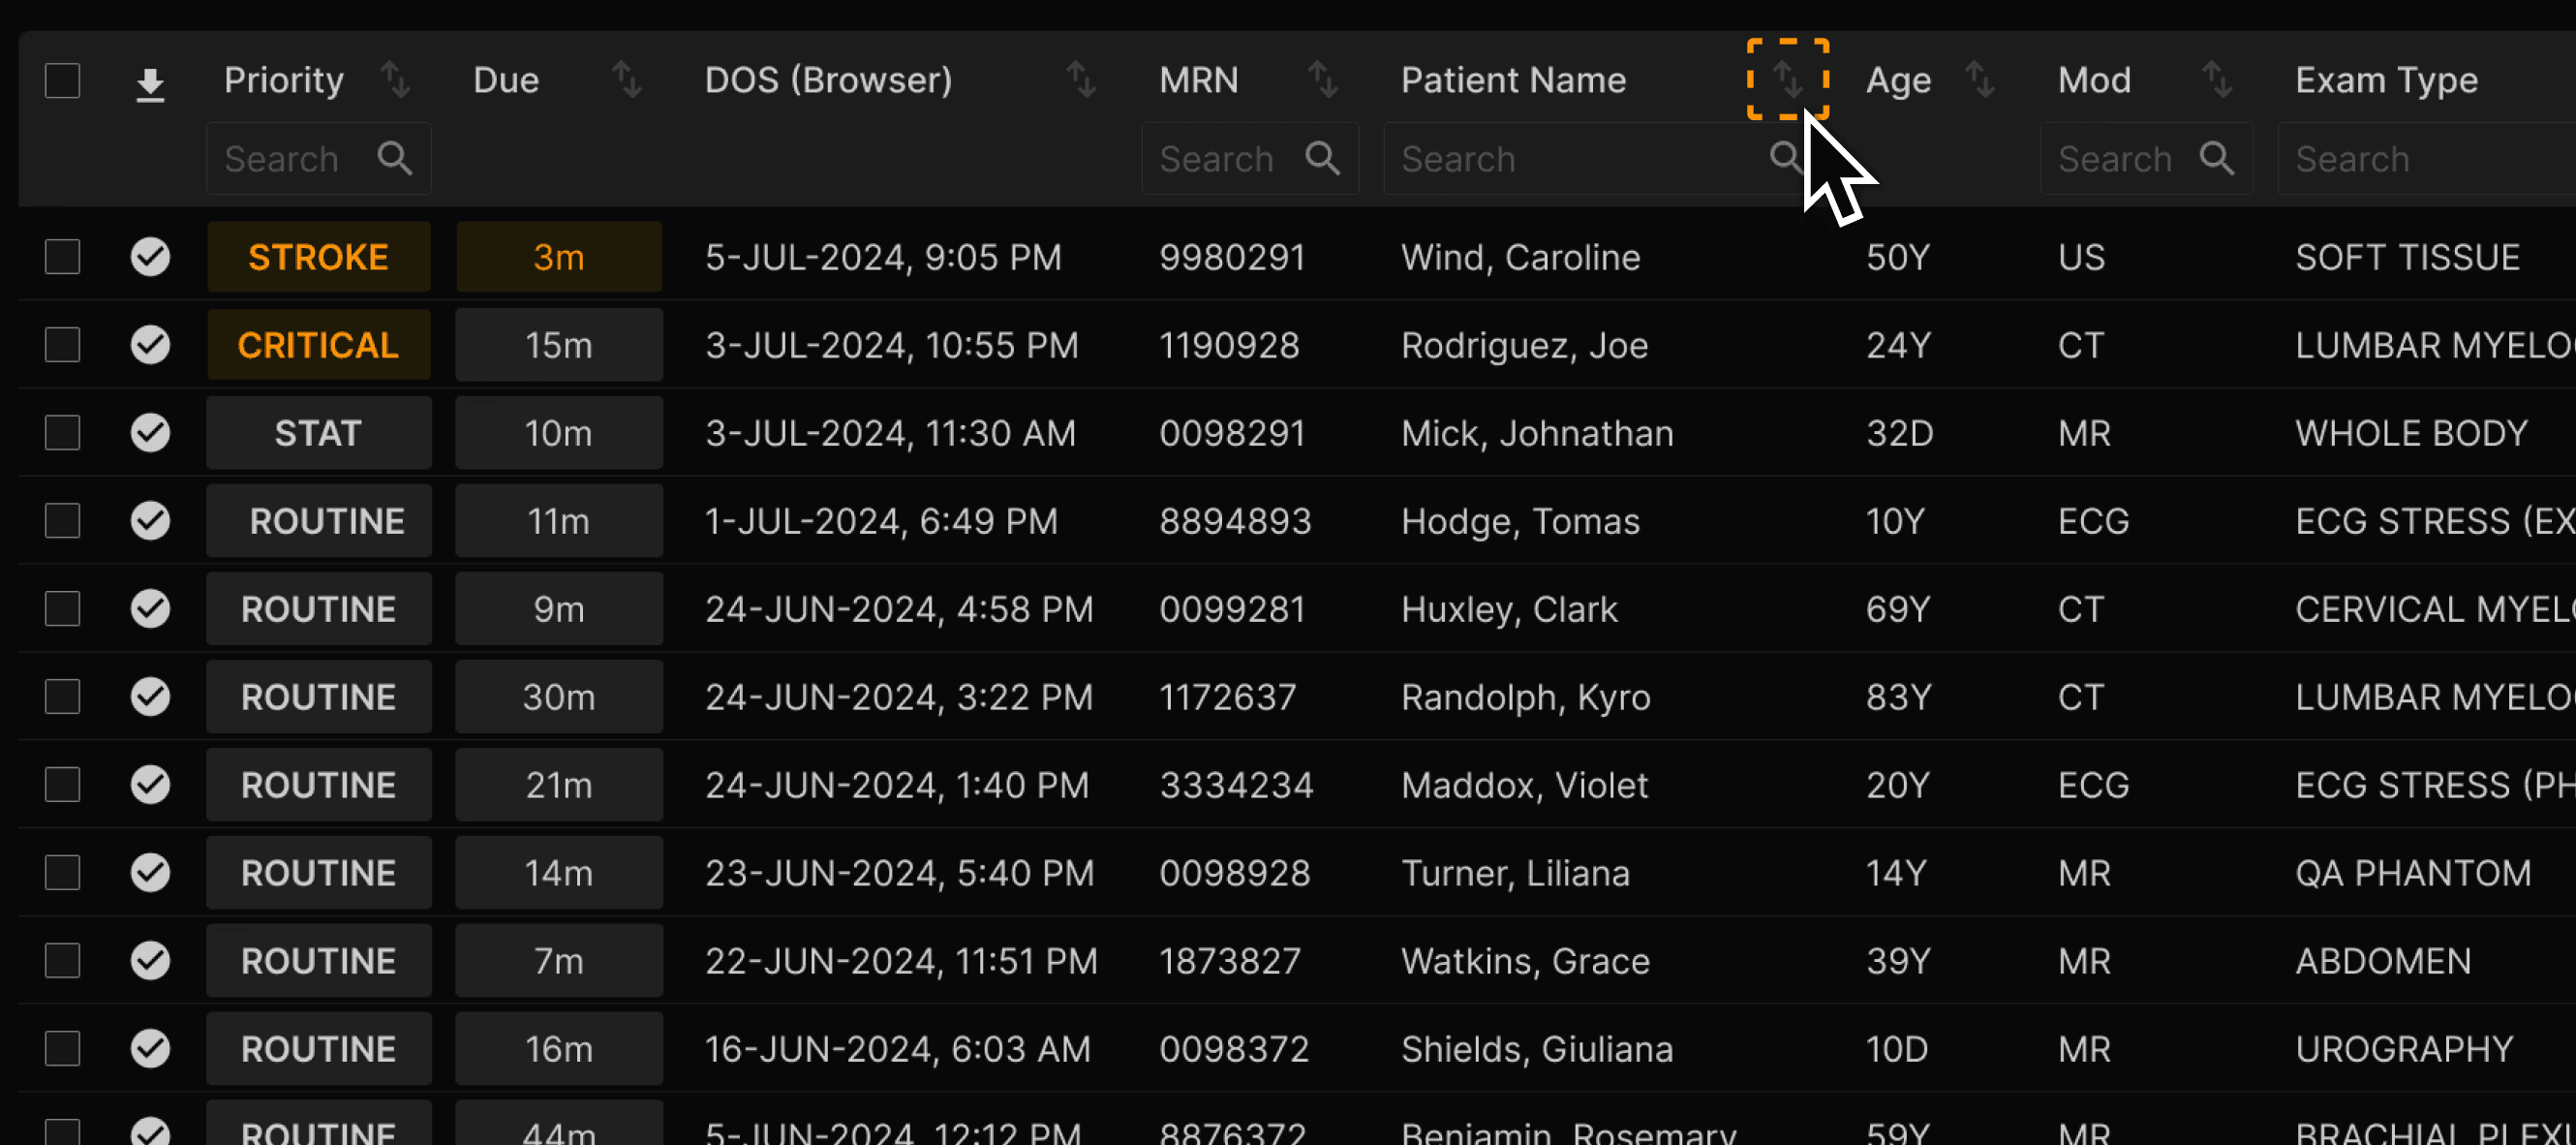 | |
Click on Reset Sort to reset to the default sort order. | |
 |
Filtering | |
|---|---|
To quickly filter using the criteria in a column, type in the desired search box. | |
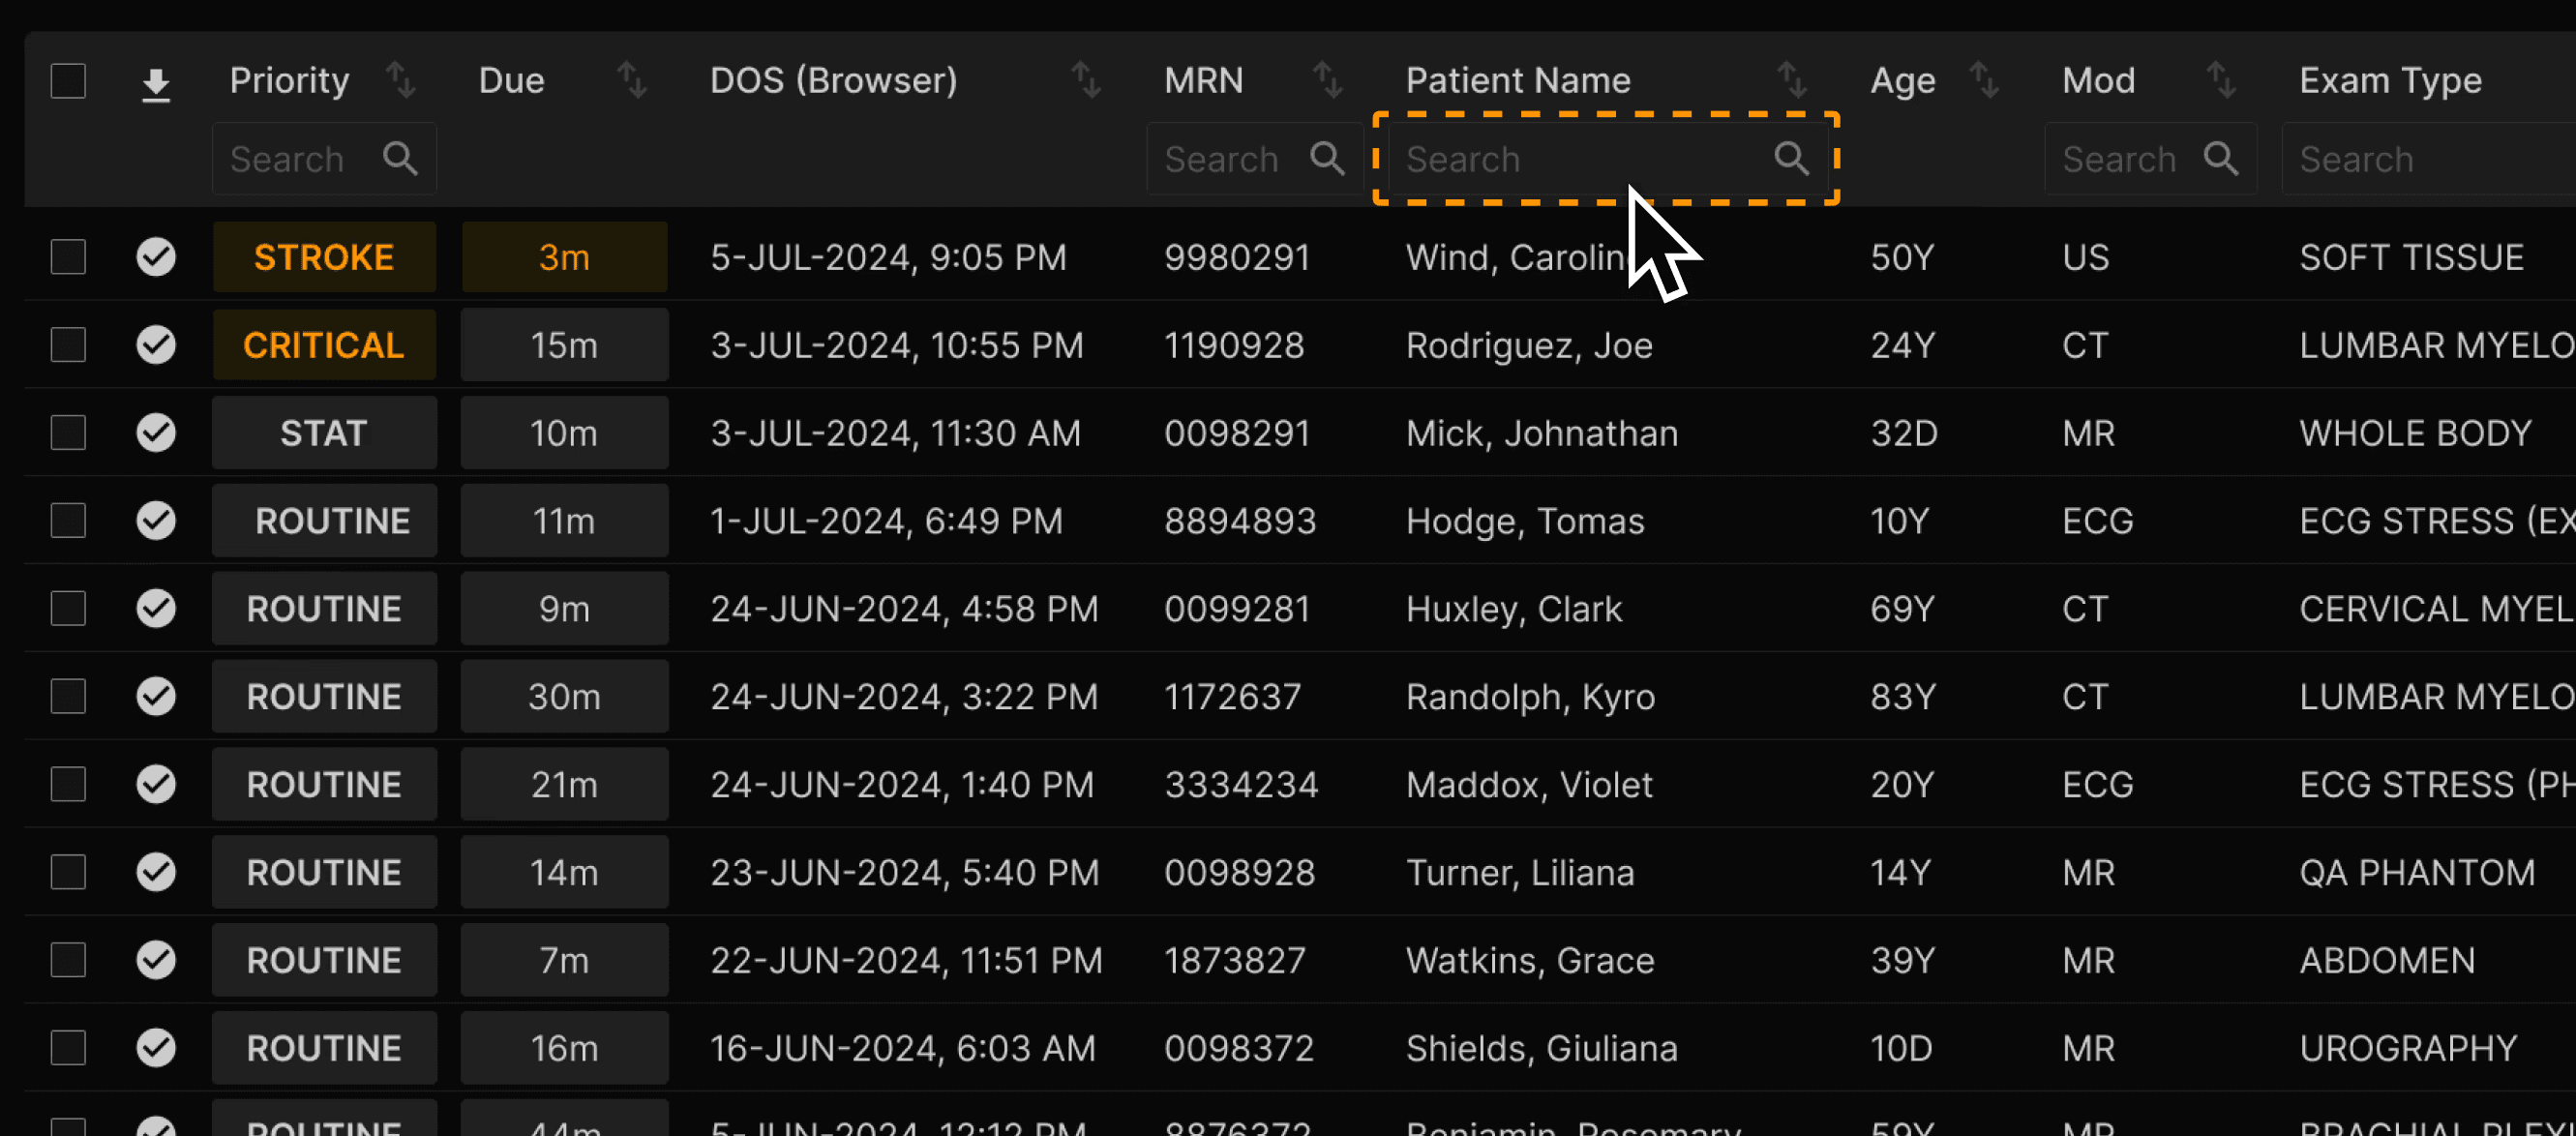 | |
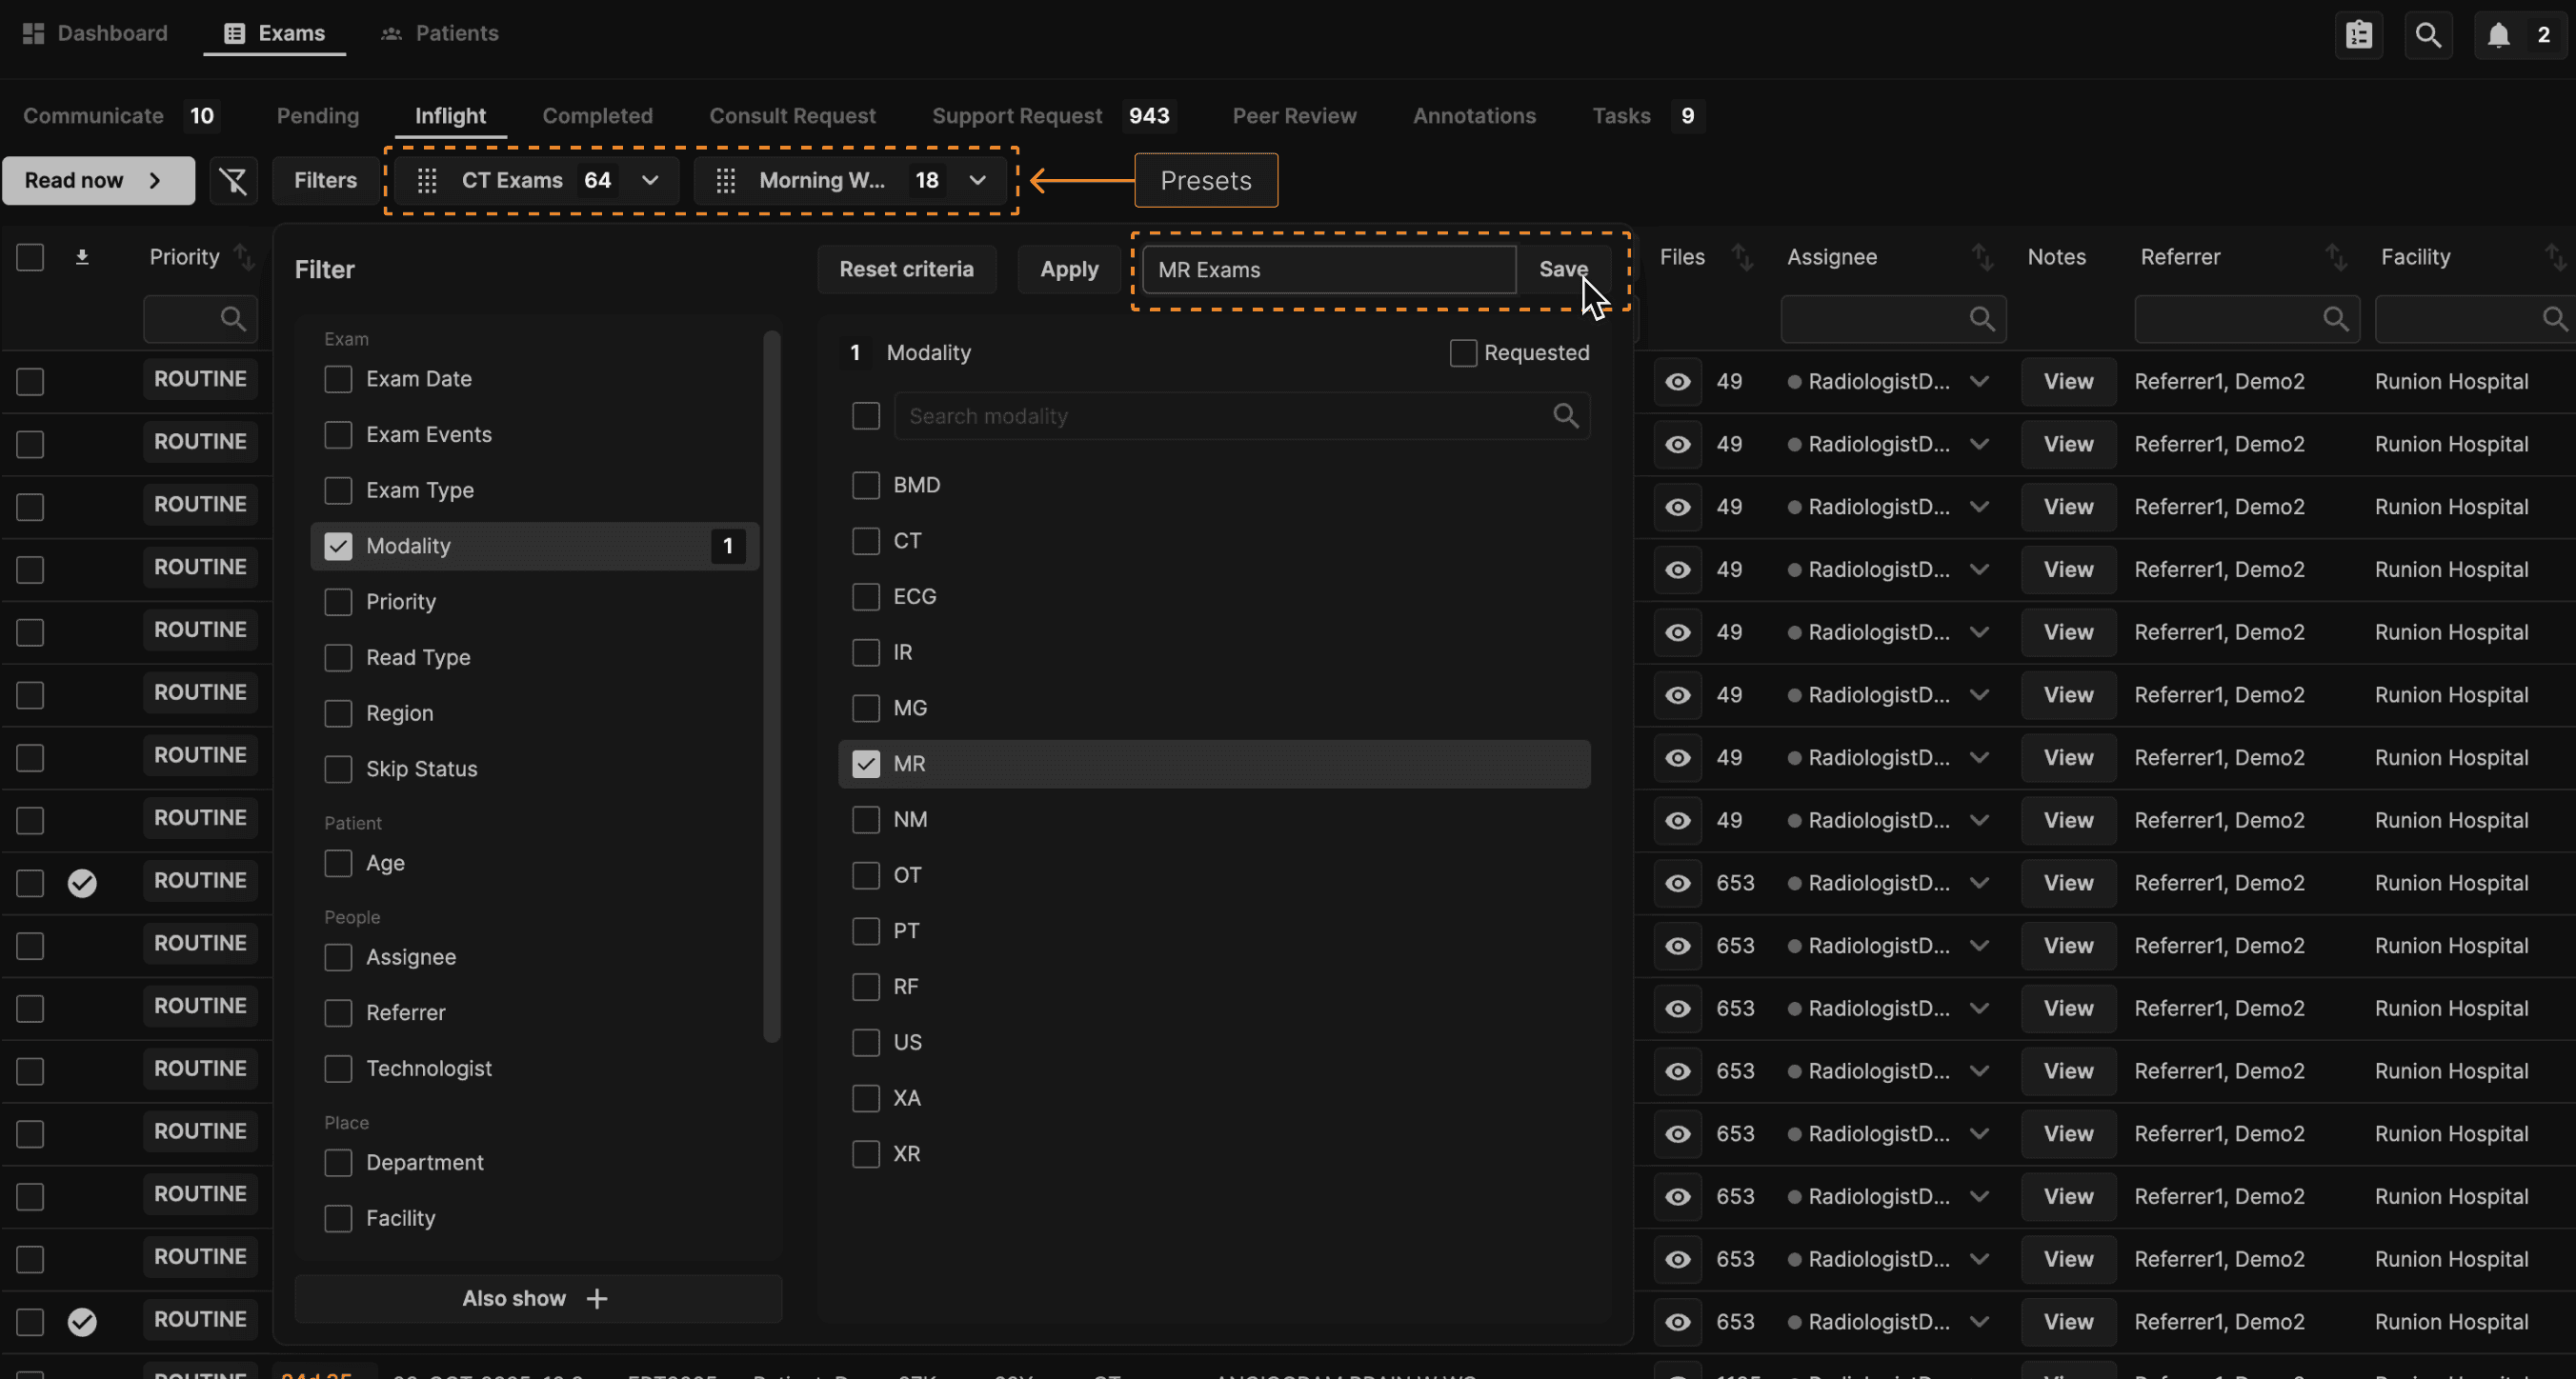
The filters dialog enables filtering of exams using a wide combination of criteria. | |
 | |
Filters can be saved for future use. We call a saved filter a Preset Filter or Preset for short. TIP: Ask your system administrator to create Presets for all reading physicians in your group that match your most common reading duties. | |
 | |
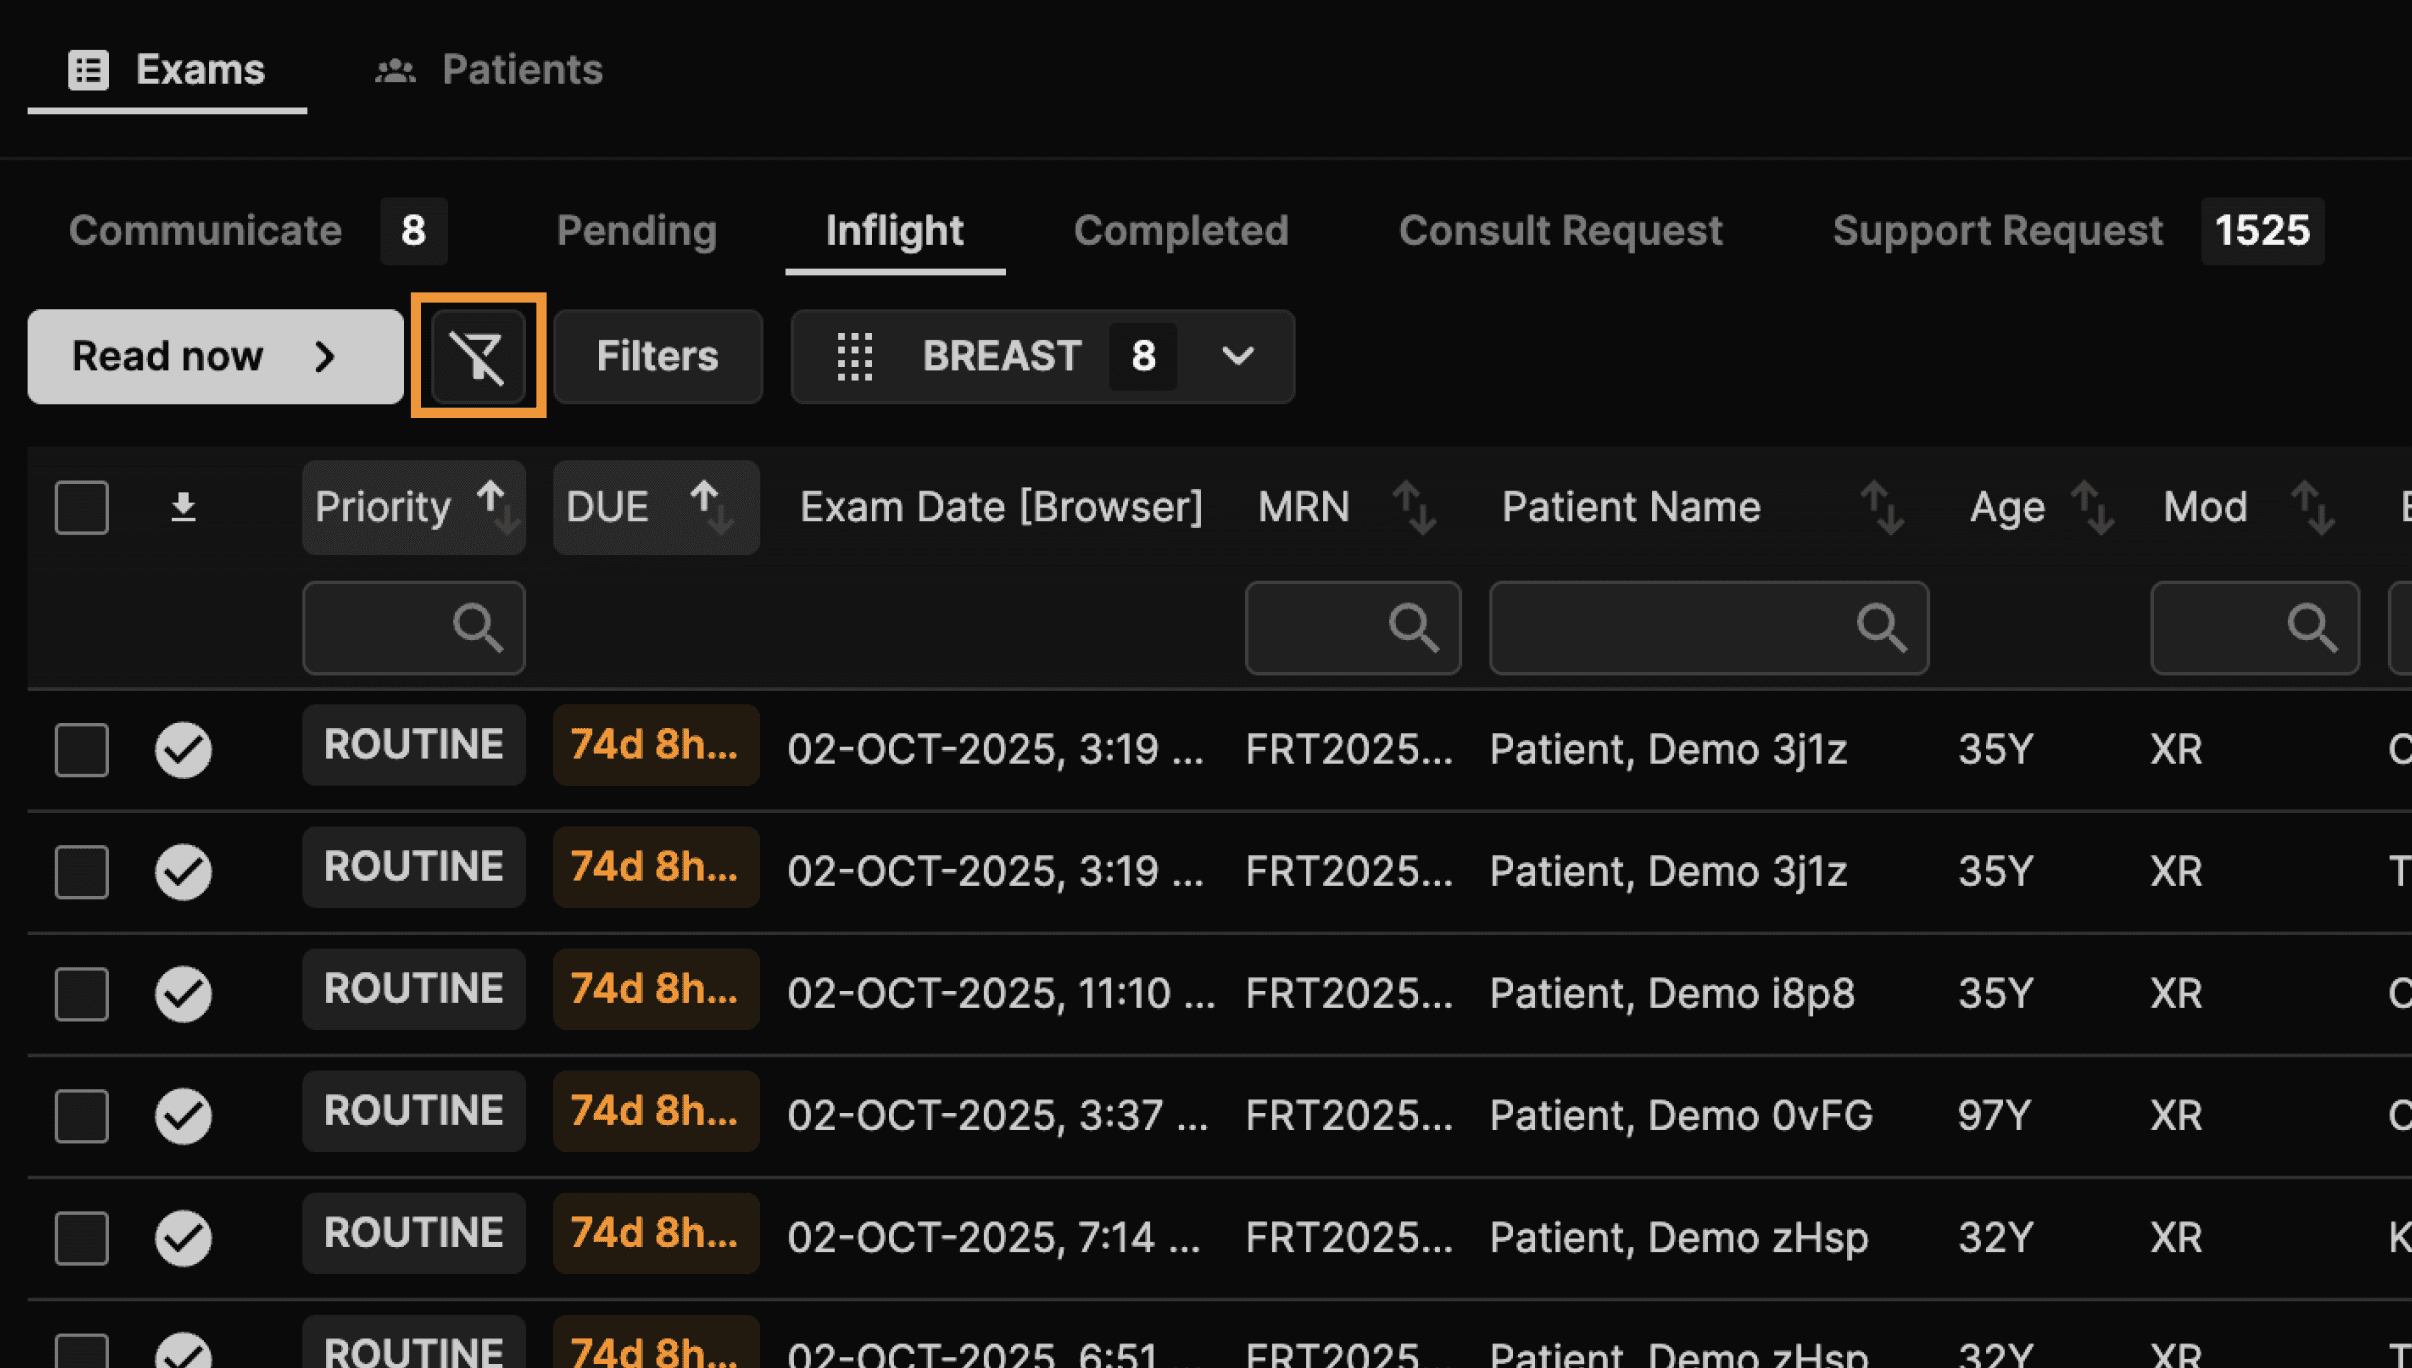
To clear filters, click on the Remove Applied Filters icon to the left of the Filters button. | |
 |
Automating Exam Assignment | |
|---|---|
Exams begin auto-assigning when you login. The exams are then automatically locally cached along with relevant priors for faster presentation. Physicians can be configured to only see and read assigned exams or to see and read assigned plus unassigned exams. If you are taking a break, you may want to pause your personal Auto-assignment using the switch at the lower right of the Inflight screen. TIP: Don’t forget to turn auto-assignment back on! | |
 |
Reading and Editing Exams | |
|---|---|
TIP: The most efficient way to read is to simply login, then click Read Now. The Read Now button opens and queues only the exams that have been assigned to you, ignoring any unassigned or skipped exams. | |
 | |
Prior to clicking Read Now, you may also manually select one or more exams. To do so, click the checkbox at the left of the desired row for any exam that is not assigned to someone else. | |
 | |
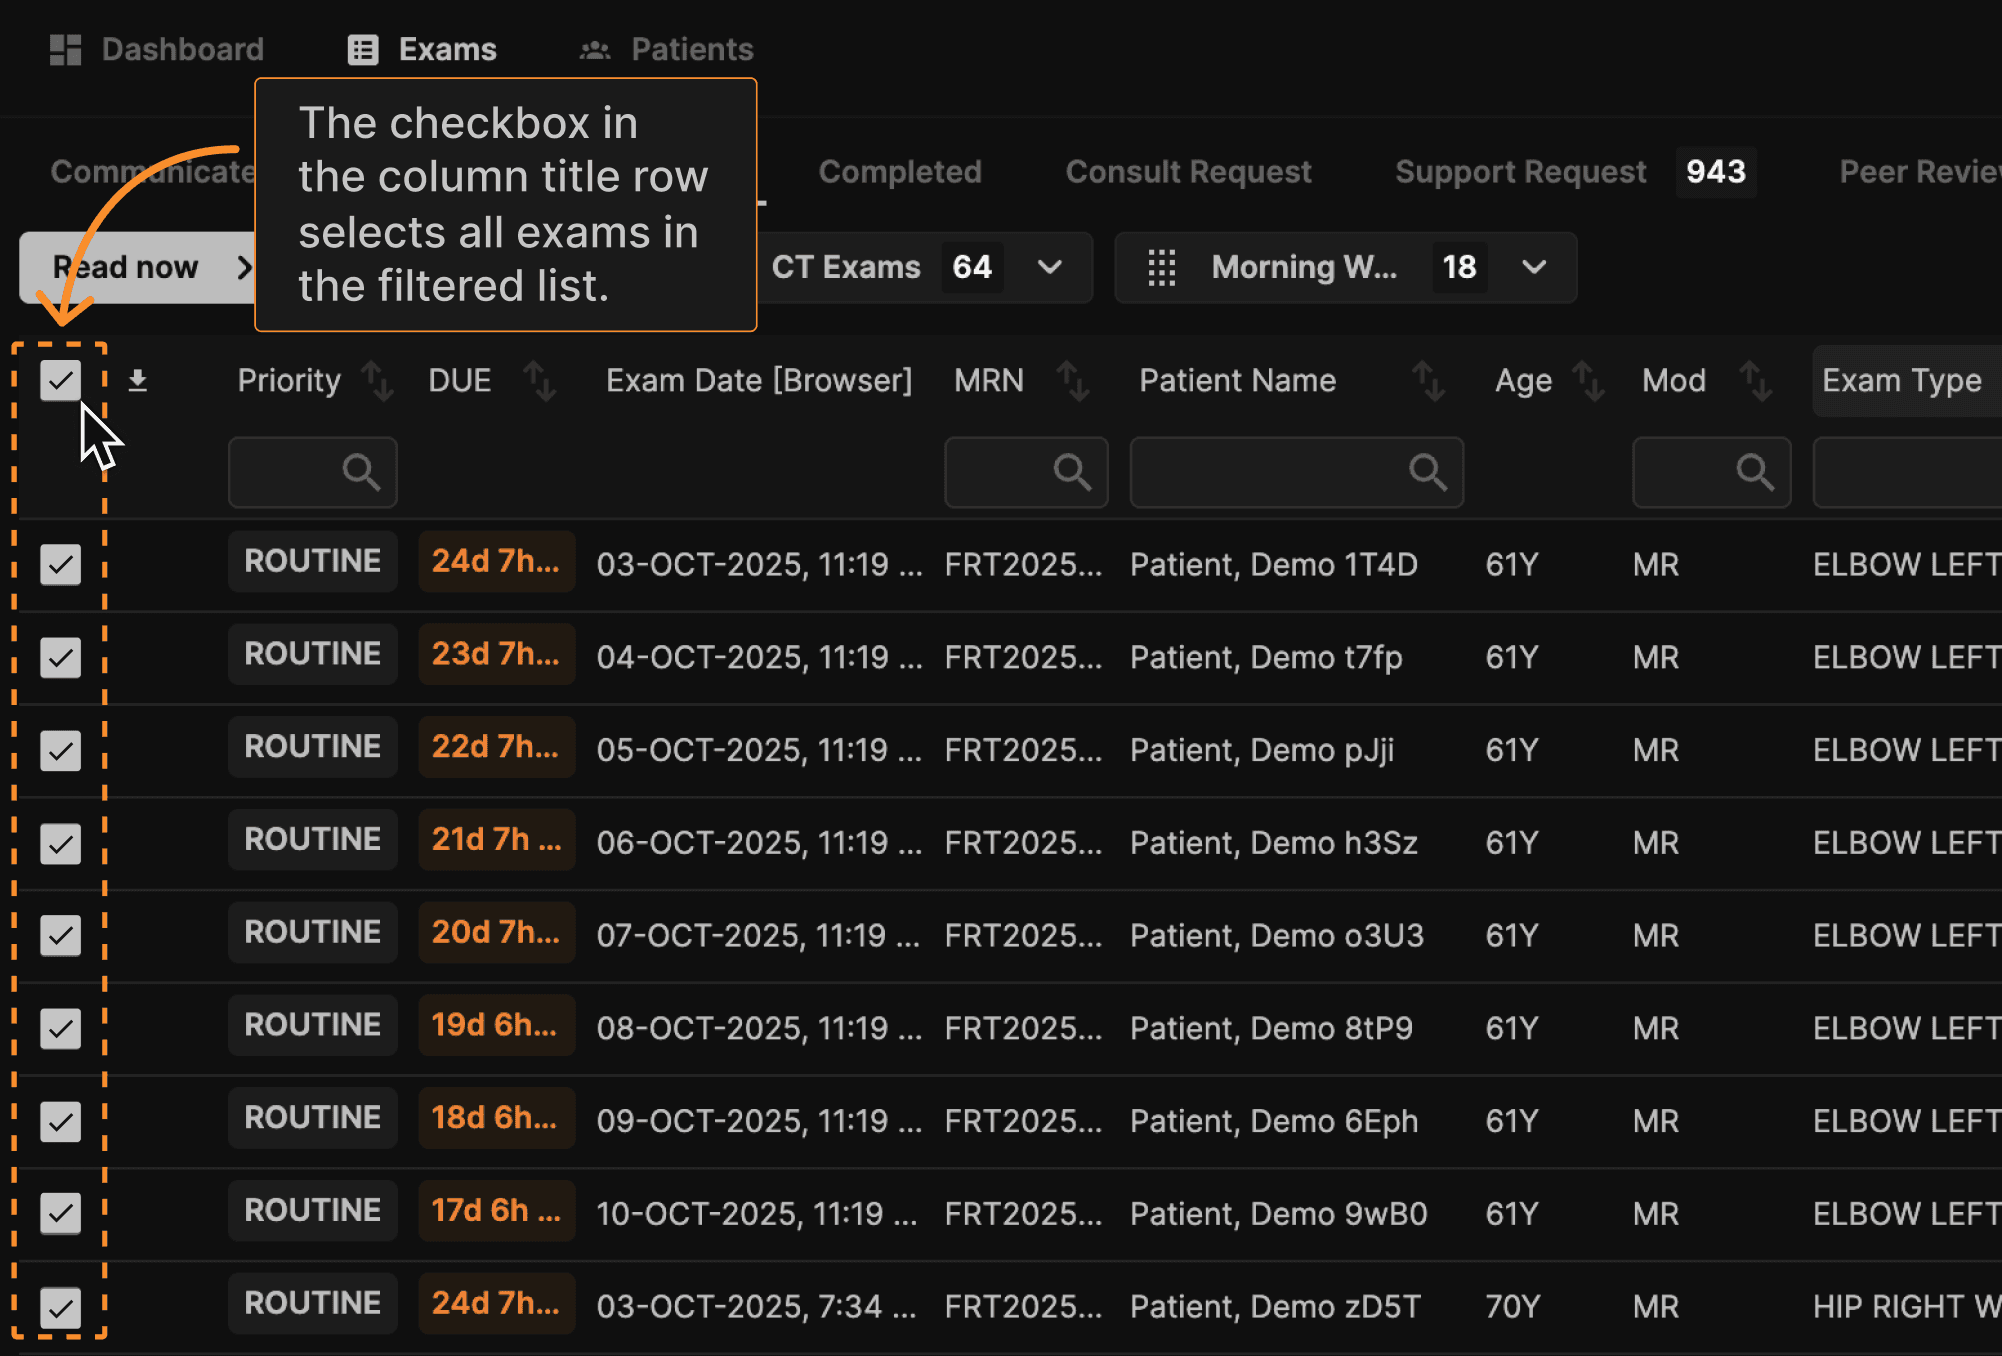
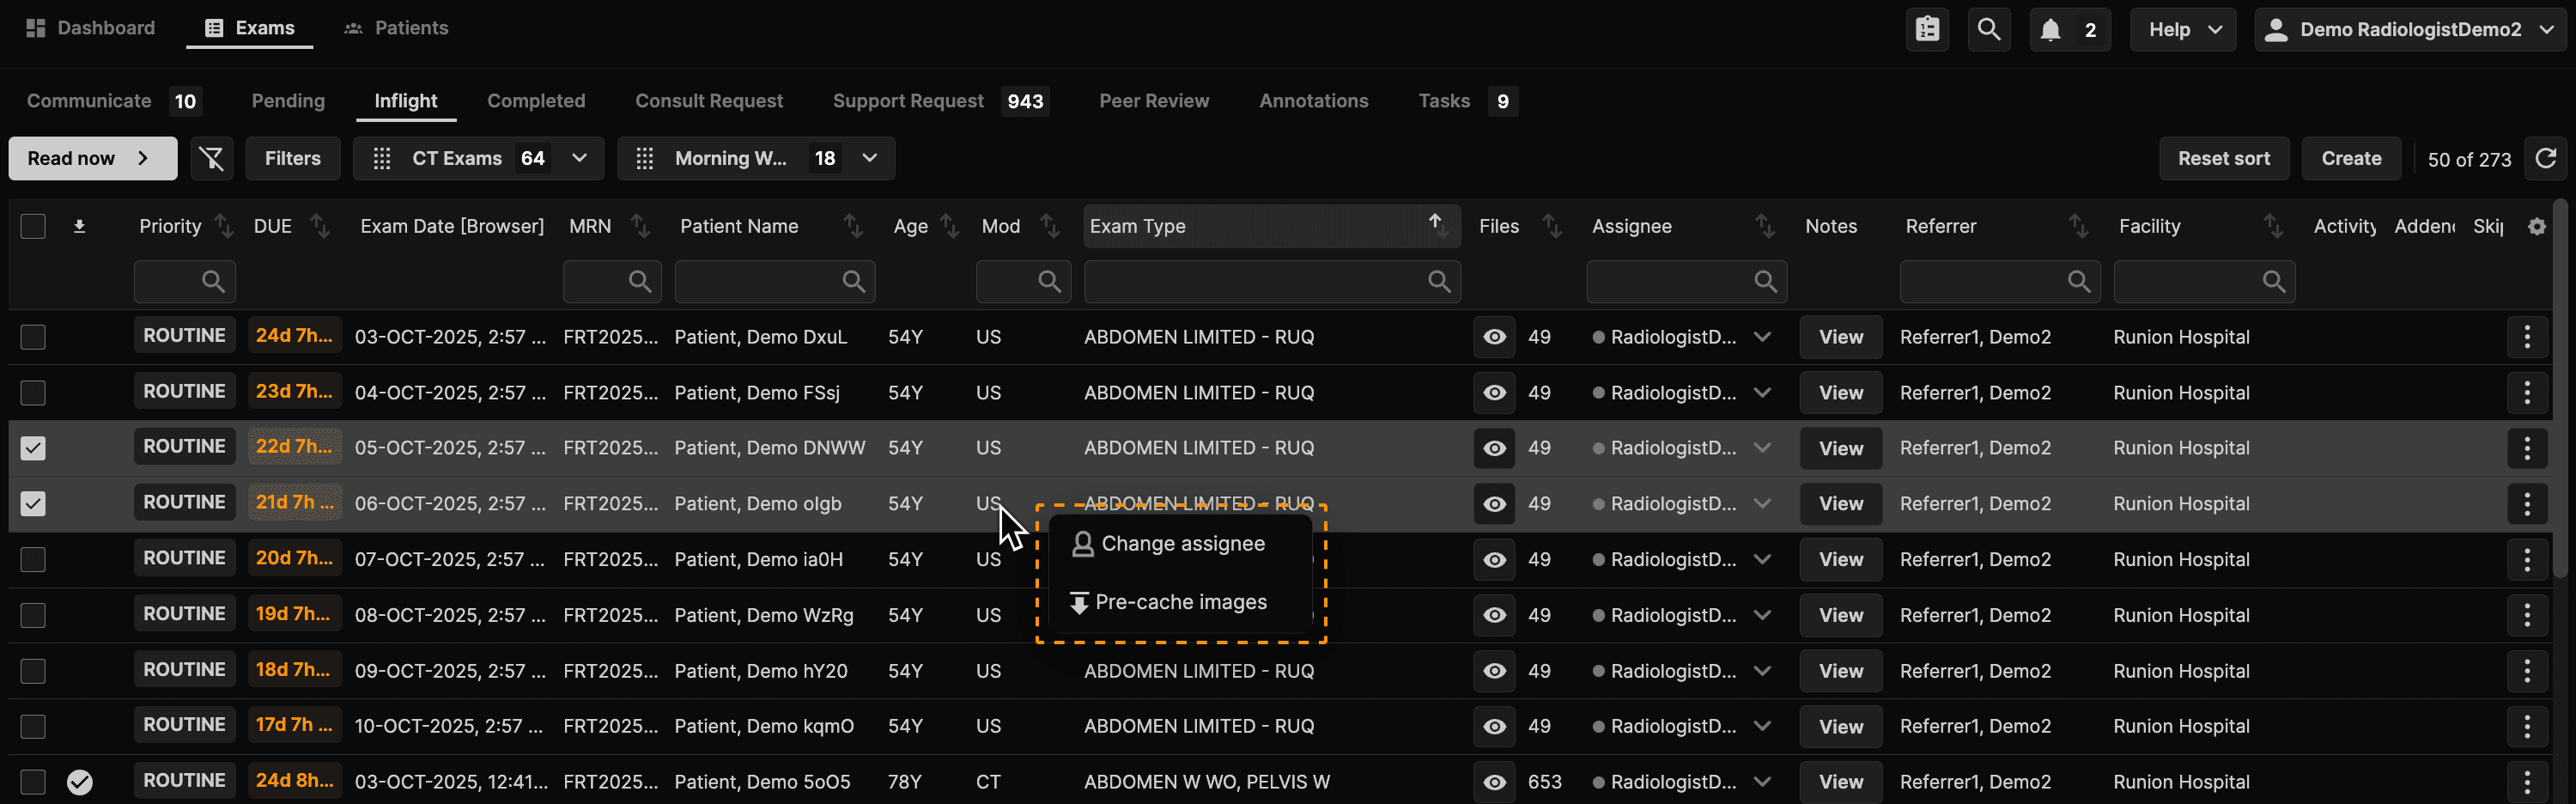
You may also multi-select individual exams for reading. First, filter when appropriate. Then select the exams using the checkbox at the top of the left checkbox column. Exams that are assigned to others will not be reassigned to you. | |
 | |
Then click Read Now. The Read Now button opens and queues the exams that have been assigned to you, ignoring any unassigned or skipped exams. Clicking Read Now also automatically assigns and queues any unassigned exams where you have checked the left checkbox. Once all assigned exams are completed, the system returns to the Exam List, and a message appears to confirm you have completed your queue. | |
 | |
Right click on any row or access the selection icon at the far right of any row to display a menu of many useful functions. | |
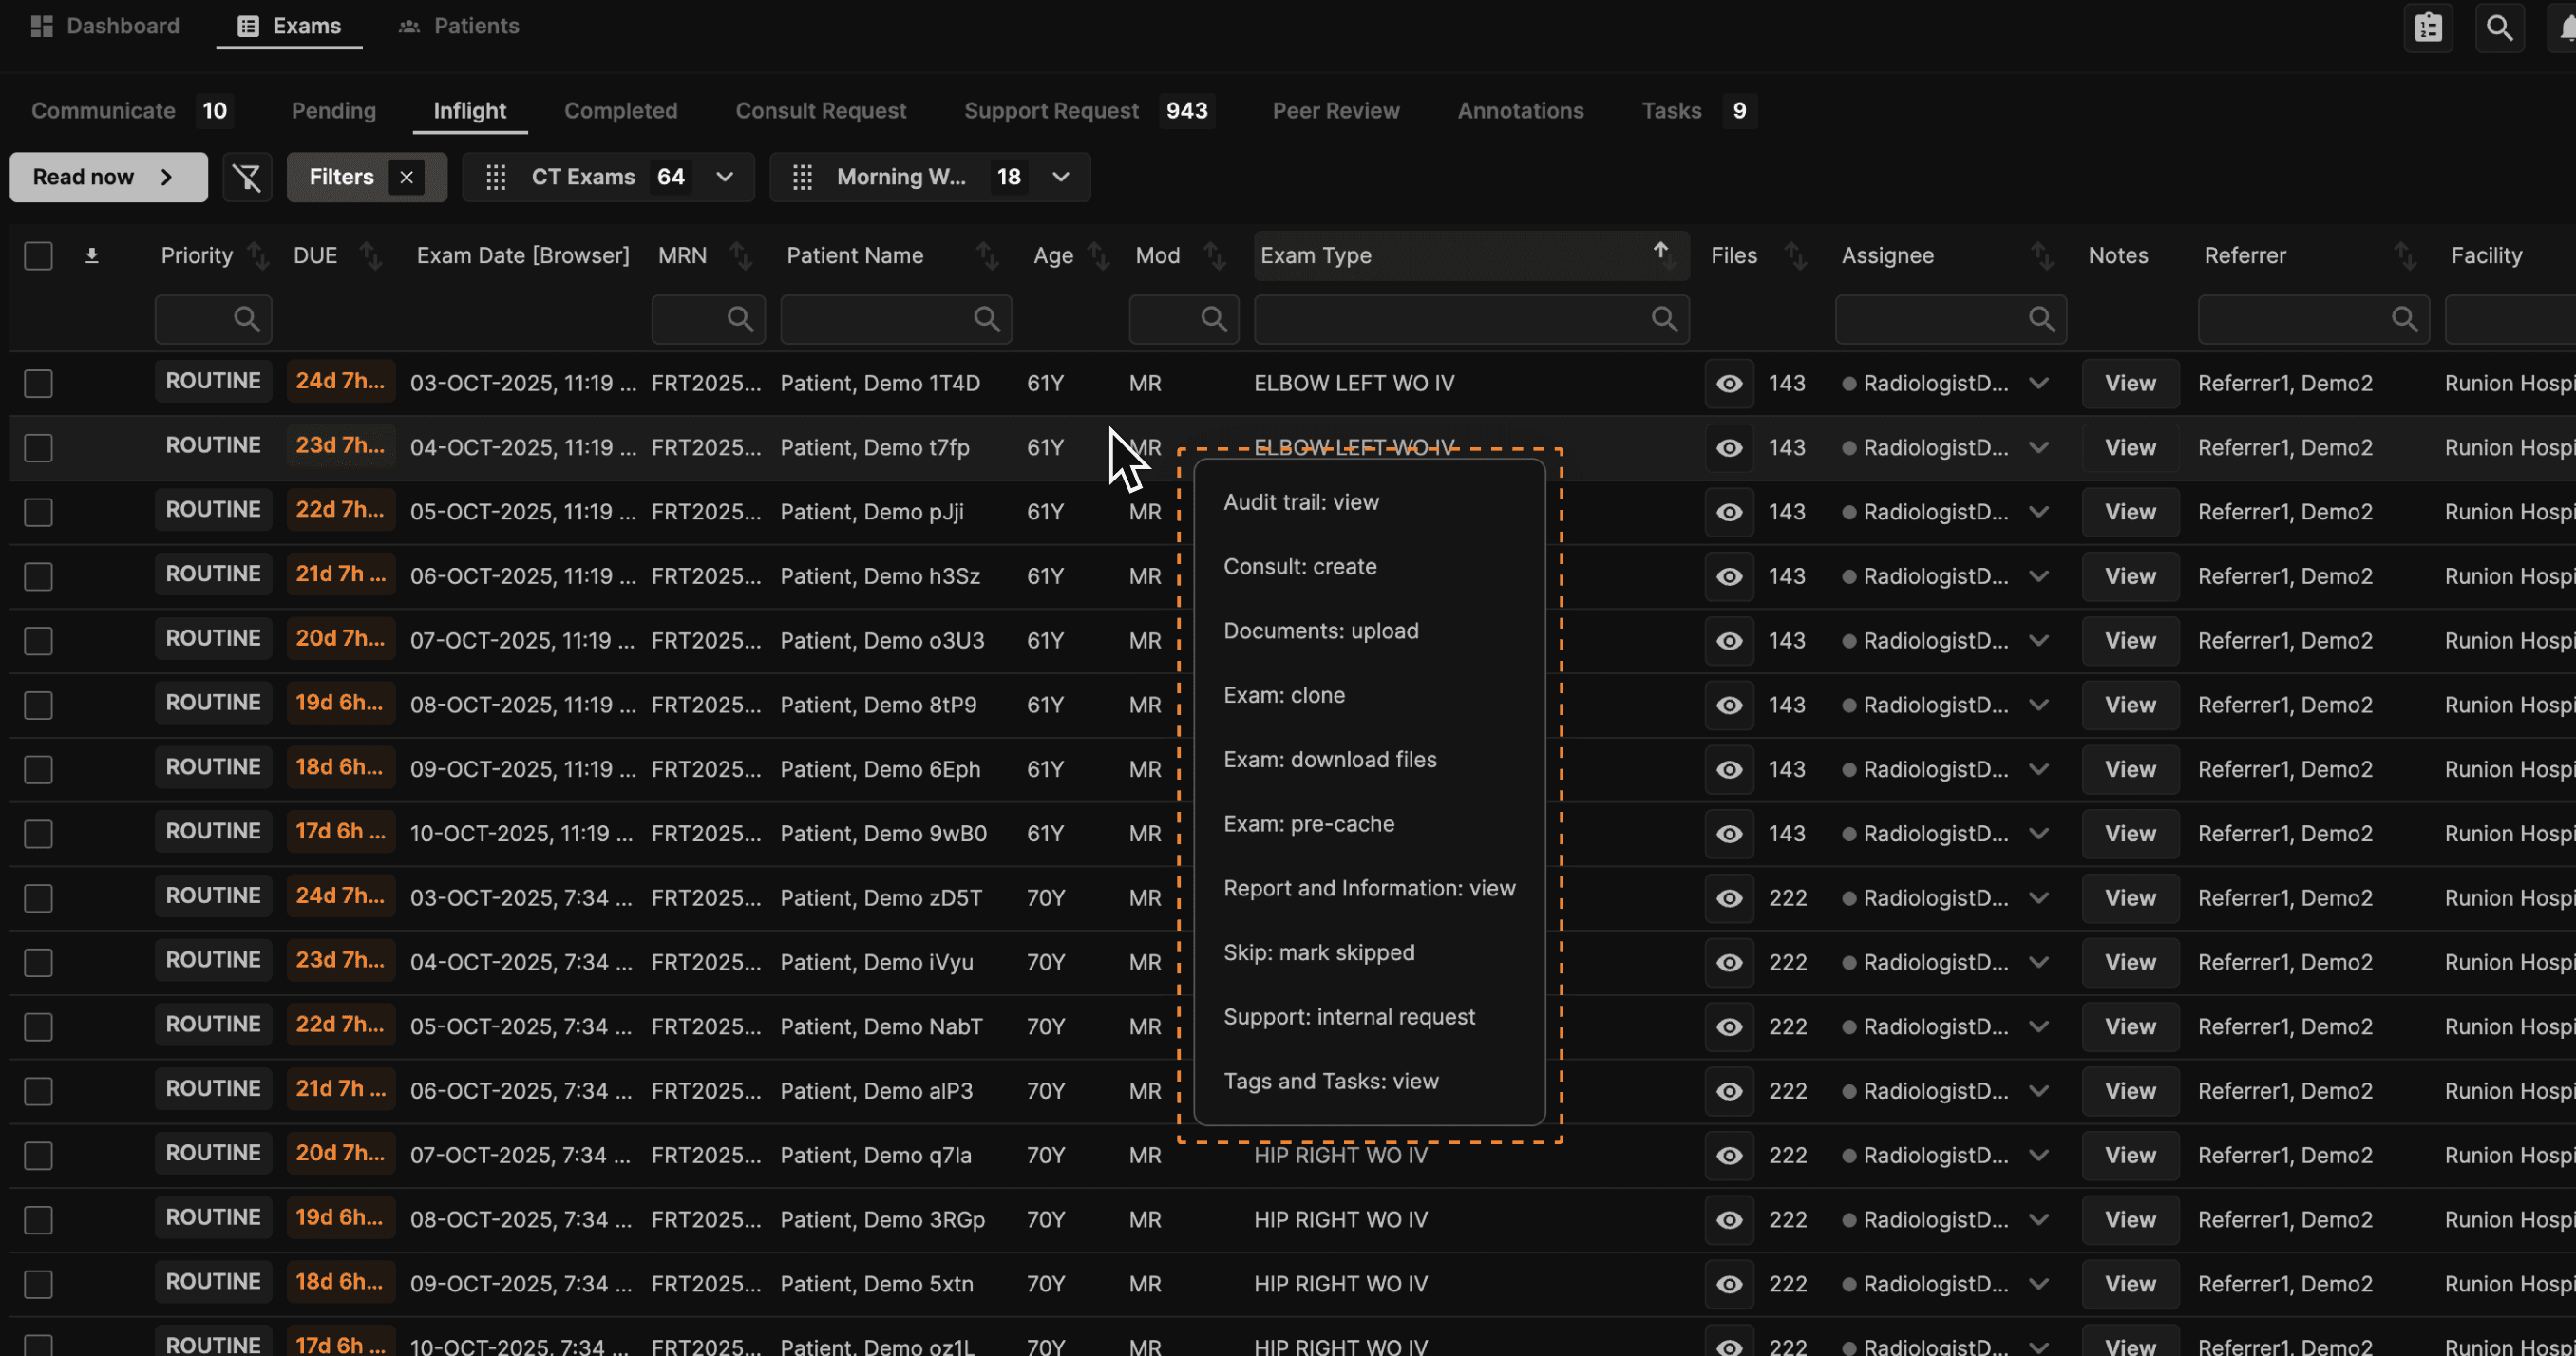 | |
You can also multi-select exams using the checkbox column on the left, then right click over the next column (the column to the immediate right of the checkbox column) to access a menu of options. Select the desired option. If you select “Exam: pre-cache" the selected exam(s) will start pre-caching as the next items in the pre-cache queue, even before other assigned exams that have yet been pre-cached. | |
 | |
If instead you wish to read a mixture of assigned and/or unassigned exams, click on any exam from the Inflight tab. When you begin your reading session this way, the selected exam will appear first. Thereafter, Sign & Next or Skip will display exams starting with the top of the Inflight tab. As exams, are added to the Inflight tab, they will be presented based on the sort order of the Inflight tab. The system also applies predictive assignment, meaning while you are reading one exam, the next logical exam group will be assigned to you and begin pre-caching. | |
The column labeled Files shows the number of files associated with the exam in each line of the worklist. To the left of the number of files, there is an eyeball icon. When you click on a row, the exam opens first to the reporting screen. When you click on the eyeball, the exam opens first to the viewer. Of course, this order is only relevant when using a single monitor. | |
 | |
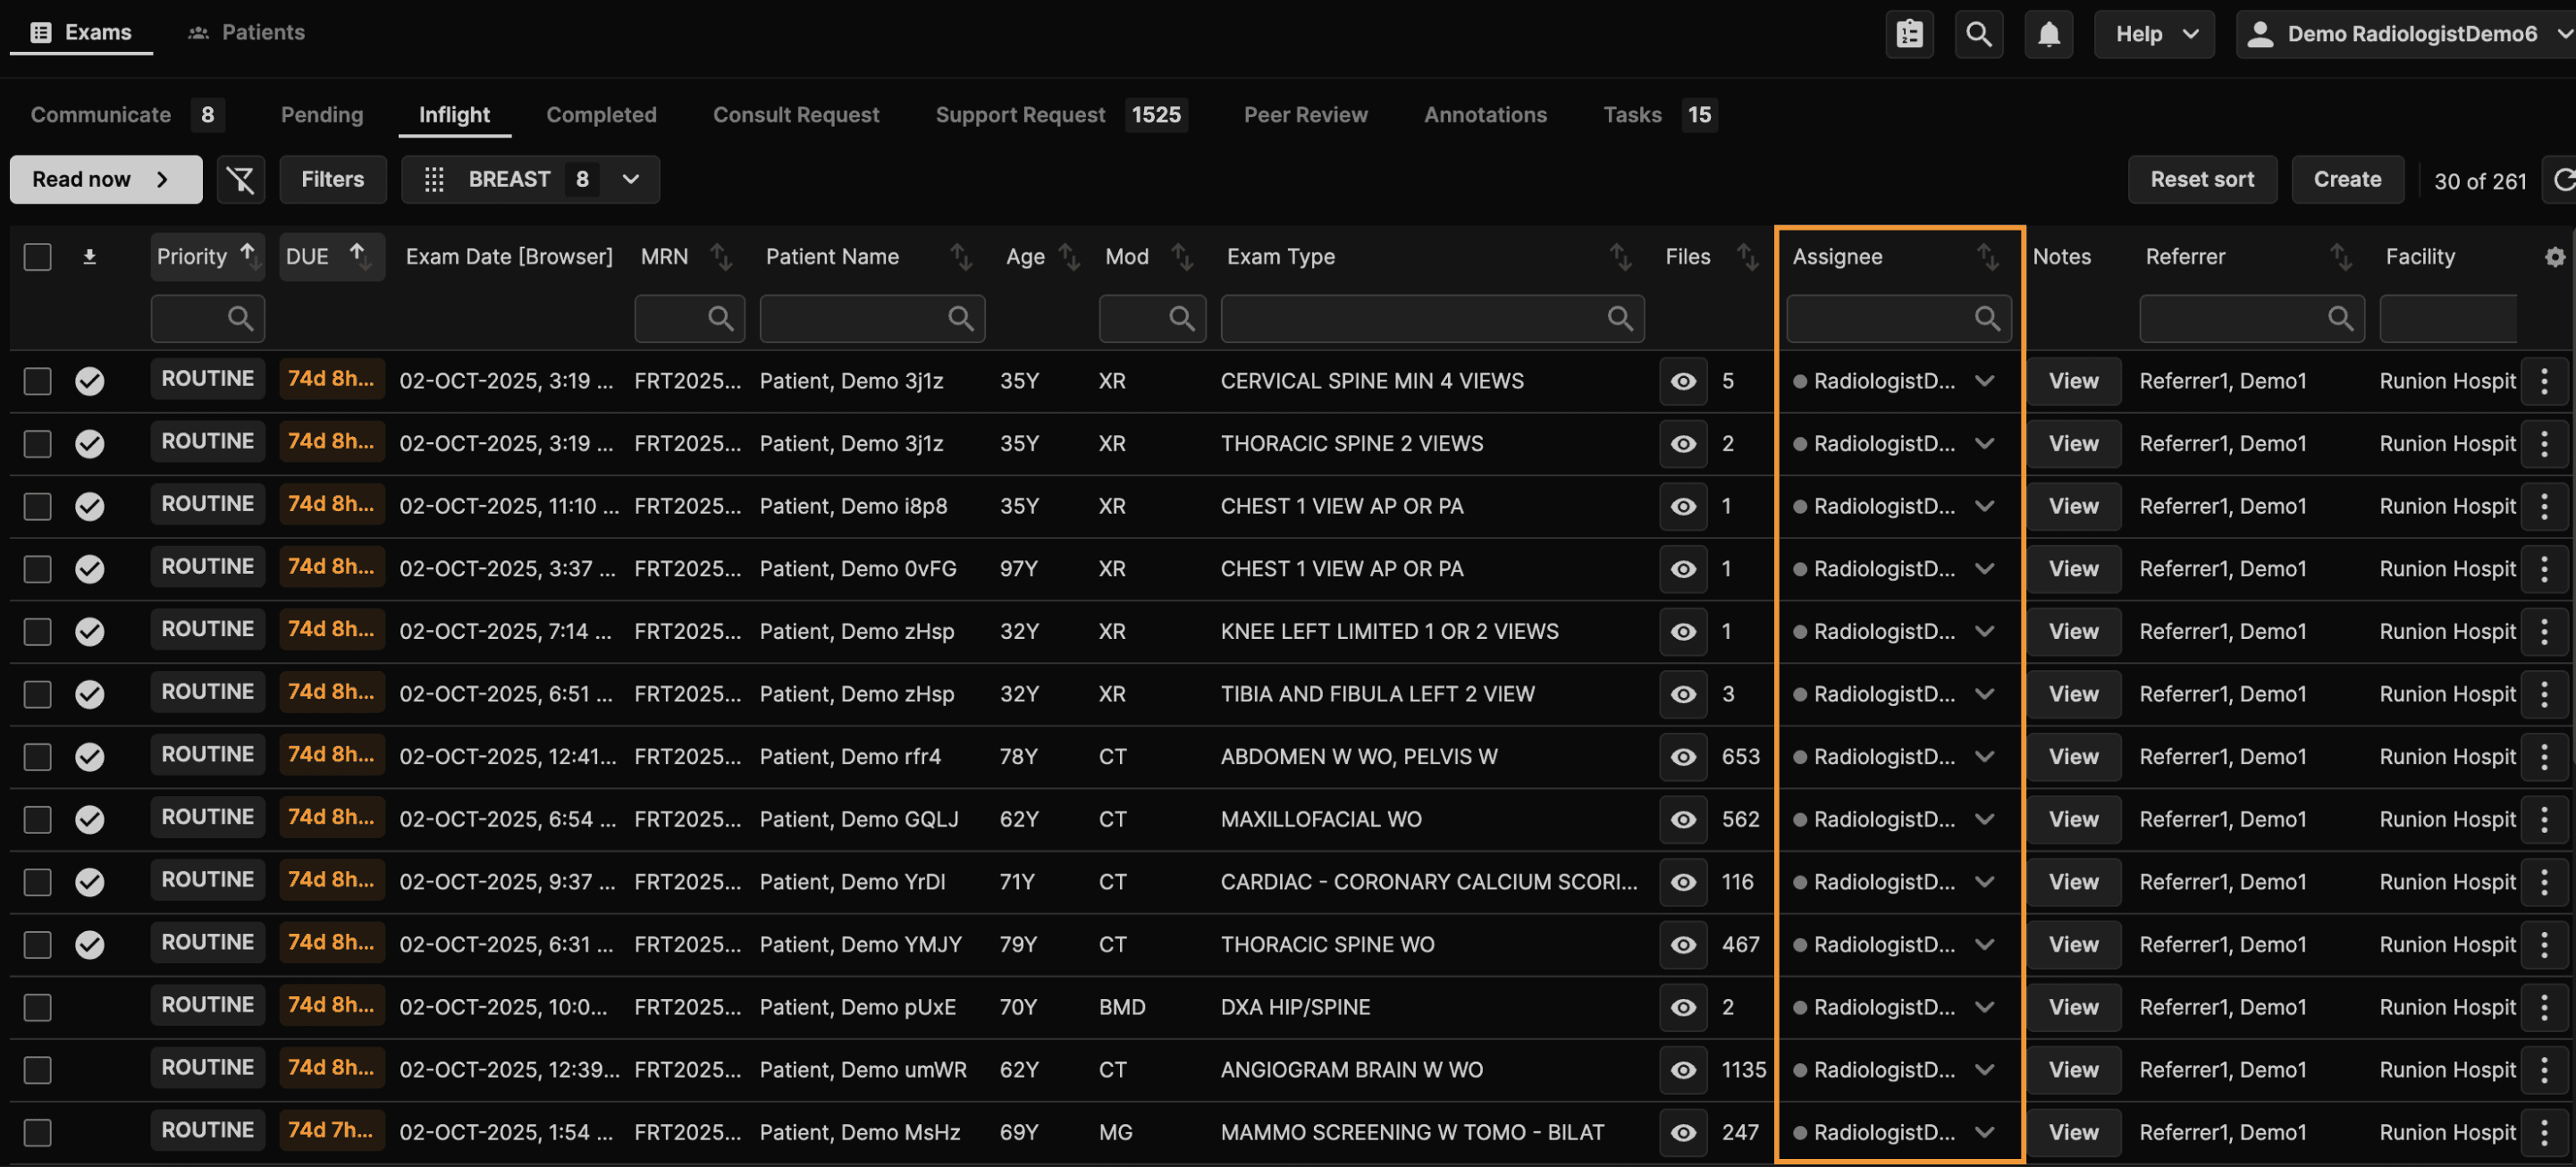
Finally, the Assignee column shows the assigned reader for each exam. You may change the assignee by using the dropdown arrow in each row. | |
 | |
Key Points: | |
|
The Reporting Screen | |
|---|---|
The top row of the Reporting Screen is called the Top Ribbon. It displays information about the current exam, Mini-dashboard, Notifications, HELP, and your Name (with a dropdown menu of additional options). | |
 | |
The Reporting Screen contains: 1. Left panel: shows the current report. 2. Right panel: shows by default the most recent relevant prior report. 3. Exams list: shows all known exams on this patient. Icons at the top right of the left and right panels allow you to expand to a single panel, which may be preferred by users employing a portrait monitor. | |
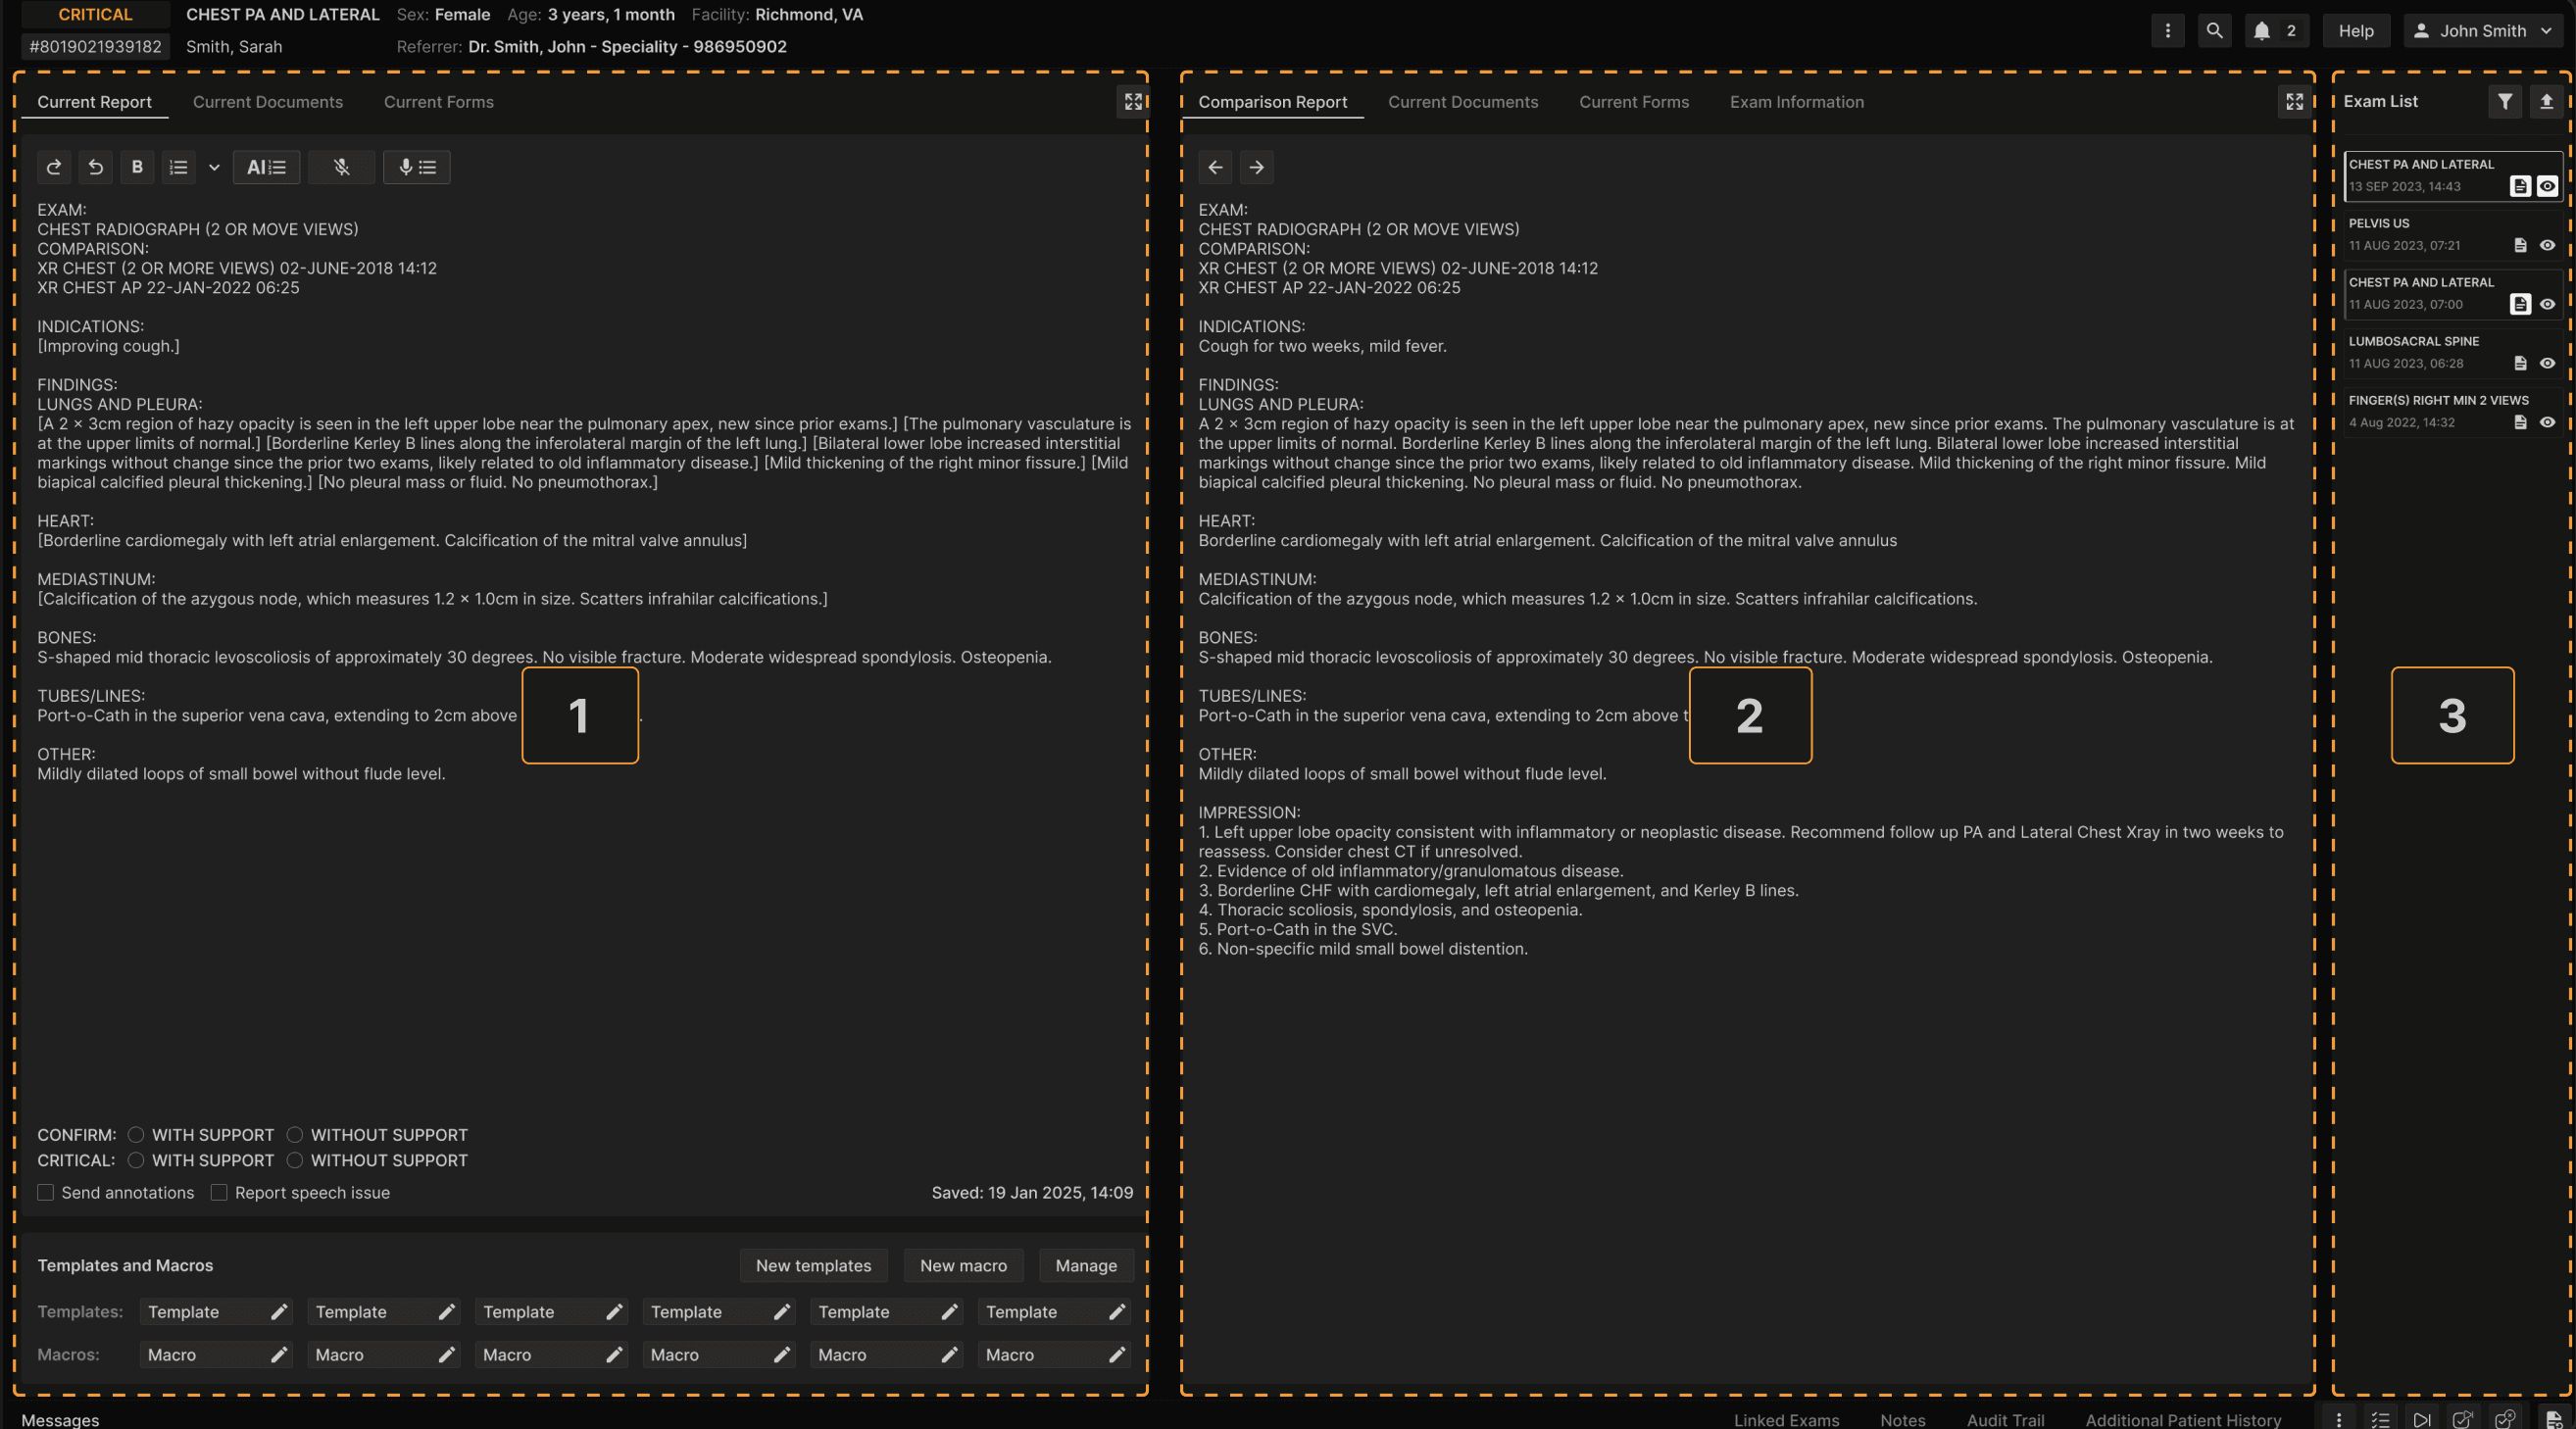 | |
Tabs at the top of the left and right panels provide options to view Forms, Documents, and Exam Information. | |
 | |
In the Exam List, the current exam is highlighted by a bright rectangular border. Relevant prior exams show a vertical gray bar at the left margin of each item. Click the report icon to view a report, the eye icon to view images, or anywhere in the rectangle surrounding an item to view both the report and images. When images from comparison exams are displayed either manually or automatically, the comparison exams are automatically cited in the comparison section of the current report. A filter icon at the upper margin of the Exams List also enables filtering of the list. | |
 | |
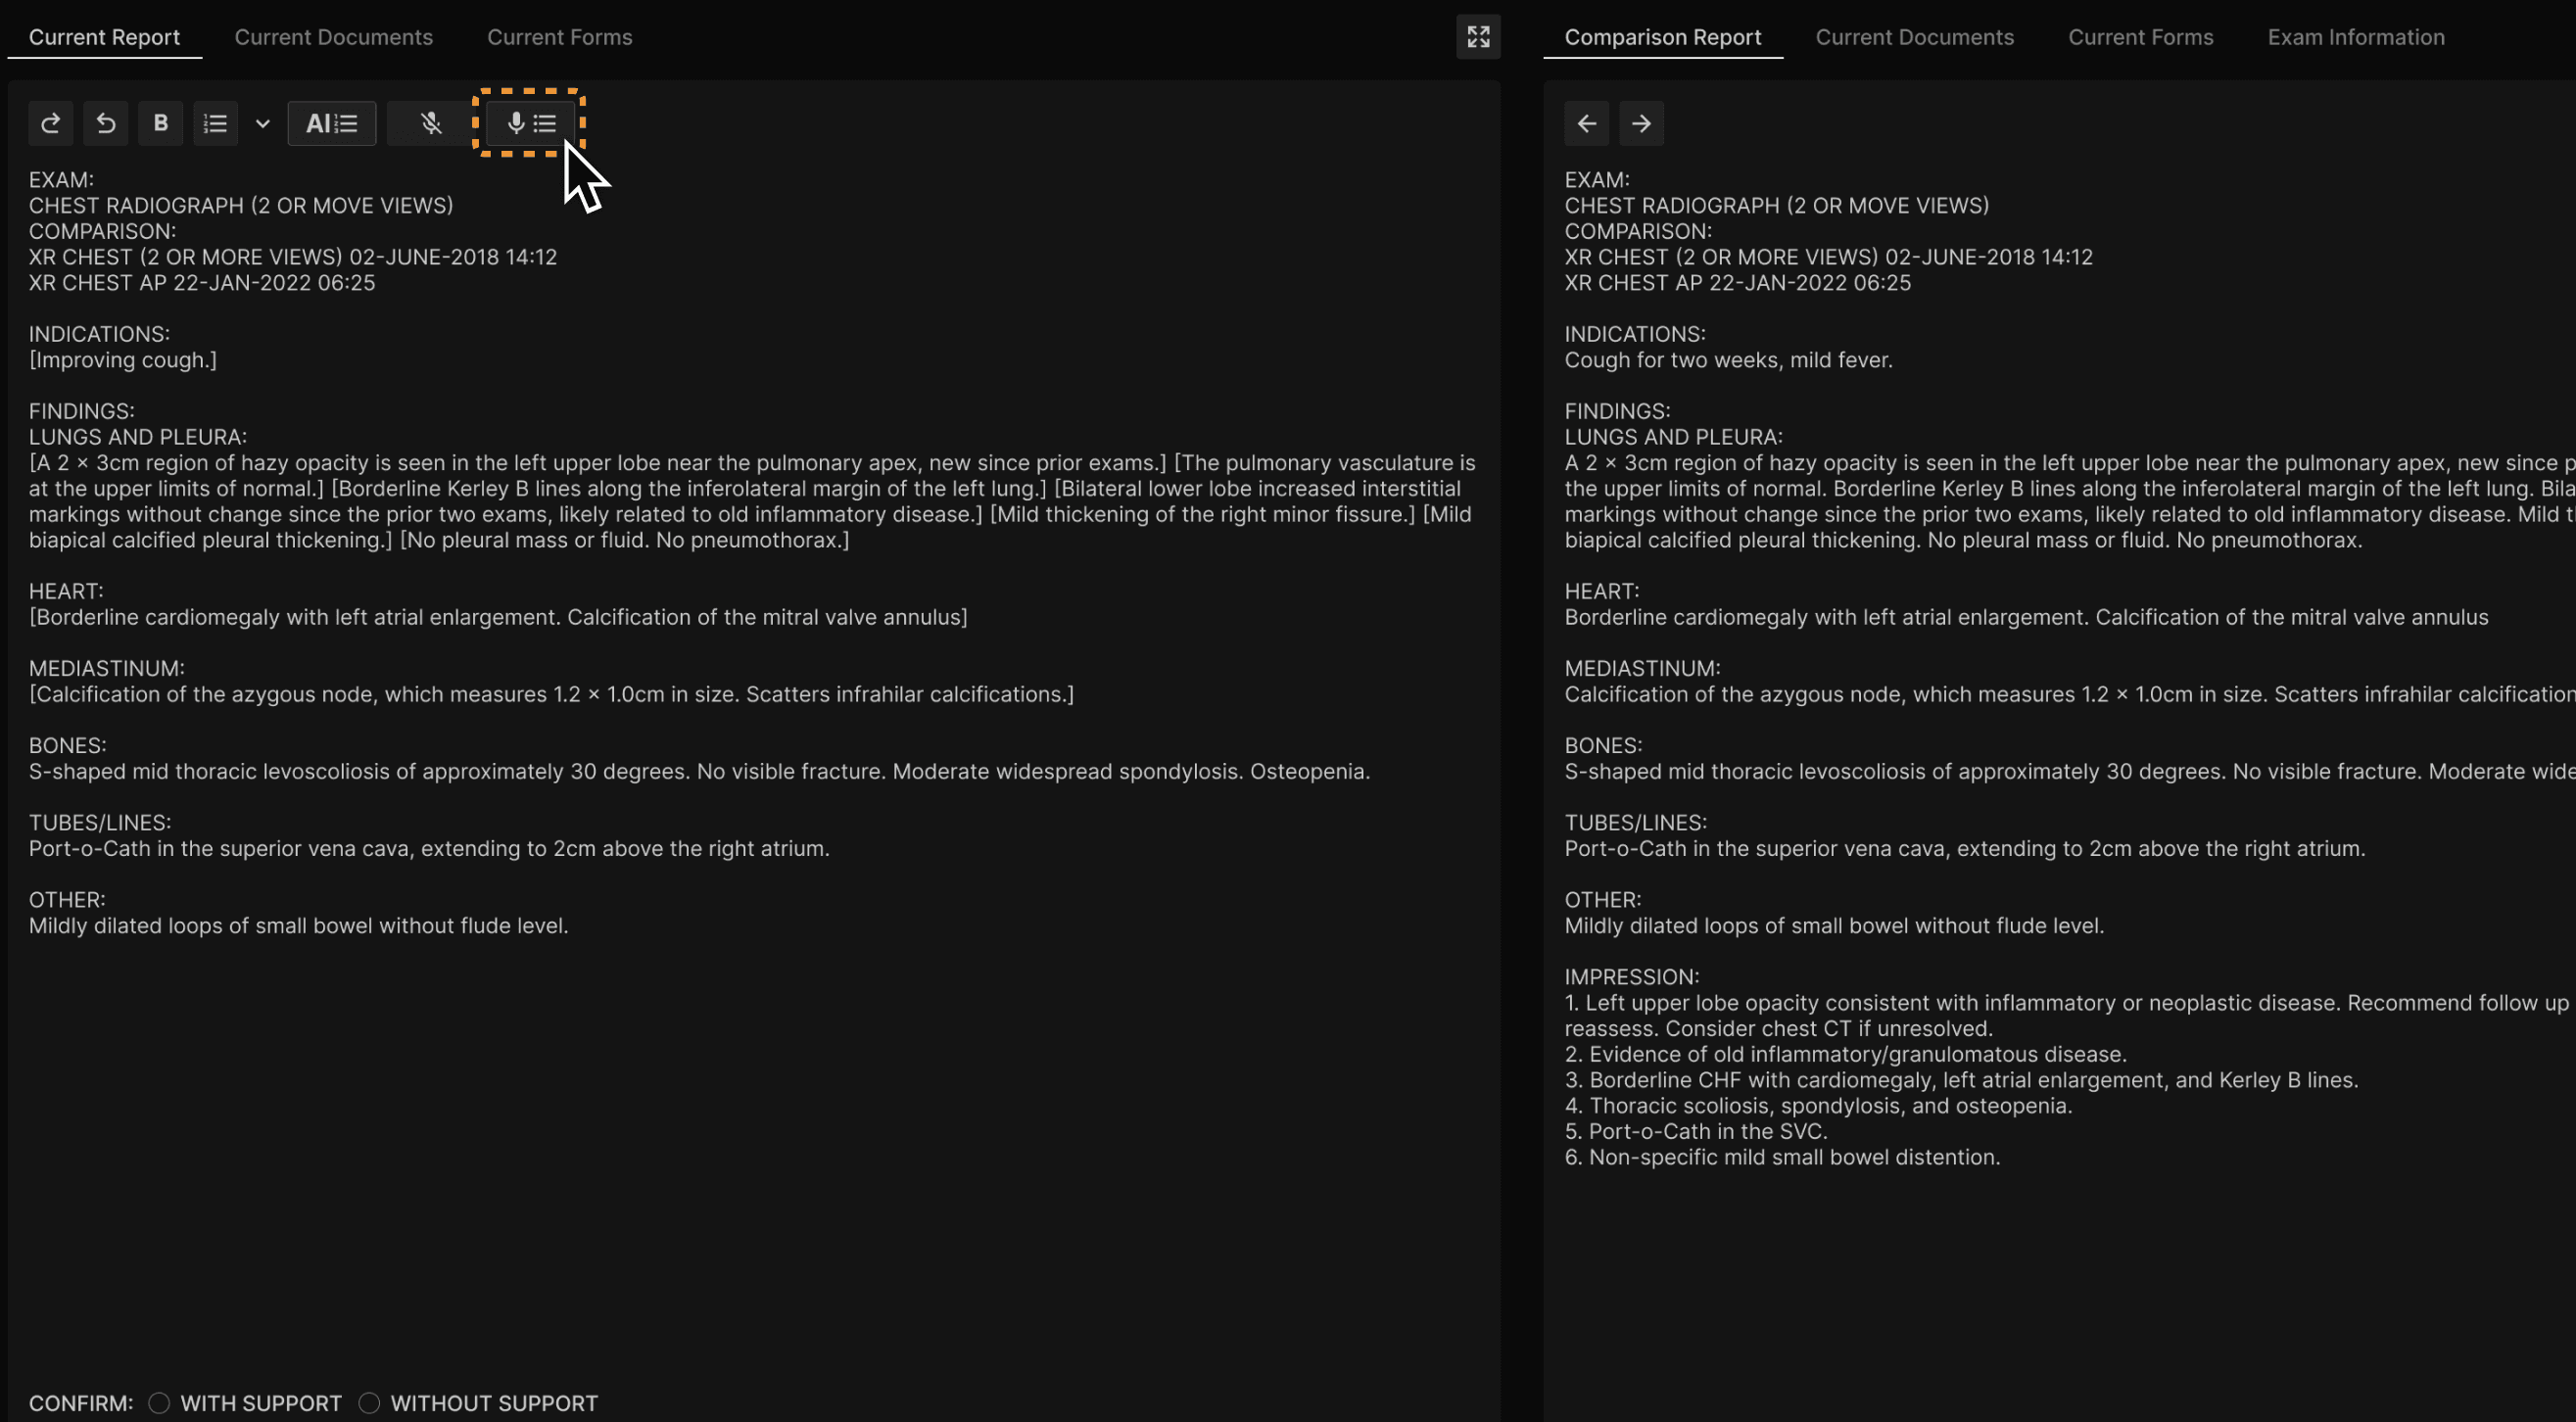
There are two arrows at the top left of the comparison report panel that can be used to cycle through prior reports. Next to these arrows is a copy icon. Click on it to copy the findings section of the selected comparison report and paste it into the findings section of the current report, replacing the existing findings. This can save time when reporting follow-up exams in patients with complex findings. At the bottom of the current report, a series of radio buttons helps you manage exams that contain Critical Results or require Confirmation of report receipt. Use the “without support” options if you have already completed the communication yourself. Use the “with support” options if you want an assistant in your practice to complete and document the proper communication. Also, below the current report, are some options for creating, managing, and using templates and macros, as well as managing your user vocabulary. | |
 | |
The Bottom Ribbon shows Messaging, Linked Exams, Notes, Audit Trail, Additional Patient History, and multiple icons. 1.The three dots icon accesses a menu of useful functions. Click “Support: internal request” from the menu to get help with exams that have problems preventing your interpretation. | |
 | |
Navigation icons are also present at the right side of the Bottom Ribbon. These include: | |
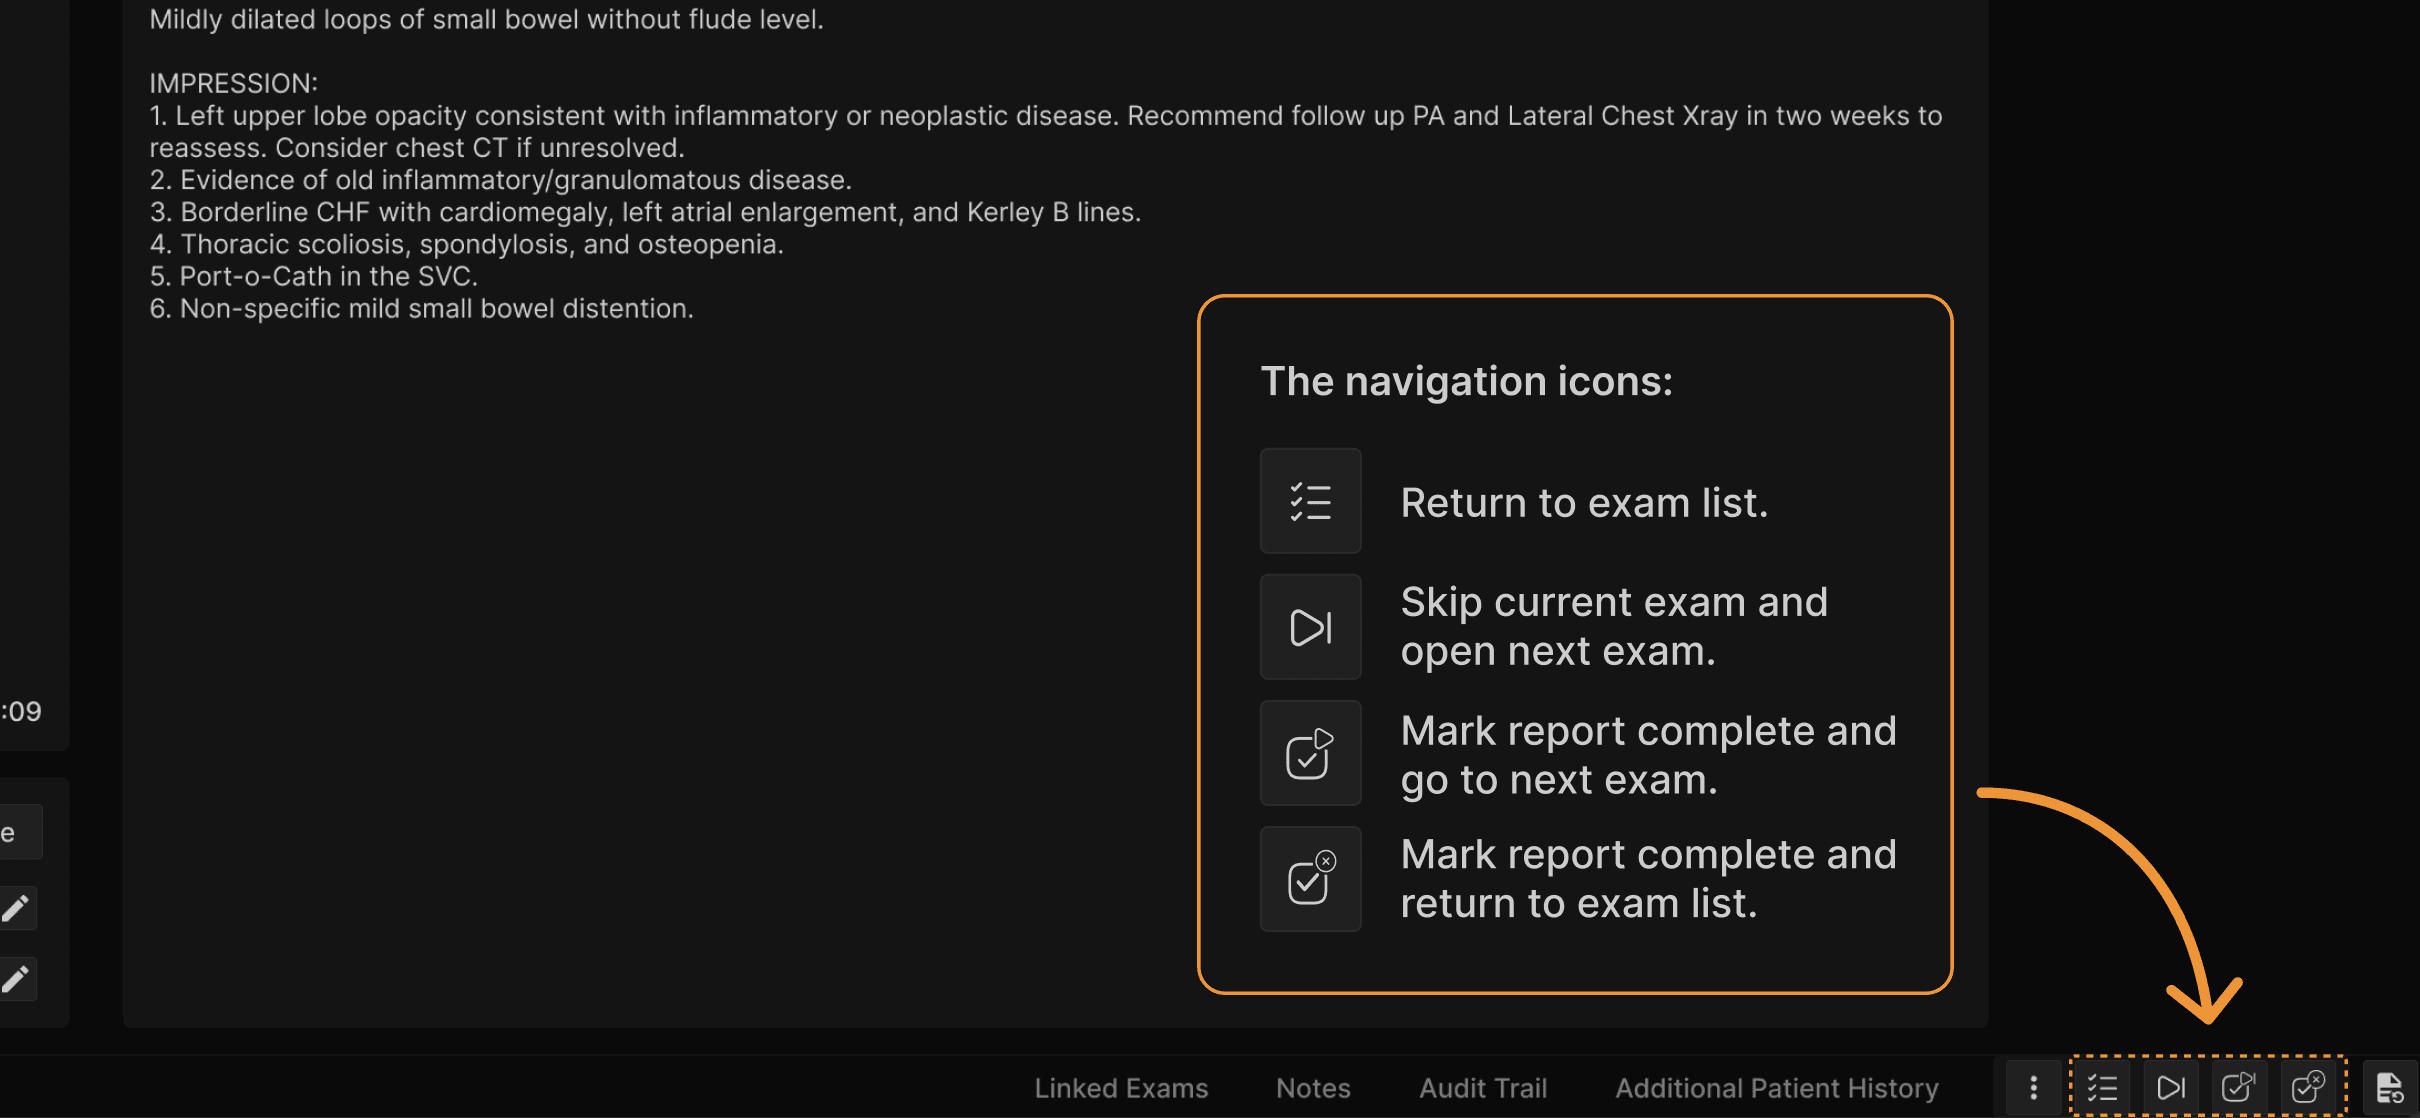 | |
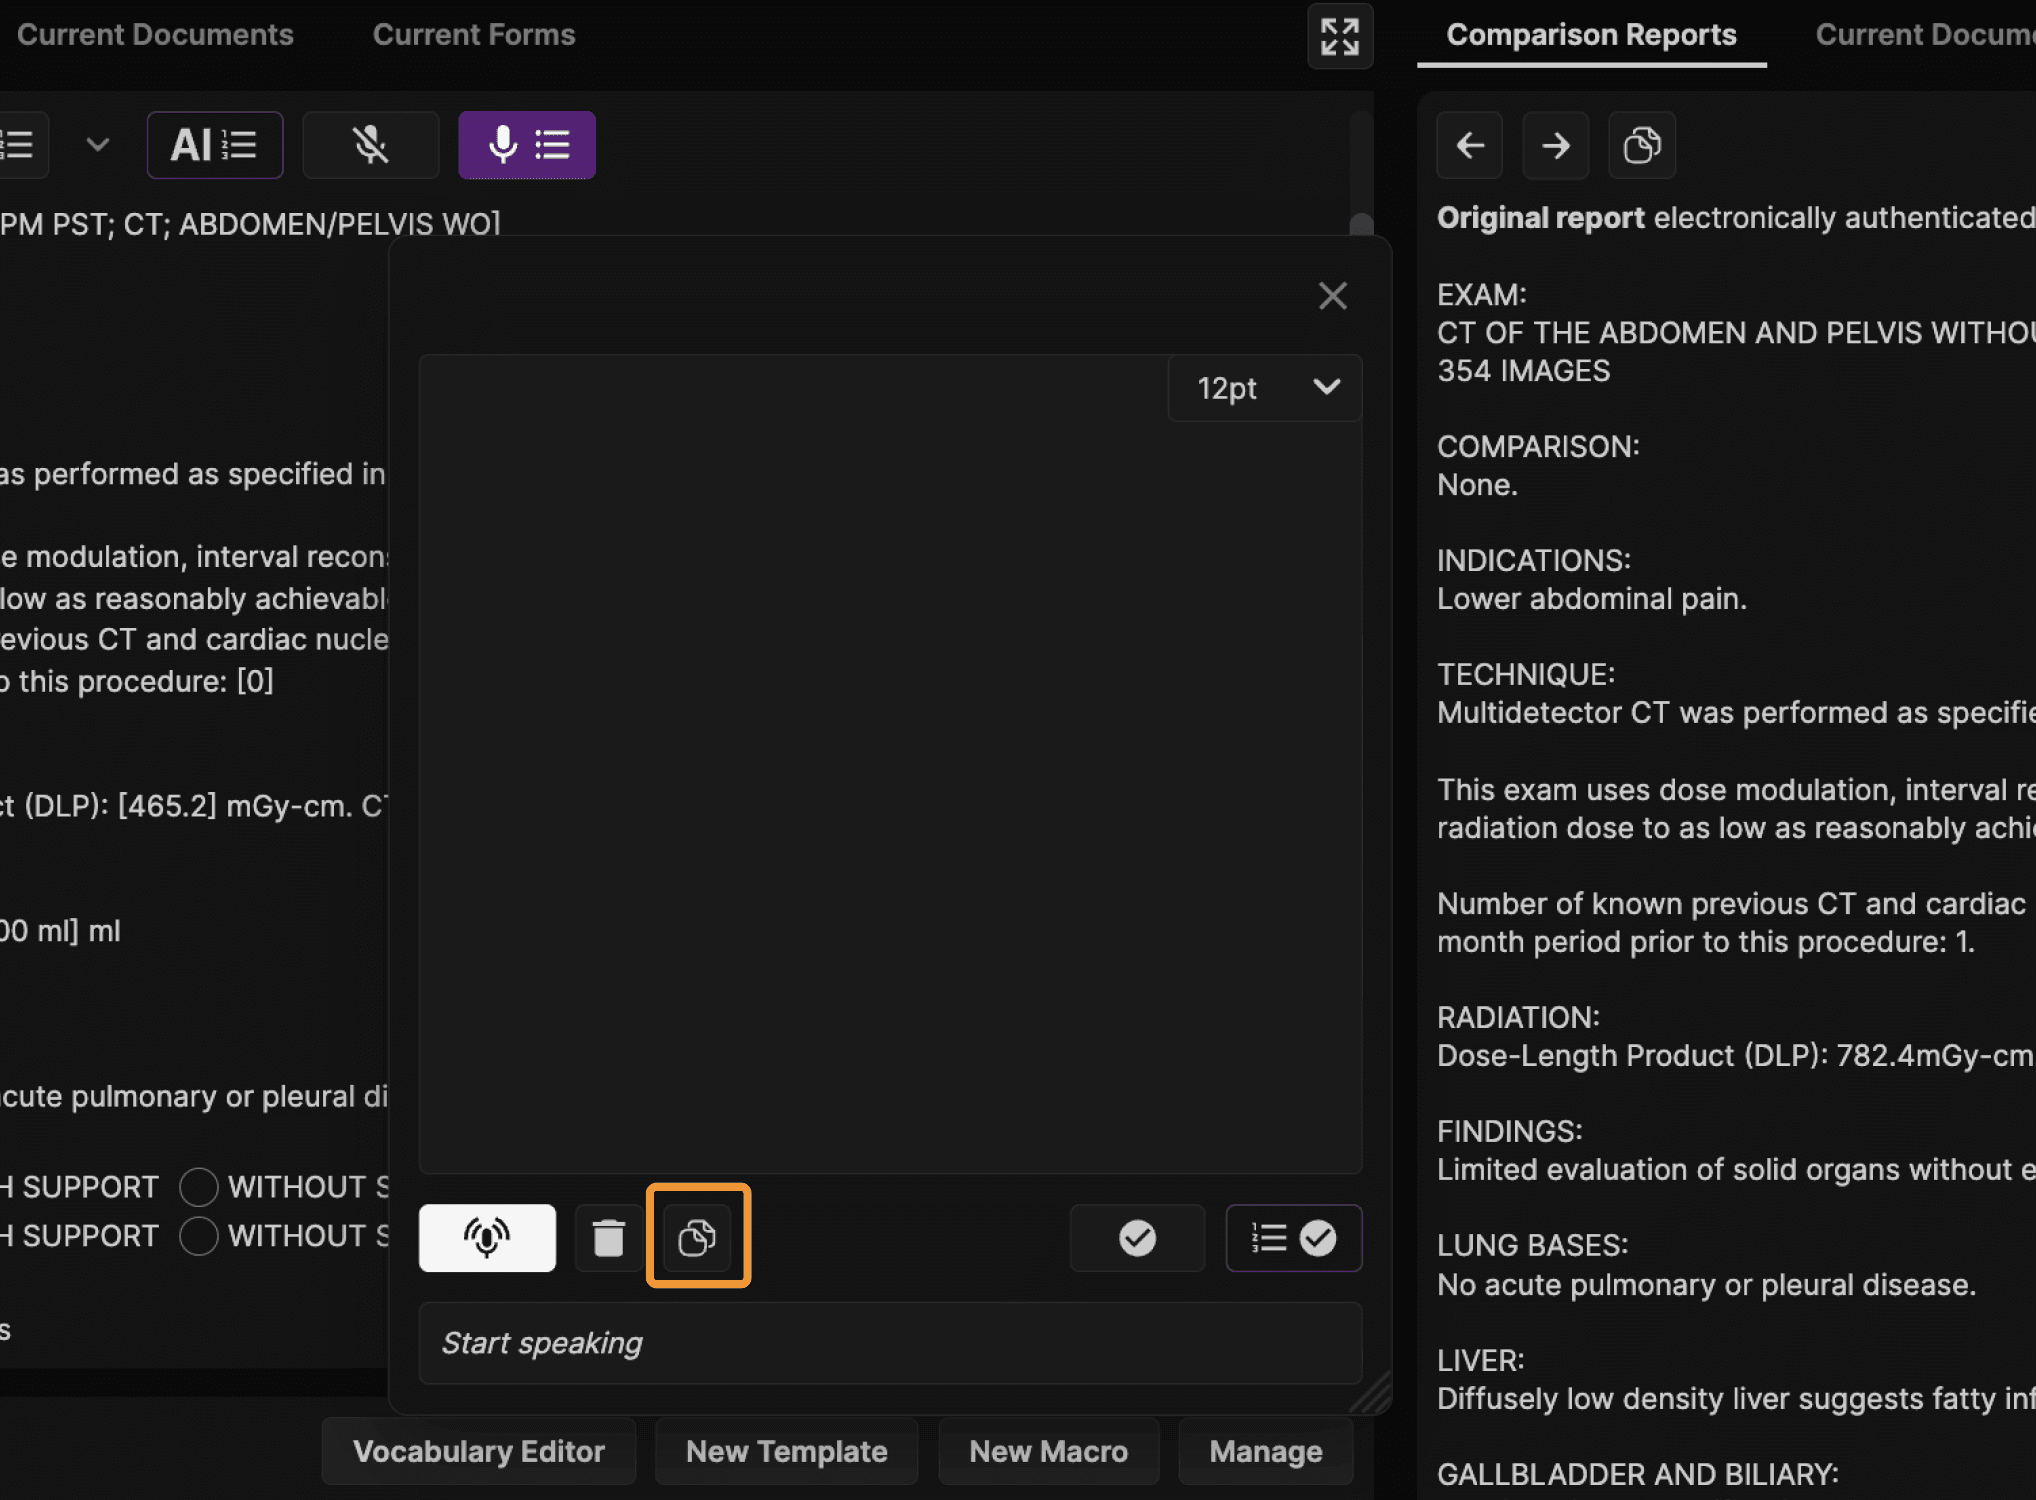
TIP: Use Speech Organization to keep your eyes on the images more and the report less! To report using Speech Organization, click on the purple outlined microphone icon or set your profile to automatically launch the Speech Organization dialog when the Reporting Screen is displayed. | |
 | |
The Speech Organization dialog can be sized by dragging the lower right corner. The font size of the displayed text can also be adjusted at the top right of the dialog. A series of icons at the bottom of the dialog enables turning the microphone on/off, discarding the text, pasting and organizing findings from the displayed prior report, or submitting contents to your report. | |
 | |
The “paste and organize findings from the comparison report” icon has a special function. It reads the selected comparison report, organizes the findings, and pastes the organized text into the finding items of the current report template. This means that prior findings reported using a different style or template can be organized and pasted into the report template you are using. This feature saves time when dictating follow-up exams in patients with multiple prior findings. | |
 | |
Dictating with speech organization is simple: dictate a sentence or phrase, then say “period.” Whenever you say “period” the dictated text is processed and assigned to the proper finding item in the report. As you dictate, you first see the resultant text appearing at the bottom of the Speech Organization box. The text when moves to the appropriate finding item in the main part of the dialog after you say “period.” If you don’t agree with how the phrase or sentence was classified, you can click on the finding item in the Speech Organization dialog. A menu of available finding items appears. Select the desired item to re-classify the text. | |
At any time, you can create a new finding item by stating a word or phrase, then “colonmark.” For example, you can be dictating a chest radiograph and say, “Spleen colonmark.” This will create a new finding item (Spleen: ). Then dictate the desired text followed by “period.” For example, when you say “spleen colonmark moderate splenomegaly period” the system will create: | |
You can also opt to replace text in the Speech Organization dialog by saying “Replace that” prior to the next dictated phrase or sentence. Suppose you have used the Paste Findings feature to pre-populate the Speech Organization dialog with findings from a prior report, but you want to change one of the finding items. For example, suppose the pasted finding says: Sometimes, you may want to dictate a pertinent negative that is added to the text in the report template instead of replacing the text. For example, support the report template has a section: Length (cm): [12] cm. | |
When you have completed using the Speech Organization dialog, click on the "Save and Report Assistant" icon at the lower right to submit your findings. In a few seconds, the AI Report Assistant checks your report for errors, makes and labels corrections, and auto-generates the impression. Also, if during your dictation, you dictated a recommendation, it is extracted into a separate Recommendation section at the bottom of your report. | |
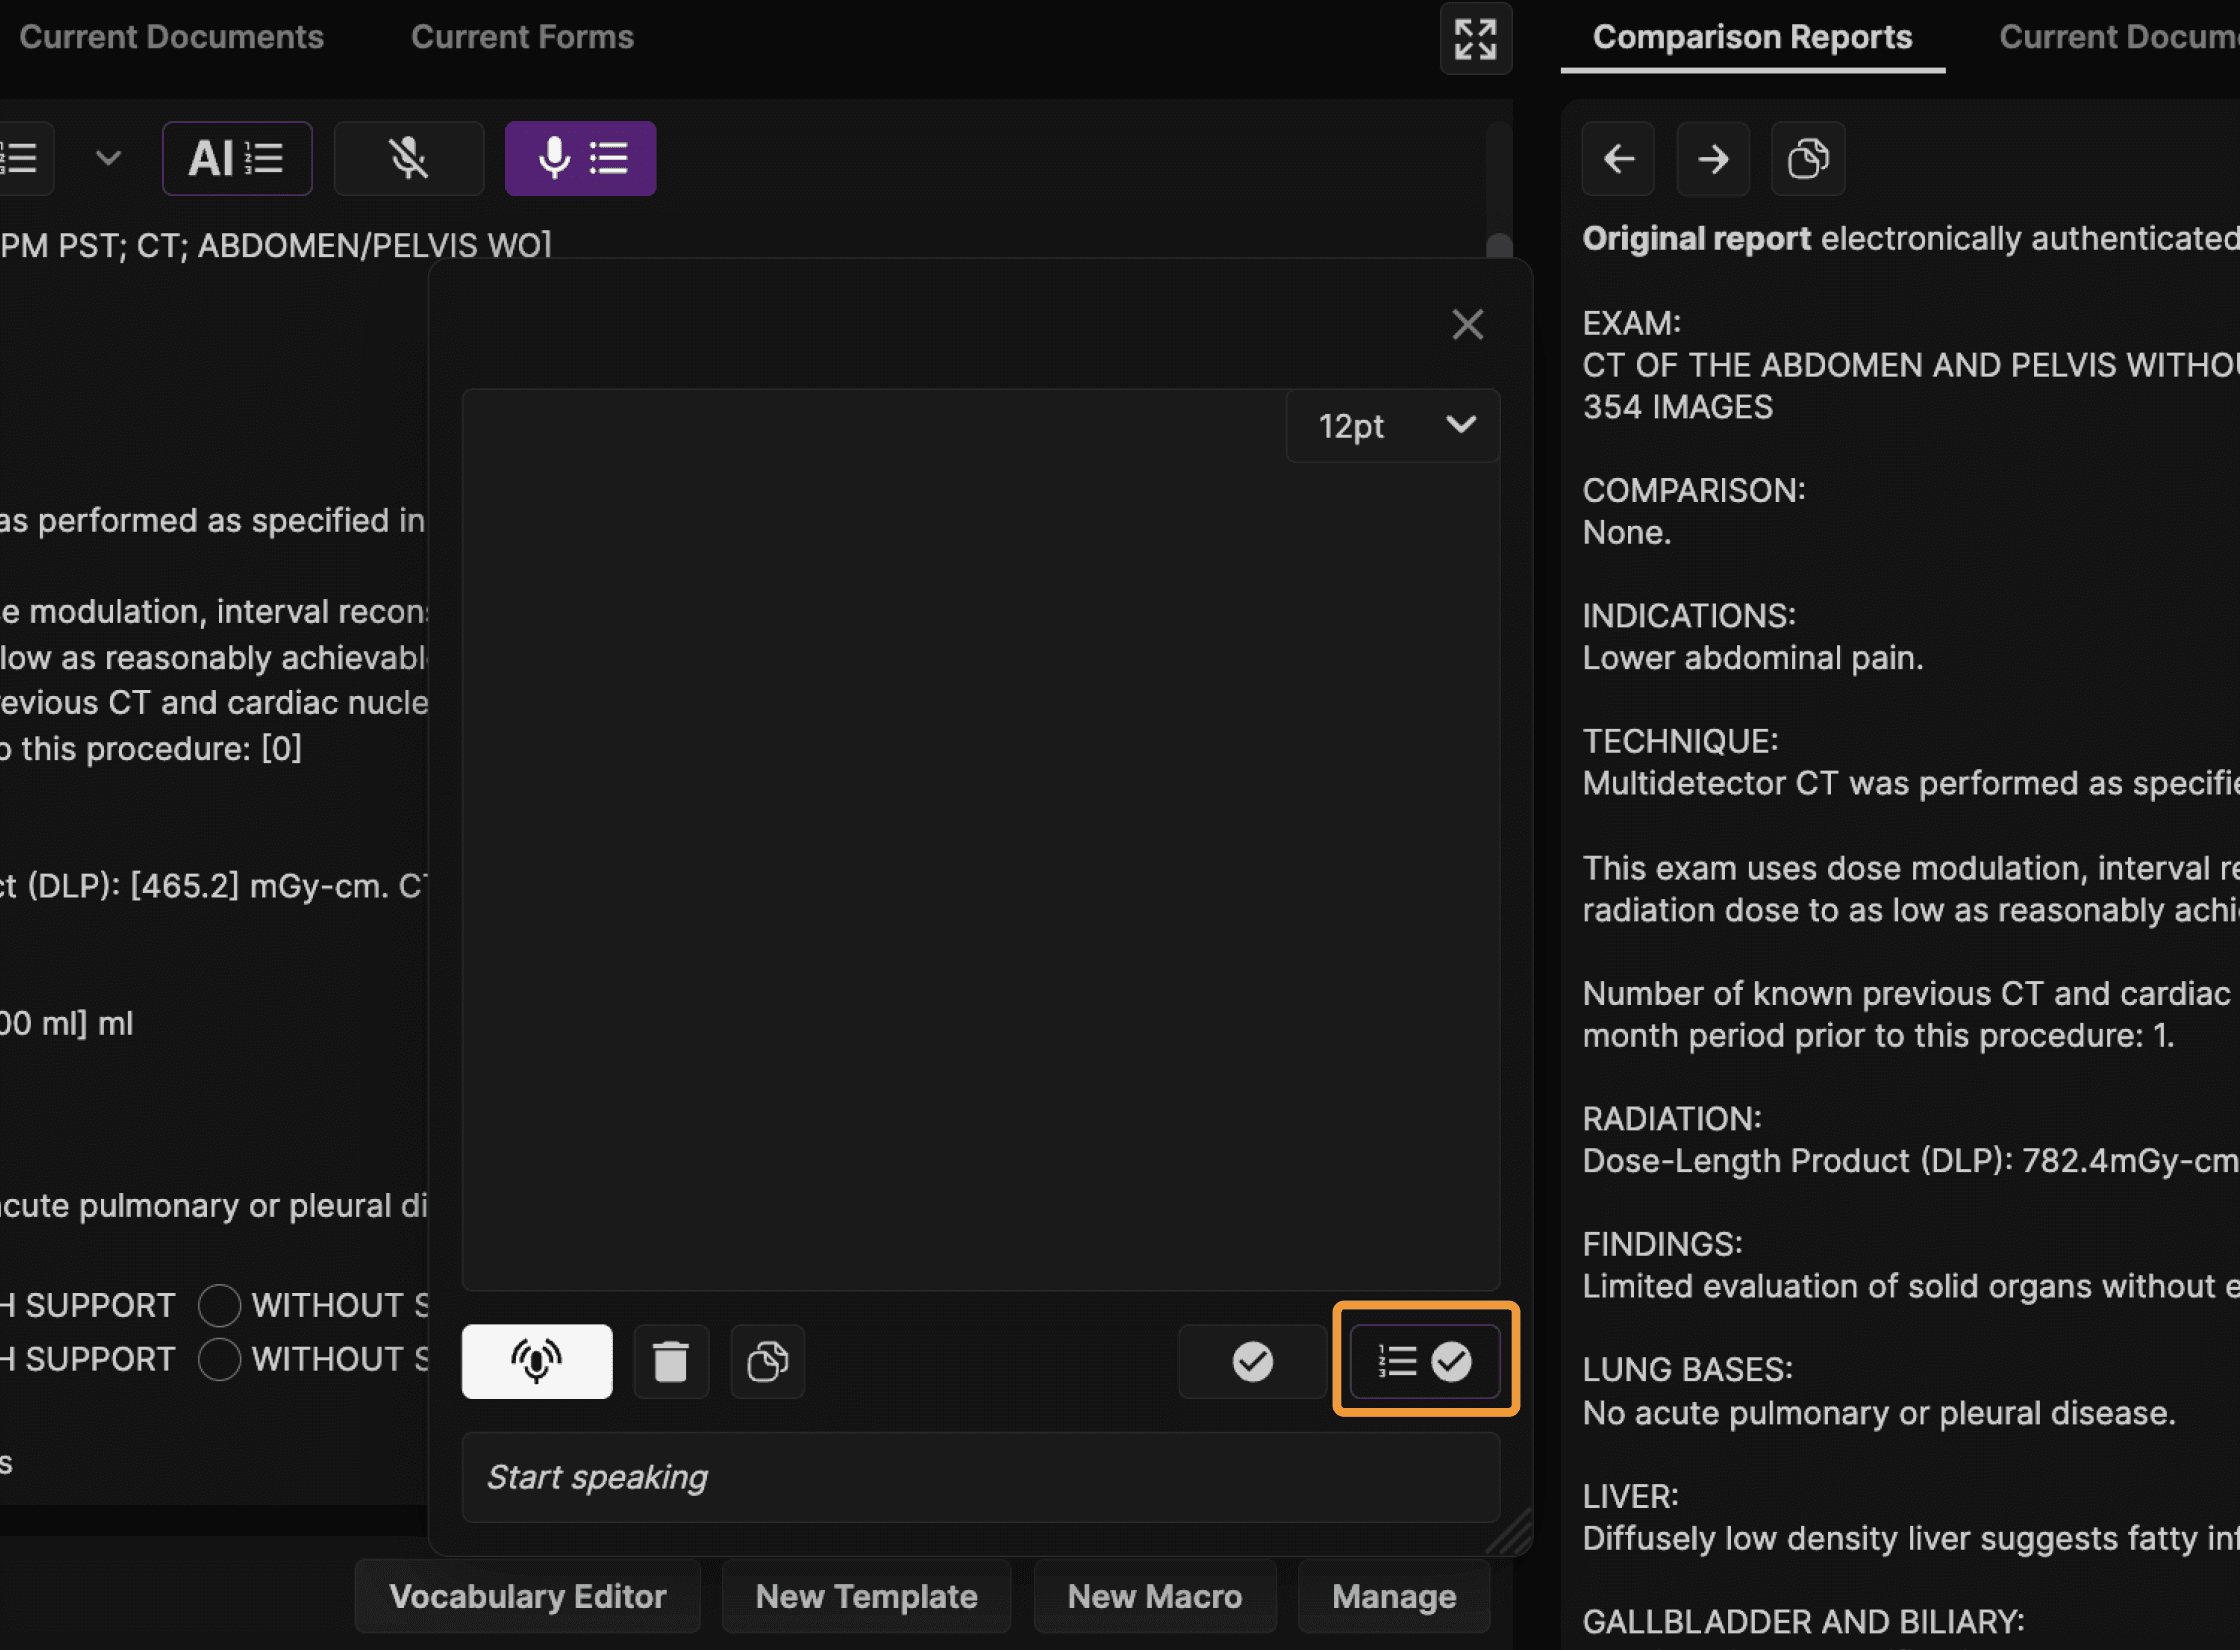 | |
You can also click on the "Save" icon near the lower right of the Speech Organization dialog if you do not want to invoke the AI Report Assistant. | |
 | |
TIP: Keyboard shortcuts are available to toggle the microphone on/off, open Speech Organization, invoke Save and Report Assistant, or Save. Take advantage of these features by using a gaming mouse or keypad. | |
At the top of the current report is a toolbar with various tools. Most are self-explanatory. The AI button offers special features. | |
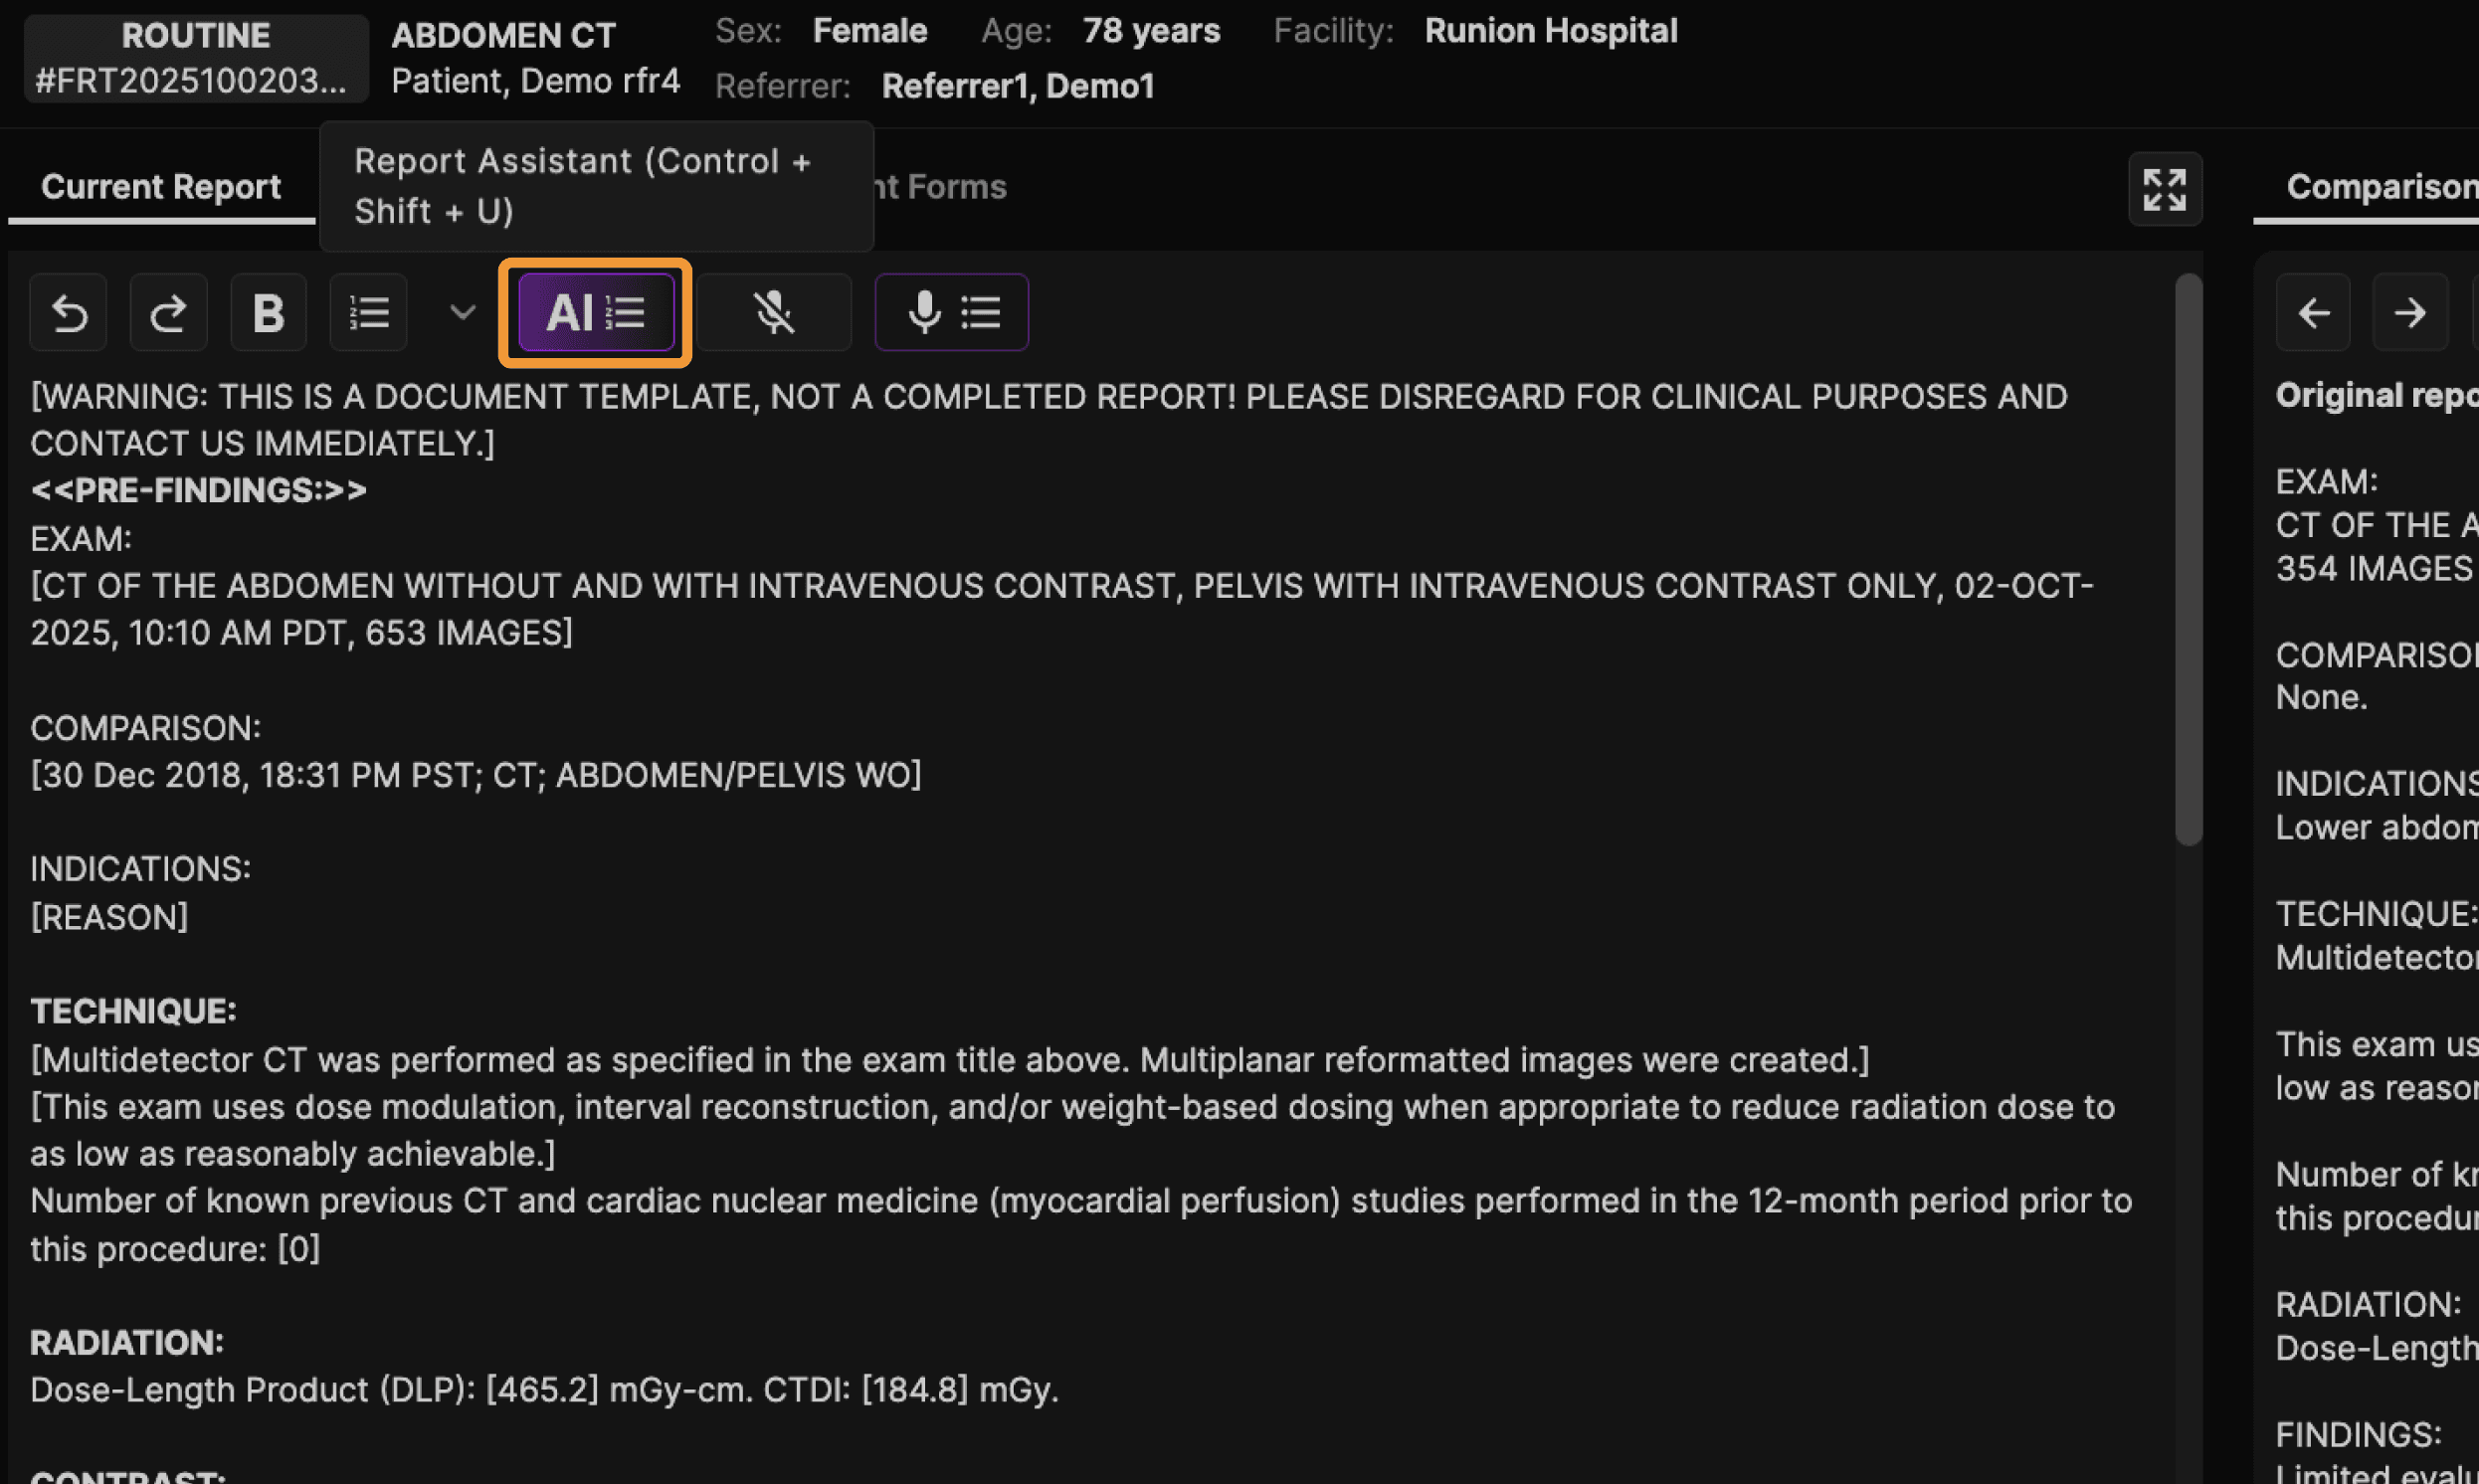 | |
Clicking it: 1. Runs the AI Report Assistant to correct the report and regenerate an impression. | |
For example, you can type or dictate ^^any question^^ such as ^^what is the differential diagnosis of a cavitary lung mass?^^, then click the AI button. (Note: ^ is typed by Shift-6). After clicking AI, the ^^any question^^ is automatically removed, and the answer is provided at the bottom of the report under Additional Information. You can use this method to create hints in your custom report templates and/or macros that provides the AI Report Assistant instructions. There are many ways in which the AI Report Assistant may be customized, even down to the individual report conclusion style. Contact us to learn more. | |
WARNING: Always carefully proofread your reports. The AI Report Assistant can make mistakes and may fail to catch all mistakes. |
Viewing Images | ||
|---|---|---|
General Orientation: | ||
The viewer is designed to allow efficient viewing with minimal head, eye, and hand movements. Most common viewing activities can be controlled with a mouse, without needing to access a toolbar or toolbox. | ||
Images from the current and prior exams are always clearly labeled with the date of the exam. The exam date for comparison exams is shown in black text with a white background to make it easy to distinguish comparison images from current exam images. | ||
Exams are initially displayed with the current exam on the left panel and the prior exam on the right panel. If there is no comparison exam and the viewer is on a single landscape monitor, the primary exam will fill the available monitor space. If the viewer is distributed across two portrait monitors, the left panel is always used for the primary exam. The number of images per panel is determined by your hanging protocol. Your hanging protocols also control many other presentation defaults, including whether the toolbar or thumbnails are shown, how the annotations appear, your favorite tools, and more. | ||
Each viewpoint contains DICOM annotations in all four corners. The annotations vary by modality. An abbreviated set of DICOM annotations can be displayed instead. This can be set via hanging protocols or clicking on the A keyboard shortcut (A for Annotations on/off). Left click over the patient’s name in the upper right corner of any viewport to increase the DICOM annotation font size. This can be repeated to progressively increase the font. Right click over the patient’s name in the upper right corner of the viewport to decrease the DICOM annotation font size. | ||
TIP: Keyboard shortcuts can be used to expedite a wide variety of viewer functions. The keyboard shortcuts are all available in the HELP center. In addition, hovering the cursor over most icons will reveal a tool tip and the keyboard shortcut for the associated tool. | ||
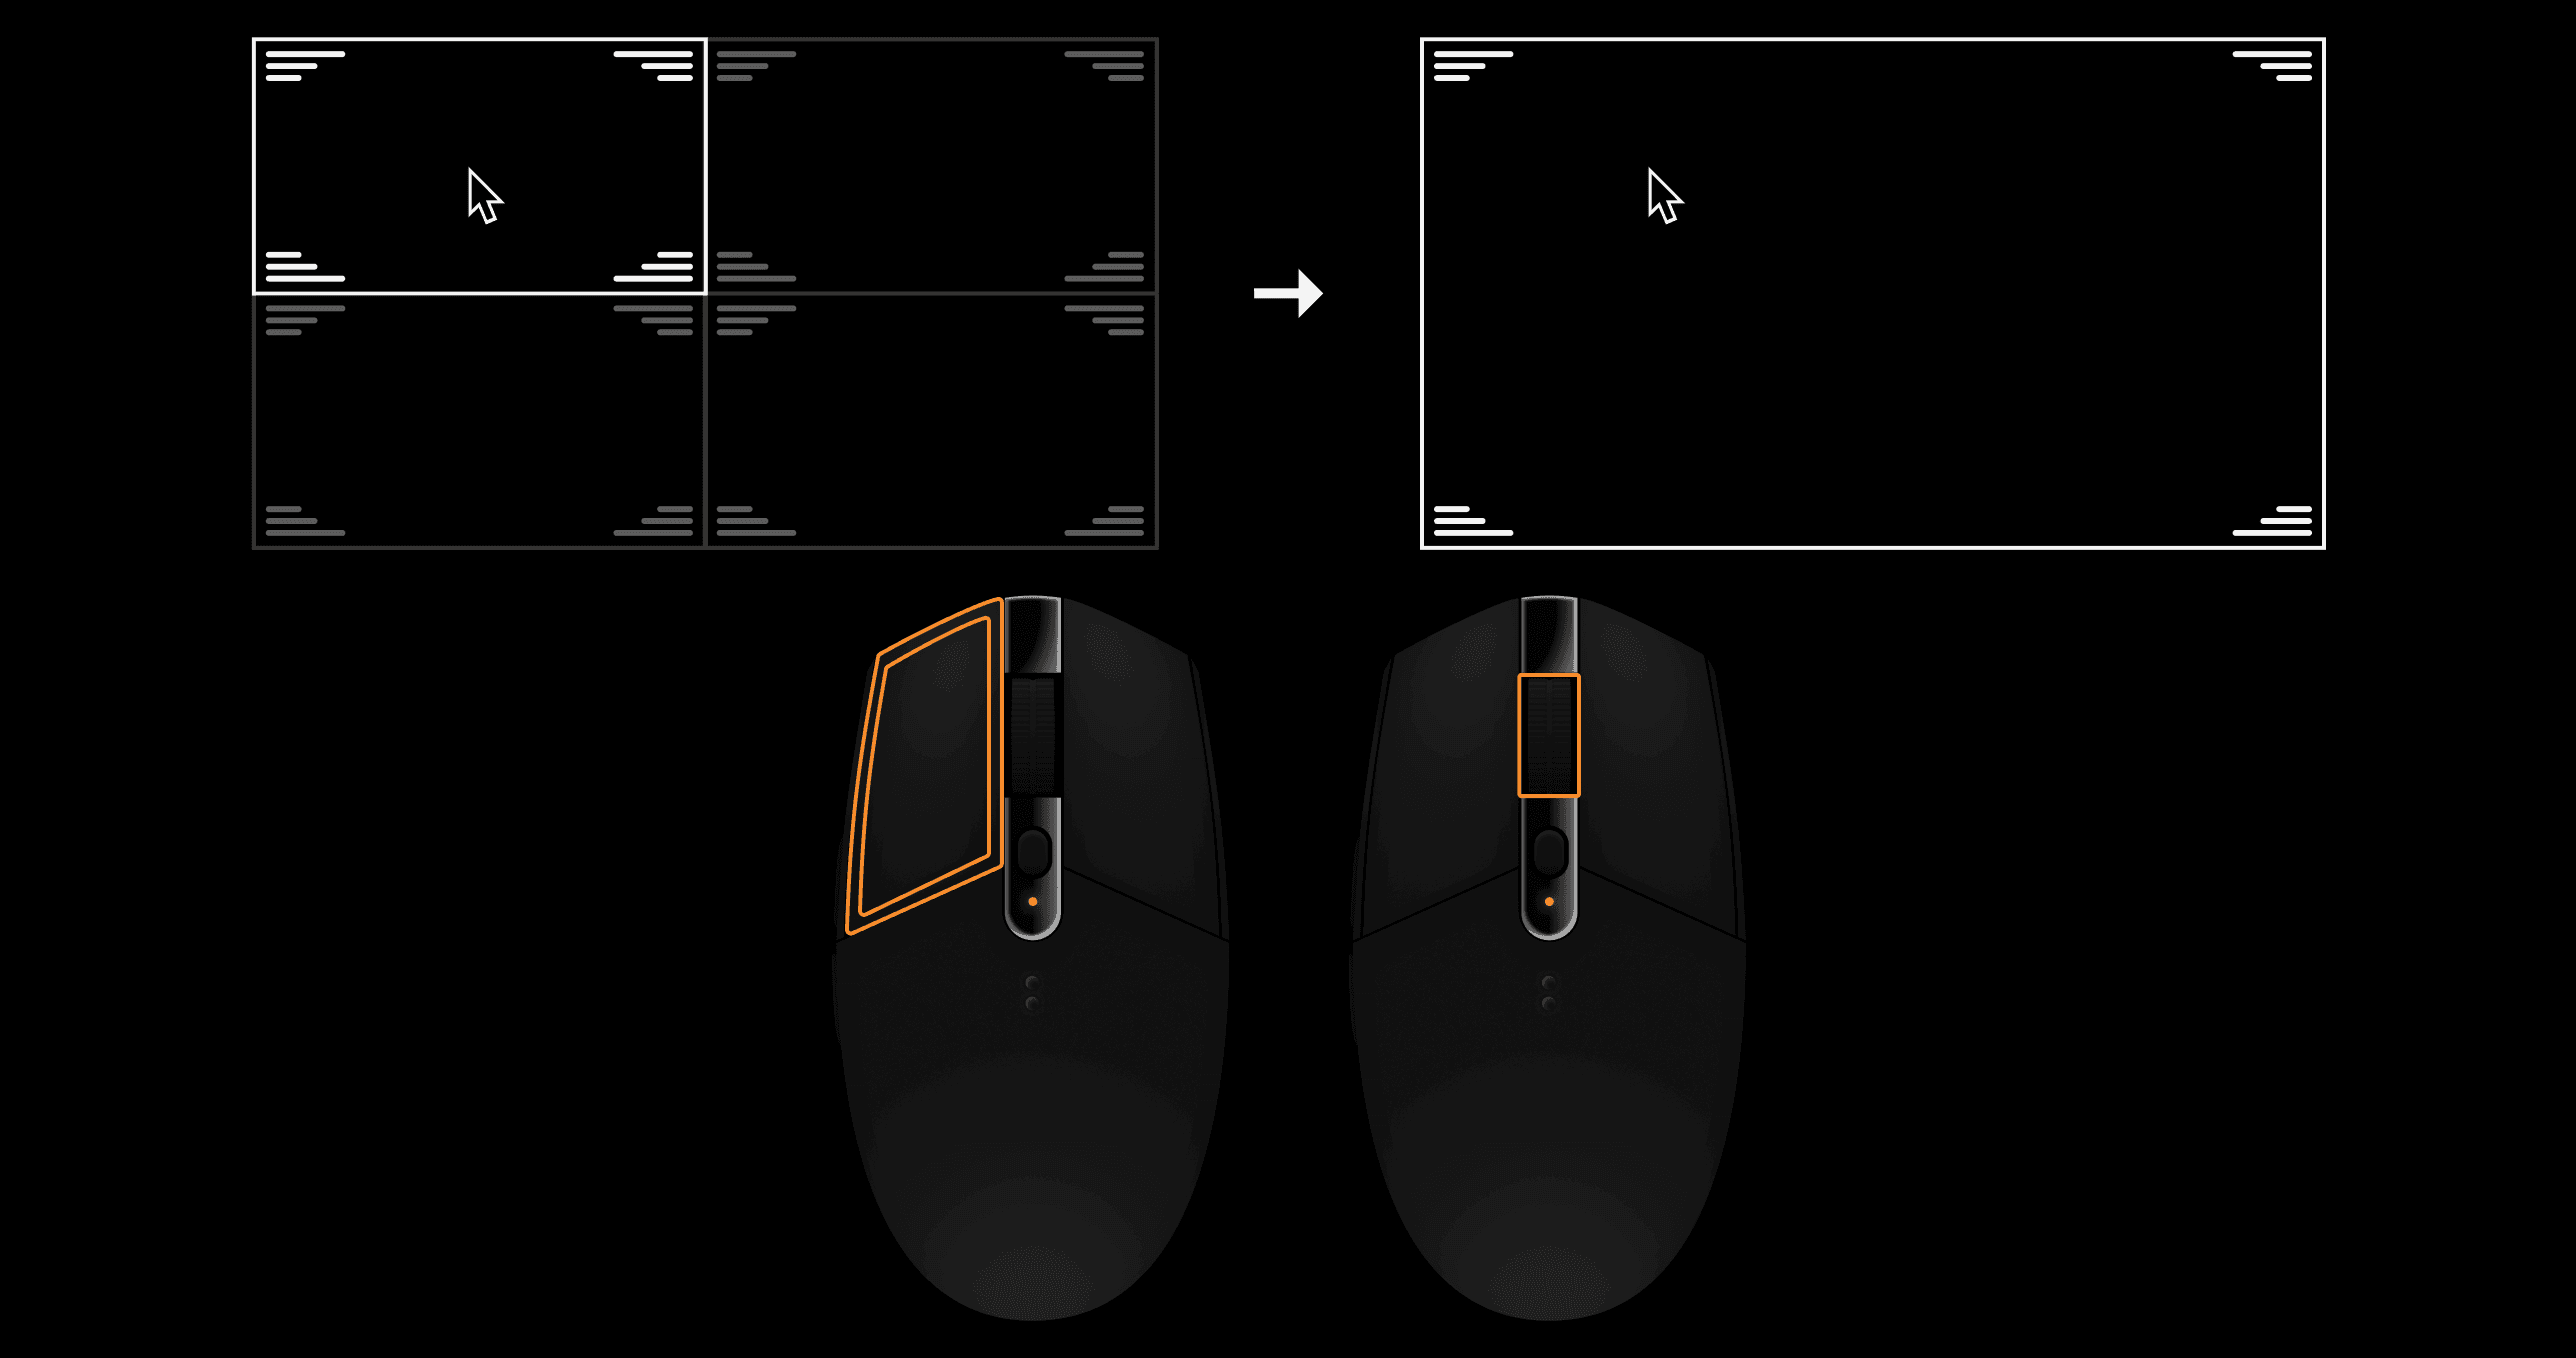
The number of images displayed per panel can be controlled by the hanging protocol or via a keyboard shortcut. Click 1, 2, 4, 6, 8, 0. Clicking 0 causes a 12 viewport per panel format. Clicking the other numbers sets the format to that number of viewports. To permanently set a preference, use hanging protocols. |
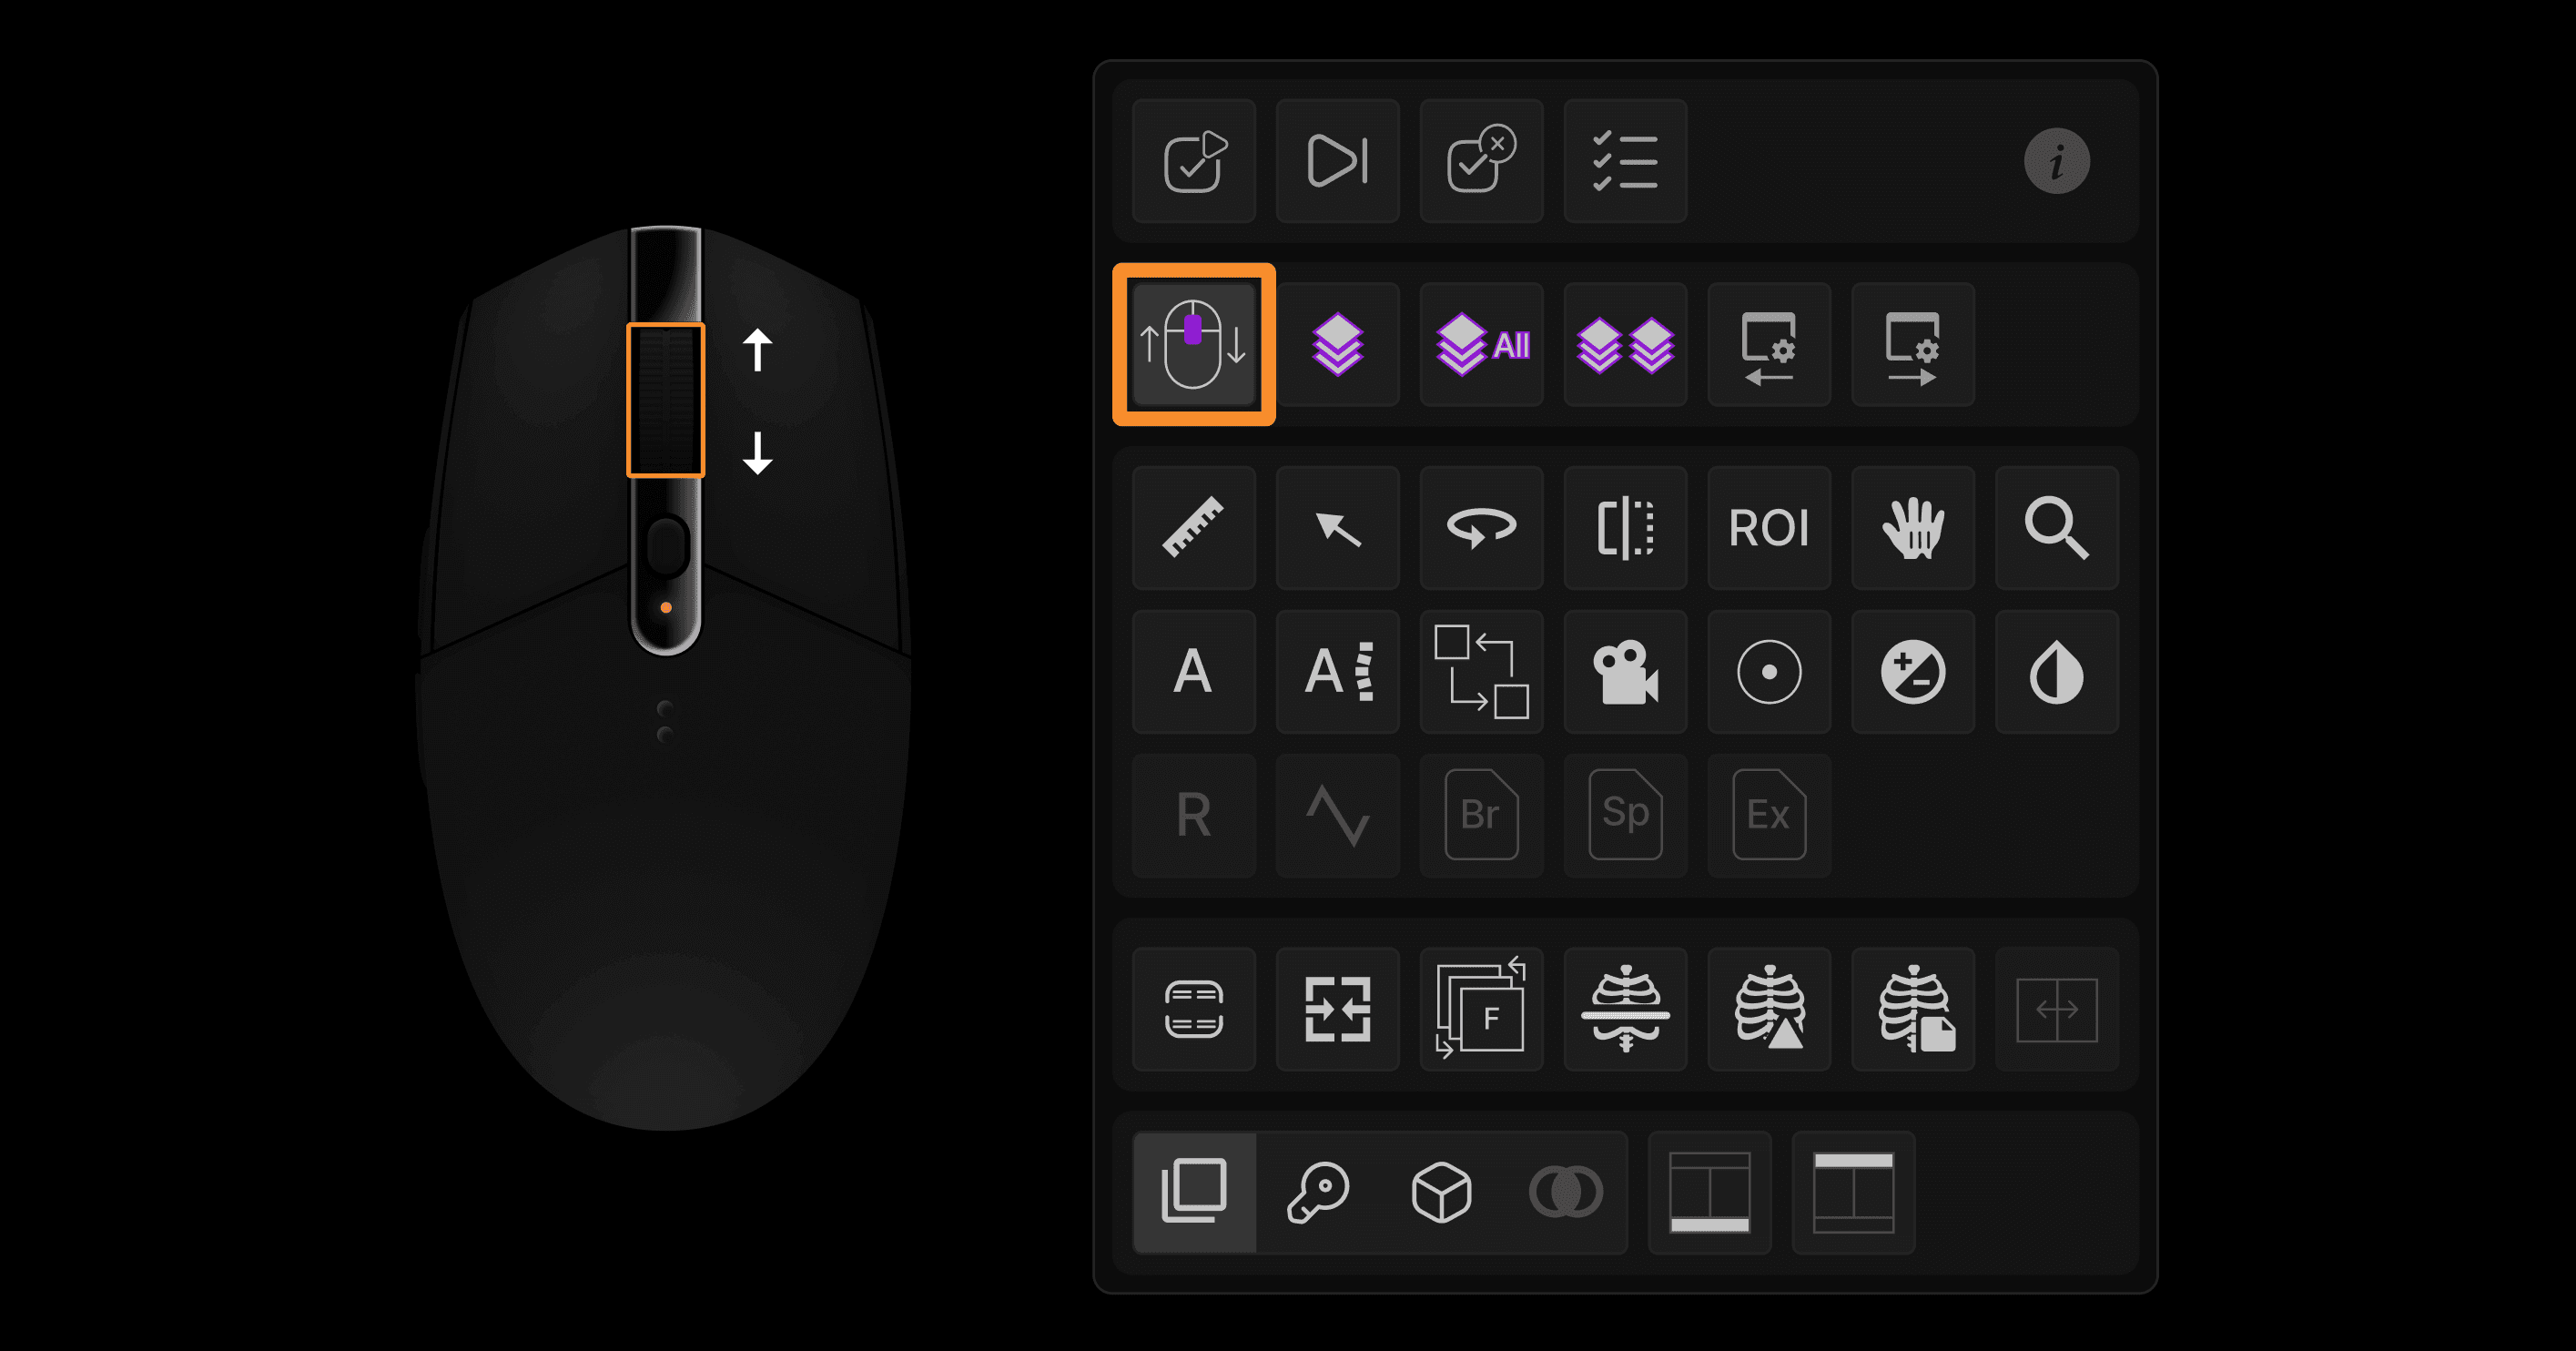
Built-In Mouse Functions | ||
|---|---|---|
 |
Paging | |||||||||||||||
|---|---|---|---|---|---|---|---|---|---|---|---|---|---|---|---|
| |||||||||||||||


Linked Paging | |
|---|---|
Action: Position the cursor near an image border. (the peripheral 25% of the image, which you can think of as the viewport frame, is the region when actions affect the current image and the nearest neighboring image). Then use the left press-push forward/backward method or the mouse wheel method to page through the desired series. | |
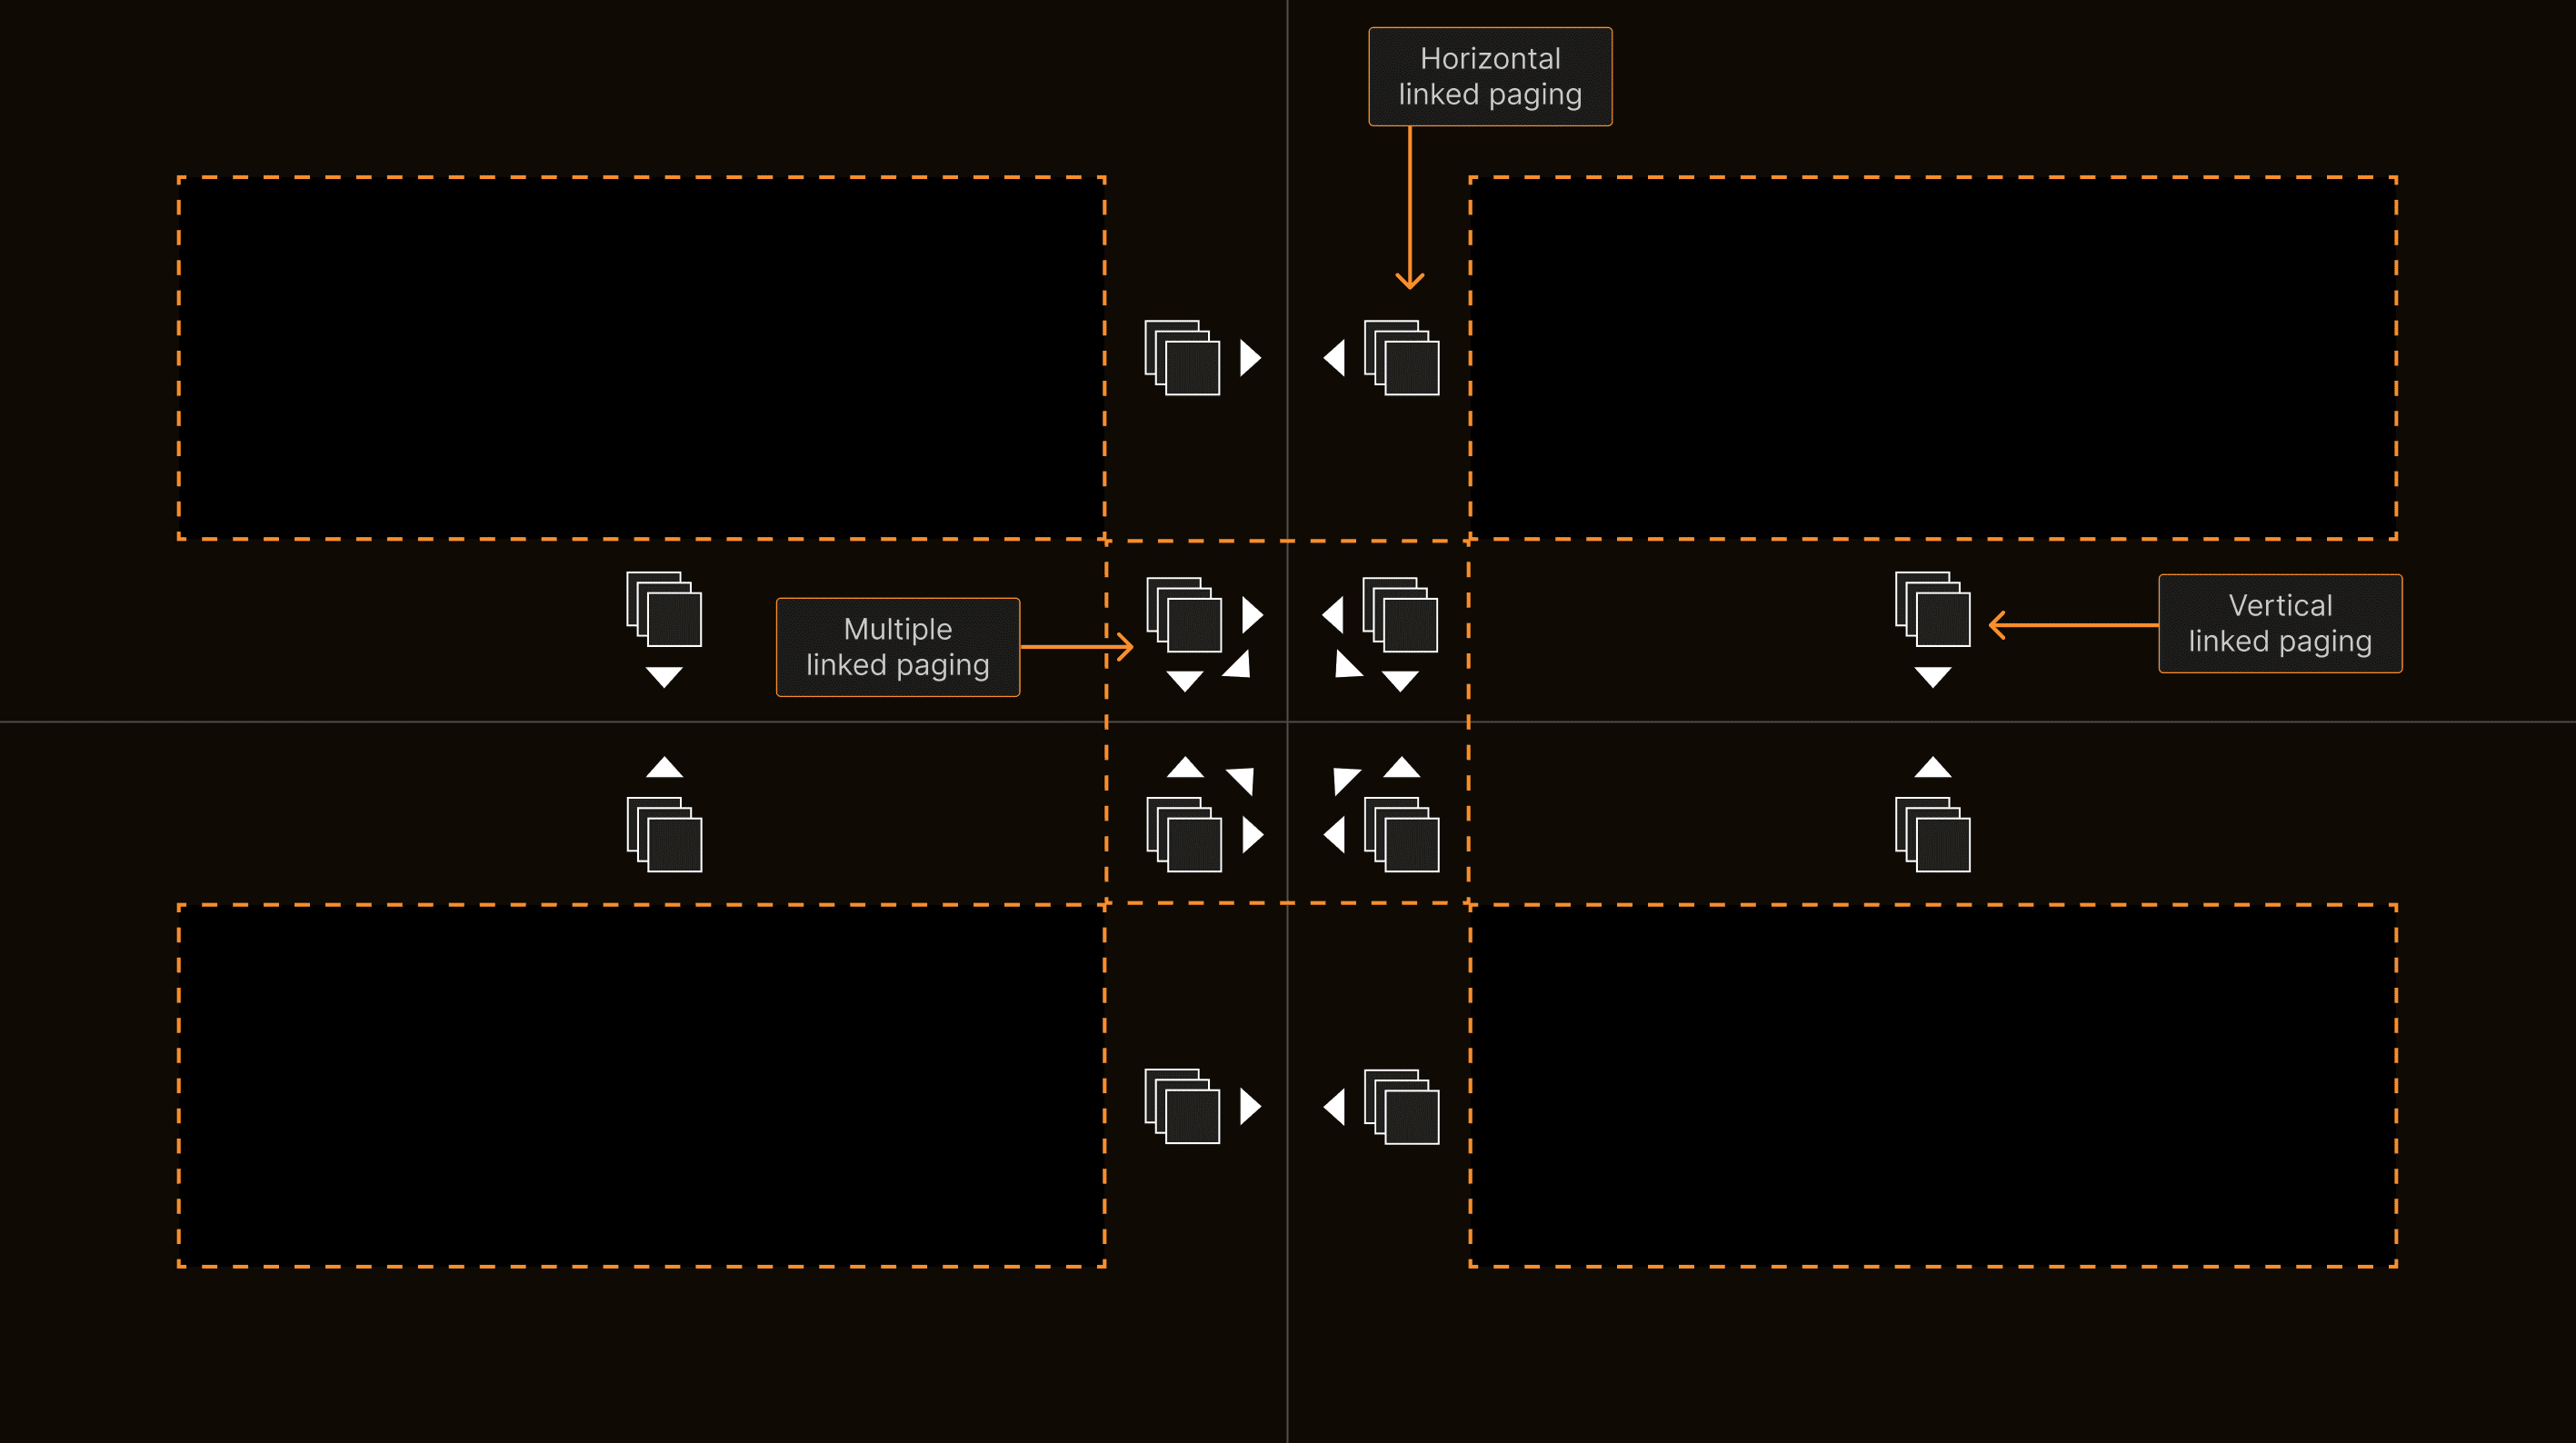 | |
Notice that the cursor image changes when you move it near an image border. This shows that you are controlling the neighboring series or neighboring three series (if near a corner bordering four viewports). Therefore, you can easily control whether you page through a single series or multiple neighboring series. Only series in the same image plane will page synchronously. The system automatically chooses the series under the cursor as the controller, which is important to realize when neighboring series have different slice thicknesses and increments. It also automatically and properly chooses to link paging via slice increment or slice number depending on the type of image. |
3D Targeting | |
|---|---|
Action: When using the various tools (Page, PageAll, Swap Series, Window/Level, Pan, Magnify), hold the mouse still for about 0.3 seconds while pressing the left mouse button. | |
 | |
The 3D Cursor tool will appear. The system will show the specified location on all displayed series that have a common DICOM frame of reference, and a target-shaped icon will specify the matching location. Continue to press the left button while dragging the mouse to control all displayed series with the same DICOM frame of reference. Release the left button to return to the prior tool. |
Toggle to 1:1 and Back | |
|---|---|
Action: Center wheel click or left double click. | |
 |
Smart Magnify | |
|---|---|
Action: Move the cursor to a desired location. Hold down the wheel and push the mouse. Pull to de-magnify. Release to stop. | |
 |
Window/Level | |
|---|---|
Action: Press the right and left mouse buttons, then push/pull to adjust level, drag right/left to adjust window. | |
 | |
For CT, PT, and NM images, there are special Window and Level functions. For CT, in the lower right of each viewport, a window/level icon is present. Right click on the icon and a menu of present CT window/level settings appears. Click on the text of any line in the menu to cause the series to change to that setting. You can also set your favorite window/level presets. To do so, right click on that same window/level icon at the lower right of the viewport, then select the checkboxes you desire in the order you desire. The system assigned number lock keyboard shortcuts for your desired window/level presets. You can see the assigned numbers when you hover the cursor over the checkboxes. Now that you have set your favorites, you have two options when you want to quickly flip between different pre-set window/level settings:
Configurating color presets for PT and NM images works in exactly the same way. |
Open Toolbox | |
|---|---|
Action: Right press while holding the mouse still 0.3 seconds to display the toolbox, then drag over the desired tool, then release to select the tool. This way, you can select a tool without dragging to a toolbar and with just one press/release action. However, if you don’t like this method, access the toolbar with the T shortcut. Remember, as with any shortcut key, you can set a mouse button or keypad to press T. For many tools, after the tool is selected, a right click displays a menu of options. Hover over any tool in the toolbox to see the tooltip and keyboard shortcut. | |
 | |
TIP: While it may be tempting to use the toolbar near the top of the display, the toolbox is much more efficient. Instead of dragging the mouse to the toolbar and moving your head and eyes to a small target away from the image, when you use toolbox, the tools come to you. Although the right-press – drag – release method is a little harder to master than clicking the T key, it allows access to tools with half as many clicks. Please also remember that the toolbox also includes the exam navigation keys. Use the toolbox to navigate to the next exam...it’s faster and easier! |
Pan | |
|---|---|
Action: Press the right mouse button while moving the mouse. | |
 |
Annotating Images | |
|---|---|
Many self-explanatory tools are available for annotating images. When you create an annotation and want to edit it, first hover over the annotation. You will see that the annotation changes to indicate that you have control over all of it or over one of the ends of it. Use the Delete or Backspace key to remove an annotation, or left-press-drag to change its position or the position of a highlighted portion. |
Working with Thumbnails | |
|---|---|
The thumbnail bars at the bottom of the left and the right panel of the viewer show the images series associated with the current and prior exam on display. Left press on a thumbnail to drag it to any viewport. You can drag thumbnail images from any exam to any panel. For example, you may have a comparison abdomen CT on the right panel, then drag a thumbnail from that exam to the left panel. You can then display a comparison abdominal ultrasound and drag a thumbnail from that exam to the left panel. Thus, the left panel can be used to compare various series from various current and prior exams. |
The Montage | |
|---|---|
Many reading physicians believe that marking key images is a time-consuming service for referrers and patients. However, when utilized properly, the montage helps the efficiency and accuracy of image interpretation as well as communication to referring physicians and patients. It is most useful for reading cross-sectional imaging exams, particularly in patients with comparison exams. To understand why, let’s compare reading with a montage vs. reading without a montage. |
Volumetric Imaging | |
|---|---|
Volumetric image display is available from either the left or right viewer panel. Access it by clicking on the MPR viewer icon on the toolbar or toolbox or using the keyboard shortcut (/). The system automated sorts thumbnails to show the series that are eligible for volumetric rendering for the exam. Drag any thumbnail upward in the main image viewport to see the MPR and volumetric views. The tools and dropdown menus at the bottom of the viewports are self-explanatory. |
Hanging Protocols | |
|---|---|
The hanging protocol dialog is accessed via the User Account (showing your name) dropdown at the right of the Top Ribbon of the Worklist or Reporting Screen. While hanging protocols have been a PACS feature for over thirty years, it is common for users to complain that they “don’t work, are too complicated, are difficult to understand, or cryptic to access.” Our hanging protocols are designed to be robust and powerful, yet simple to understand. At the left of the Image Hanging Protocol dialog, select from two options: |