Release notes: Workflow and reporting
Workflow and Reporting: Version 14.0.0
Reporting Panel: Macros, Templates and Forms Sidebar Redesign
User feedback received was that the display of macros and templates in the report editor was difficult to read. Names were truncated and the panel layout made navigating to items slow. The Current Forms tab also displayed forms in a single column, requiring excessive scrolling when many forms were present.
The macros and templates panel has been redesigned and moved to a collapsible sidebar within the report editor. The Current Forms tab now displays forms in a two-column layout. No changes have been made to backend logic or existing macro and template functionality.
New Templates and Macros Sidebar
Macros and templates have been moved into a dedicated sidebar displayed to the left of the Current Report tab.
The sidebar is only shown to users who have access to templates and macros.
Templates and macros are each collapsible vertically by clicking the collapse/expand icon beside their section heading.
The sidebar can be collapsed to the left by clicking the button to the left of the Current Report tab. The expanded or collapsed state is remembered per user within the browser session until the cache is cleared.
Users can edit a template or macro by hovering over its name and clicking the pencil icon.
A scrollbar is provided when the list of macros or templates exceeds the available panel space.
The “+” button adds a new macro or template, and the gear icon manages macros or templates — both retain their existing functionality.
If the Current Report tab is hidden for a user by any existing platform logic, the sidebar is also not displayed.
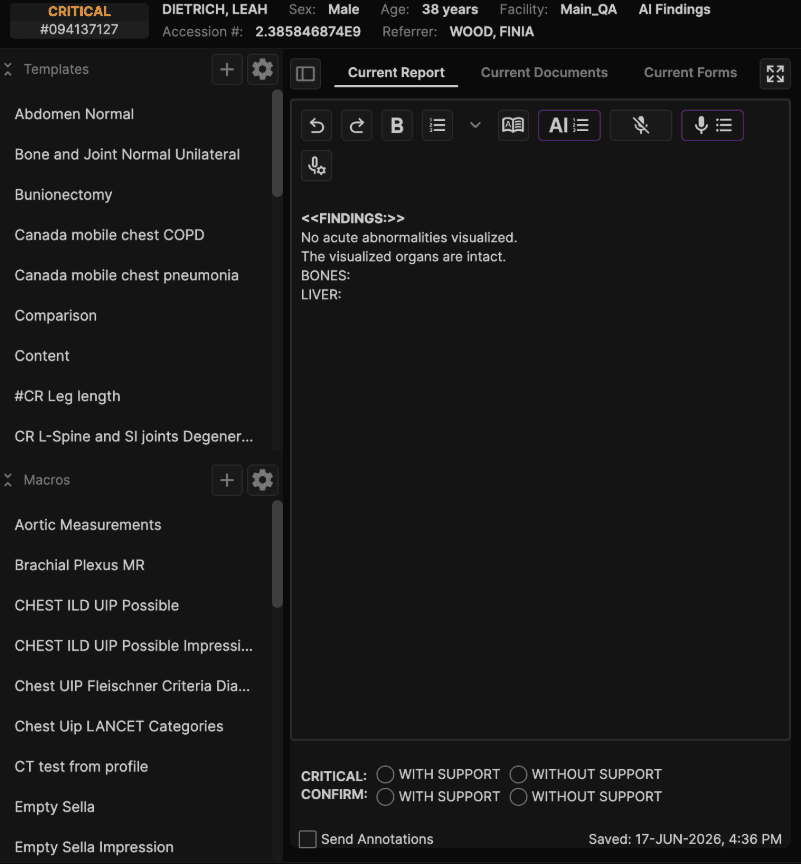
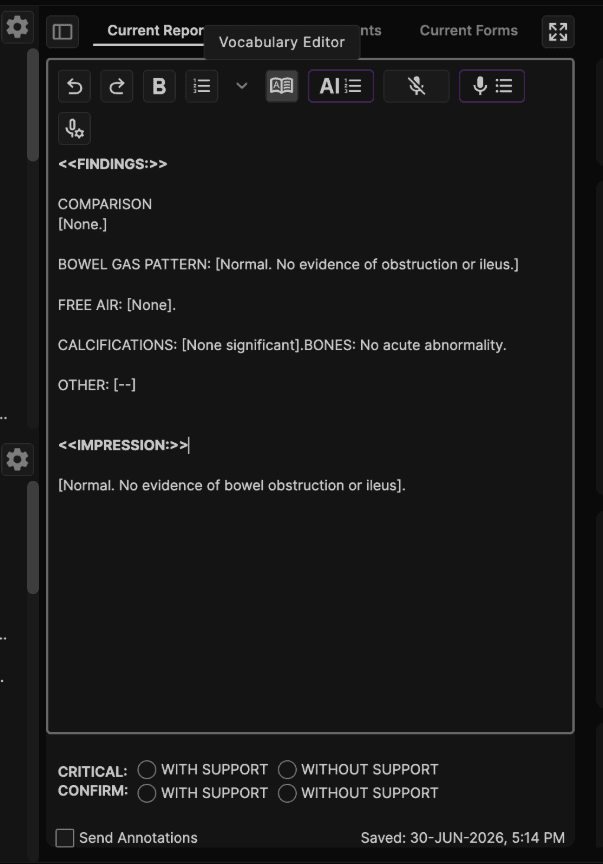
Vocabulary Editor Button Relocated
The Vocabulary Editor button has been moved to an icon positioned to the left of the AI button in the report editor toolbar. Hovering over the icon displays the tooltip “Vocabulary Editor”.
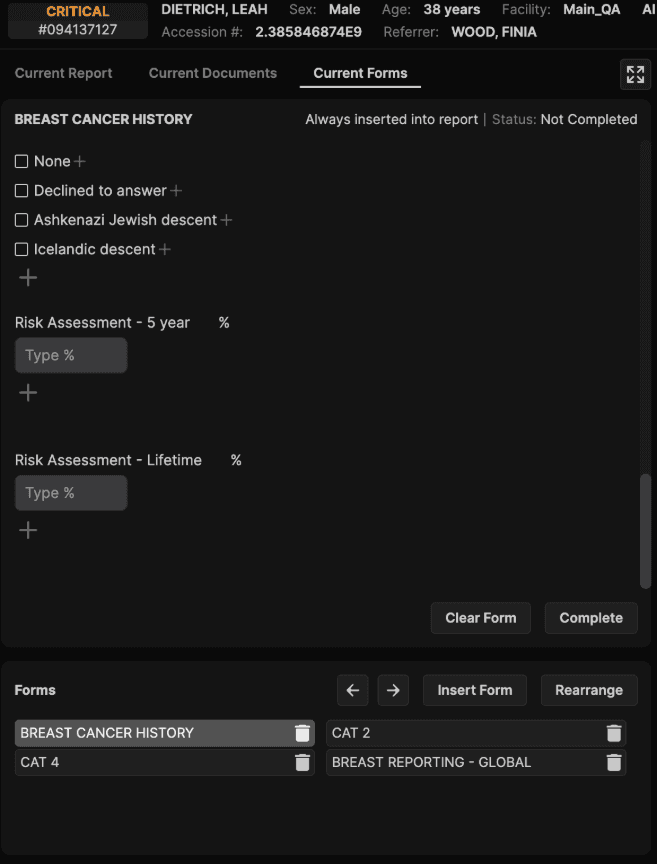
Two-Column Form Layout in Current Forms Tab
Forms in the Current Forms tab are now displayed in two columns. A scrollbar appears when the list of forms exceeds five rows. No changes have been made to form functionality.
Report Editor Focus Highlight
When working in the report editor, keyboard input such as the backspace key is intercepted by the editor component — a behaviour that can cause confusion because Vision hotkeys stop responding while the editor is in focus. There was no visual indication to communicate when the editor was active and intercepting input.
The report editor now displays a visible border when the cursor is hovering over it, signalling that the editor is actively intercepting keyboard input and that Vision shortcuts are temporarily paused.
A visible border appears around the entire report editor component — including the header area — when the user hovers over it.
The border is removed when the cursor moves away from the editor, indicating that Vision shortcuts are re-enabled.
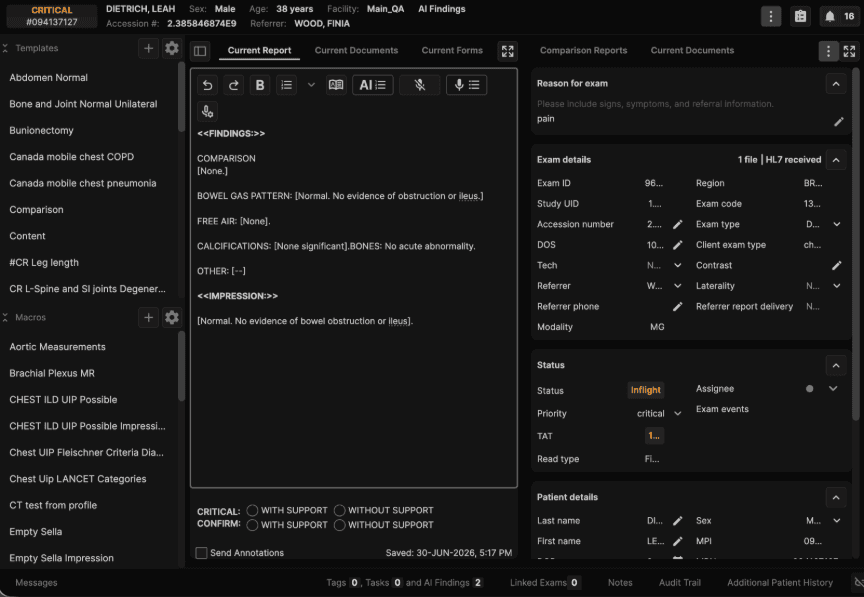
Form-Field Highlight Color Update in Report Editor
When a form field updated text in the report editor, the affected text was shown with a light gray highlight that lacked sufficient contrast and was easy to miss, particularly in longer reports.
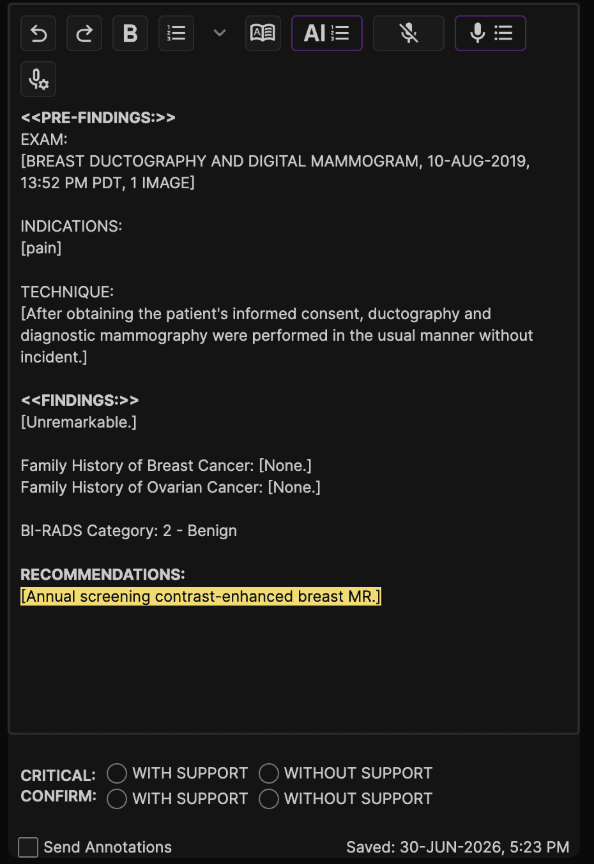
The highlight color applied to report editor text when it is updated by a form field has been changed from light gray to yellow (color #F9DC5C). This applies across all forms in the report editor.
When a form field updates report editor text, the resulting highlight uses the new yellow color.
Highlight behavior and logic are unchanged — only the color has been updated.
Blue highlights (default first-item behavior) and the absence of highlight (when AI detects no finding) remain unchanged.
Improved Warning Behavior When Signing Without Changes
When a radiologist signed a report without making any edits to the template, a blocking dialog was displayed requiring explicit user confirmation before proceeding. This interrupted workflow even when signing an unedited template was intentional.
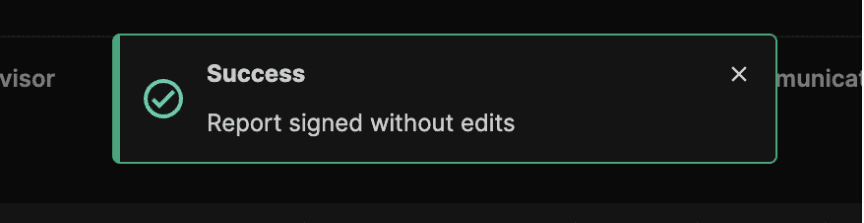
The blocking confirmation dialog has been removed. Signing now proceeds immediately, and a brief non-blocking notification is displayed instead.
The blocking warning dialog requiring user confirmation before signing an unedited report has been removed.
When a radiologist signs a report without making changes, the report is signed immediately.
A non-blocking informational message reading “Report signed without edits” appears briefly after signing and disappears automatically. No user action is required.
The existing warning statement visible within the report template before signing continues to behave as before: it remains visible until the report is signed, at which point it is removed.
Cancel Button for AI Report Assistant Processing
When a user initiated the Report Assistant AI to generate an impression, a full-screen processing overlay locked the UI and prevented any interaction until generation completed. There was no way to interrupt the request once it had started.
A Cancel button is now displayed on the AI processing overlay, allowing users to interrupt an in-progress Report Assistant AI request at any time.
A Cancel button appears on the processing overlay while the AI request is actively in progress.
Clicking Cancel interrupts the active AI request. No AI-generated content is inserted into the report and no partial changes are applied.
After cancellation, the processing overlay closes and the report editor and navigation are fully restored to their pre-processing state.
The Cancel button is visible only while the request is actively processing. It disappears once processing completes or once cancellation has been completed.
If the user does not click Cancel, the AI request continues and the generated output is applied as designed.
Re-Arrange Tabs in Exams Menu
In a previous release, the Exams menu tabs were rearranged. However, the new order did not match the way clients actually work through their exam queues, which made navigation less intuitive and slowed down day-to-day workflows.
The Exams menu tabs now appear in the following order, from left to right:
Pending
Inflight
Completed
All Exams
Consult Request
Communicate
Unmatched
Support Request
Tasks
Peer Review
Peer Review Supervisor
Annotations

This new order reflects the natural progression of an exam through the workflow (Pending → Inflight → Completed), followed by supporting and administrative tabs, making it easier and faster for users to move through their daily tasks.
Tab visibility rules remain the same. Which tabs a user can see is still determined by their existing user permissions/role. This update only changes the order of tabs a user already has access to — it does not grant or remove access to any tab.
No tabs were added or removed.
No functionality within any individual tab was changed.
Improvements to Exam Share via External Sharing Link
The External Exam Share feature allows internal users to share a medical imaging record with external users who do not have a platform account. This release delivers enhancements including UI improvements, a guided tour, embedded image viewing, and environment-specific white-label email branding.
Exam Access Flow
External users receive two emails: one containing the exam link and one containing the temporary access code. The access code is valid for 24 hours; if it expires, the user can request a new code via a “Click here” link.
All emails open with the greeting “Hello,” — consistent across both flows and both email types.
External access does not change the exam status. The exam does not appear as “In Reading” for internal users when accessed externally.
UI Panels and Navigation
The Reporting tab opens by default. The current report and comparison report (if available) are shown in a dual-panel layout. Reports render as PDF; if a PDF is unavailable, an HTML fallback is used.
If no comparison report exists, a single-panel layout is used. Users can toggle between panel modes manually.
The Images tab supports 1-panel and 2-panel toggle modes. The prior exams list shows relevant exams with a page icon (reports) and an eye icon (images).
Guided Tour
A Tour button is available on the external share page. Hovering shows the tooltip “Tour”. Clicking launches a guided walkthrough; users can click Next, skip, or restart at any time. The color scheme aligns with the platform color scheme.
Email Templates
Email 1 — Exam Link: Subject reads “Medical imaging record shared with you from [Facility Group].” The body notifies the recipient that a confidential medical imaging record has been shared and includes a View Exam Report button.
Email 2 — Access Code: Subject reads “Temporary Exam Access Code from [Facility Group].” The body contains the temporary access code, a 24-hour expiry notice, and a “Click here” link to request a new code.
Exam Patient MRN Transfer
When an exam was acquired under the wrong patient identity, or when a duplicate patient record needed to be resolved, the system previously blocked any attempt to reassign an exam’s MRN to one that already existed in the system. Support teams were required to intervene manually for every patient identity correction, and downstream systems were not notified when workarounds were applied outside the standard workflow.
A new Patient MRN Transfer feature allows permissioned users to reassign an exam from one patient record to another, or update a patient’s MRN to a new value, directly from the exam interface.
Access Control
A new ACL, exam_patient_mrn_transfer, controls access to the Patient MRN Transfer workflow. This permission is enabled by default for Facility Group Admins and Global Admins.
The pencil icon entry point is visible on the exam details page MRN field for users with the permission, and hidden (not just disabled) for users without it.
Patient MRN Transfer Dialog
The dialog offers two independent actions: entering a new MRN to update the current patient record, or searching for and selecting an existing patient to transfer the exam to.
Patient search supports filtering by Patient Name (minimum 2 characters), Patient MRN (partial match), and Patient MPI (minimum 2 characters). Results display MRN, full name, and MPI to support positive patient identification before selection.
Typing in the new MRN field locks the patient list; selecting a patient from the list disables and clears the MRN input. The user must clear one before using the other.
If an entered MRN already exists in the system, the input border turns red and an error message appears. The existing patient is shown in the list with the option to select them for a transfer instead.

Confirmation Dialog
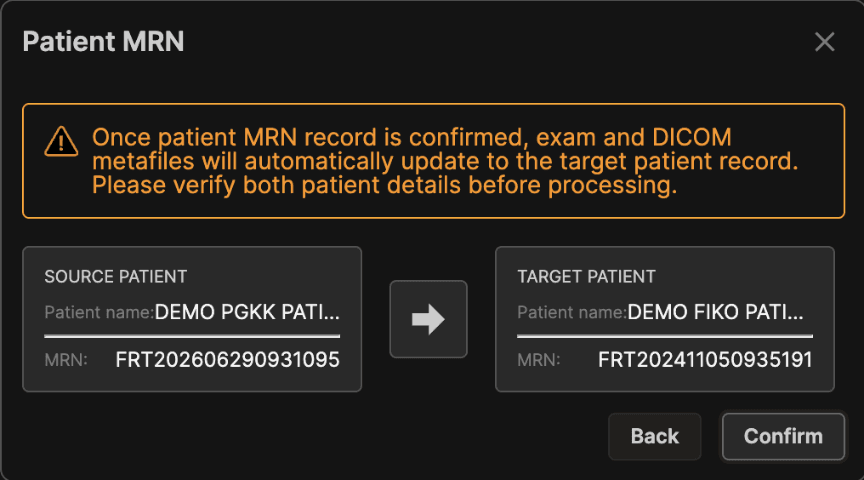
Before any transfer is executed, a confirmation dialog displays the source and target patient cards (name and MRN) with a directional arrow indicating the direction of the transfer.
An amber warning banner reads: “Once Patient MRN record is confirmed, exam and DICOM metafiles will automatically update to the target patient record. Please verify both patient details before proceeding.”
Transfer Behavior
Upon confirmation, the exam is moved from the source patient to the target patient immediately. All associated data — forms, documents, and DICOM structured reports — transfers with the exam. The exam’s status is unchanged.
When transferring to an existing patient, the MPI is also updated to match the target patient.
If the target patient exists in a different facility within the same subgroup but not in the exam’s facility, the system automatically clones the patient record into the exam’s facility to enable the transfer.
DICOM Metafile Update
Upon confirmation, DICOM metafile fields (Patient Name, MRN, DOB, Sex) are automatically updated to match the target patient. No separate user action is required.
If the DICOM metadata update fails, the patient transfer still completes and a notification reads: “DICOM metadata update failed, please update manually.” The failure is recorded in the audit trail.
An exam can be transferred again at any time, including back to a previous patient. Each action generates a new audit log entry.
HL7 Notification and Audit Trail
Upon a successful transfer, the system sends an HL7 ADT A40 message using the existing message pipeline. If the A40 fails to send, the failure is logged without rolling back the transfer.
All Patient MRN Transfer actions — successful and failed — are captured in the audit trail with the performing user’s name, timestamp (UTC), source MRN, target MRN, exam accession number, and any DICOM metafile changes.
Allow Signing of Exams Without Images
In certain clinical and operational scenarios — such as no-shows, aborted procedures, external image review, and documentation-only cases — an exam may have no images. Previously, DICOM images were mandatory both for submitting an exam from Pending to Inflight and for signing. This prevented workflow progression and required manual workarounds.
Images are no longer mandatory for submitting an exam from Pending to Inflight or for signing a completed exam.
Submission from Pending Without Images
The block that previously prevented exam submission when images are missing has been removed. All other mandatory fields (Reason for Exam, Department, Exam Type, etc.) remain unchanged.
When a user submits a Pending exam with no images, a confirmation dialog is displayed requiring explicit acknowledgment before submission proceeds.
Signing Without Images
When a radiologist opens an Inflight exam with no images, the viewer does not launch automatically.
When a radiologist attempts to sign an exam with no associated images, a confirmation dialog is displayed requiring explicit acknowledgment before the signature is accepted.
Once signed, existing Redo report logic applies. ORU and PDF reports are generated per current behavior.
All standard post-sign workflows are available for exams signed without images: Communicate, Addendum, Support Request, Consult Request, and Peer Review.
Edge Cases and Behavior
Linked exams: if an exam has no images but is linked to an exam that has images, it inherits those images and is treated as a standard exam — no no-image confirmation dialogs appear and the viewer launches normally.
Images arriving while the exam is Inflight: images are added to the exam without workflow disruption. The radiologist can view them and sign as usual.
Individual Worklist: exams with no images cannot be added to the individual worklist. The add button is disabled for these exams with the tooltip “Action unavailable for this exam.”
Key Images: an exam signed with no images has no key images to mark. If images subsequently arrive, the exam moves back to Inflight and key images marked in the viewer will appear in the PDF report per standard behavior.
Admin Correction Workflow — Administrative Changes on Completed Exams
Once a radiologist signs an exam and it moves to the Completed tab, administrative errors such as split and merge issues, missing forms, or DICOM metadata discrepancies could previously only be corrected through the Addendum workflow, which is designed for clinical changes and requires radiologist involvement.
A new Exam: Admin Changes feature allows permissioned users to perform a defined set of administrative-only actions on completed (once-signed) exams directly from the Completed tab, without affecting the signed report or changing the exam status. All changes are saved automatically and captured in the audit trail.
Access Control
A new ACL, exam_admin_changes, controls access to Admin Changes capabilities on completed exams. This permission is enabled by default for Facility Group Admins and Global Admins.
The ACL governs four capabilities: splitting an exam, merging an exam, adding forms, and updating DICOM Metafiles. No other existing editable fields or functionality in the Completed tab are affected.
Admin Changes Capabilities
When a user with the exam_admin_changes ACL opens a completed exam, the following additional capabilities become available:
Split
The Split tool is available within Admin Changes mode. The Once Signed tag does not block the Split tool in this mode.
A completed exam may be split with exams in any status (Unmatched, Pending, Inflight, Support Request), but not with other completed exams.
The recipient exam must already exist and be associated to the correct patient before initiating a split. There is no automatic undo — to revert, the split workflow must be performed in reverse.
Merge
The Merge tool is available within Admin Changes mode. The Once Signed tag does not block the Merge tool in this mode.
A completed exam may be merged with exams in any status, but not with other completed exams. If both exams carry a final signed report, the merge is blocked and an error message is shown.
A confirmation dialog is shown before the merge is executed: “You are merging an exam. This action is irreversible. Please click Confirm if you would like to proceed.” Merge cannot be undone.
Add Forms
Forms can be uploaded to a completed exam in Admin Changes mode. Adding forms to a completed exam does not update the signed report. Deleting forms is available today and is unchanged.
Update DICOM Metafiles
The Update DICOM Metafiles button is available in Admin Changes mode. DICOM Metafiles are also updated automatically whenever any admin change or existing editable change is saved.
Study UID is read-only and remains unchanged throughout all admin actions, including merge and split operations. When an accession number is changed, IOCM messages carry both the old and new values; the original accession number is permanently retained in the audit trail.
Report Behavior, Auto-Save, and Audit Trail
The signed report remains visible and read-only during Admin Changes. It cannot be edited or modified.
All changes are saved automatically as they are applied. The standard in-reading lock applies when the user is making changes. When an admin change is saved, a new HL7 ORU is triggered and a new PDF is regenerated.
All actions during Admin Changes mode are captured in the audit trail with username, date, and time: initiation of Admin Changes mode, form uploads, DICOM Metafile updates (including old and new accession number values), split and merge actions (with exam IDs), HL7 ORU triggers, and exit from Admin Changes mode.
Automatic Update of Exam List Icons on Prefetch
When a user triggered pre-fetching of images for a comparison exam, the icons in the Comparison Exam List did not update automatically. Users were required to manually reload the entire page to see updated image availability status, which sometimes caused report changes to be lost.
The Comparison Exam List icons now update automatically when a pre-fetch is triggered, without requiring a page reload.
When a user triggers pre-fetch for a current or comparison exam, the Comparison Exam List icon progresses automatically:
Pre-fetch requested: an in-progress (download) icon appears with the message “Request received. This might take a few minutes.”
First image available: the eye icon appears as soon as the first image is available. The system does not wait for pre-fetch to fully complete.
A manual page reload is not required at any point. This behavior applies regardless of exam status.
When pre-fetch completes for a prior exam that is on the user’s Individual Worklist and the viewer is set to Vision, the system automatically adds the exam to the user’s Exam Group and notifies the cache manager to re-pull updated data so that newly available images are included.
This change is scoped to automatic icon state updates only. No changes have been made to exam viewability behavior or viewability rules.
Study Matching and Post-Processed Image Reconciliation
Synthesis previously required a single Study Instance UID (SUID) per exam. Post-processed studies returned from third-party applications with a new SUID could not be automatically reconciled into the original exam, and there was no fallback matching path when a SUID was absent or changed even when an Accession Number was present. Both gaps required manual workarounds.
Two new matching capabilities have been added to allow the platform to reconcile incoming DICOM data using Accession Number as a fallback, and to associate post-processed studies with their original exams via a secondary SUID.
Accession Number fallback matching: when incoming DICOM data does not match an existing exam by SUID, the system now attempts to match by Accession Number as a secondary path. Study Instance UID remains the primary matching key and existing matching behavior is unchanged.
Secondary SUID for post-processed studies: the system can now associate a post-processed study (which arrives with a new SUID assigned by a third-party application) with its original exam by storing a secondary SUID on the exam record, allowing post-processed images to be automatically reconciled without manual intervention.
Referrer Report Delivery Auto-Selection
When an ORM (Order Management) message was received, it could include a referrer along with an associated delivery contact (phone, email, or fax). Previously, the system mapped the referrer to the exam but did not capture or auto-select the accompanying delivery contact. Technologists were required to manually search and select the correct delivery destination for every exam.
The platform now captures referrer delivery contact information arriving in ORM messages and automatically selects the appropriate delivery destination on the exam.
ORM Delivery Contact Capture
When an ORM specifies a referrer fax number or email address, those values are saved to the referrer record and are visible in the Referrer details in the UI.
Fax numbers added via ORM are given the location name “HL7 Import.” This name can be manually edited. Email addresses and fax numbers received via ORM can also be manually edited or deleted.
The previous limit of a maximum of three fax numbers and three email addresses per referrer has been removed. There is no longer a limit on the number of delivery locations per referrer.
New delivery contacts arriving in an ORM are appended to the referrer record. If the same fax number already exists on the record, it is not duplicated.
Auto-Selection Logic on Exam
When a referrer is selected on an exam (manually or via HL7), the Referrer Report Delivery field is auto-populated using the following rules:
If the ORM specifies a delivery value, that value is used — even if the referrer has other options on record. If more than one delivery location arrives in the ORM, the first is auto-selected.
If the ORM provides no delivery value and the referrer has only one delivery option on record, that option is auto-selected.
If the ORM provides no delivery value and the referrer has multiple delivery options, no option is auto-selected. The technologist selects the correct one manually.
Users can manually override or select multiple fax/email values after auto-population. Existing behavior for manual selection is unchanged.
Communicate Workflow - Allow Radiologists to Work with Exams in Communicate Tab
Radiologists (both default and custom roles) with the "Ability to work with studies in the Communicate tab" permission can now fully work with Critical With Support exams in the Communicate tab — even when those exams are assigned to a different user.
This closes a gap where radiologists could see the Communicate tab but couldn't always act on exams that weren't assigned to them.
Radiologists with this permission can now work with Critical With Support exams in the Communicate tab regardless of who the exam is assigned to:
Clicking the Critical button now opens the addendum editor even if the exam is assigned to another user.
After the addendum is auto-saved, the Done button becomes available so the radiologist can move the exam out of the Communicate tab — matching the experience already available for other roles.
Assignment behavior stays unchanged: when a radiologist acts on an exam assigned to someone else, the exam remains assigned to the original user (unless someone manually reassigns it). This means:
When the exam returns to the Communicate tab, the original assignee will still see and can edit the addendum.
When the original assignee signs the addendum, their own name — not the radiologist who moved the exam — appears in the signature.