Release notes: Workflow and reporting
Workflow and Reporting: Version 15.0.0
Hanging Protocols: Comparison Exam Display Rule
A new Hanging Protocols setting, Comparison Exam Display Rule, provides use level options for controlling comparison exams.
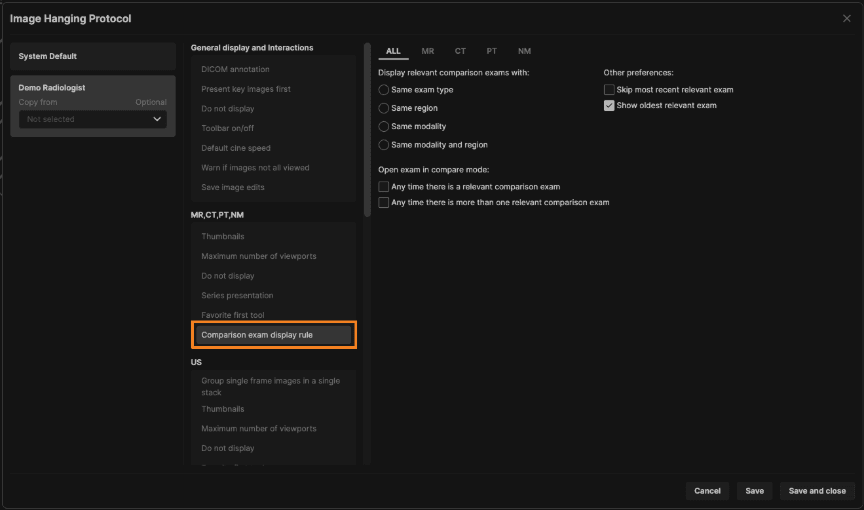
Display Rule Options
Display relevant comparison exams with (single-select): Same exam type, Same region, Same modality, or Same modality and region. This rule filters comparison exams selected based on facility group level rules.
Other preferences (single-select in this phase): Skip most recent relevant exam, or Show oldest relevant exam. This rule filters comparison exams selected based on facility group level rules.
Open exam in compare mode (multi-select): Any time there is a relevant comparison exam, and/or Any time there is more than one relevant comparison exam. Compare mode is not available for MG modality.
Modality-Specific Configuration
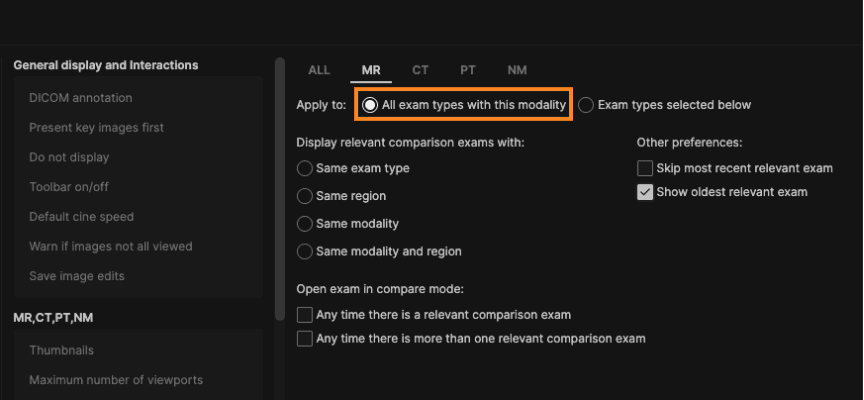
Within each modality tab, users choose to apply the display rule to all exam types with that modality, or only to exam types selected below.
When Exam types selected below is chosen, users can create multiple named tabs, each with its own exam types and display rule. The same exam type cannot appear in more than one tab, and at least one exam type must be selected to save a tab.
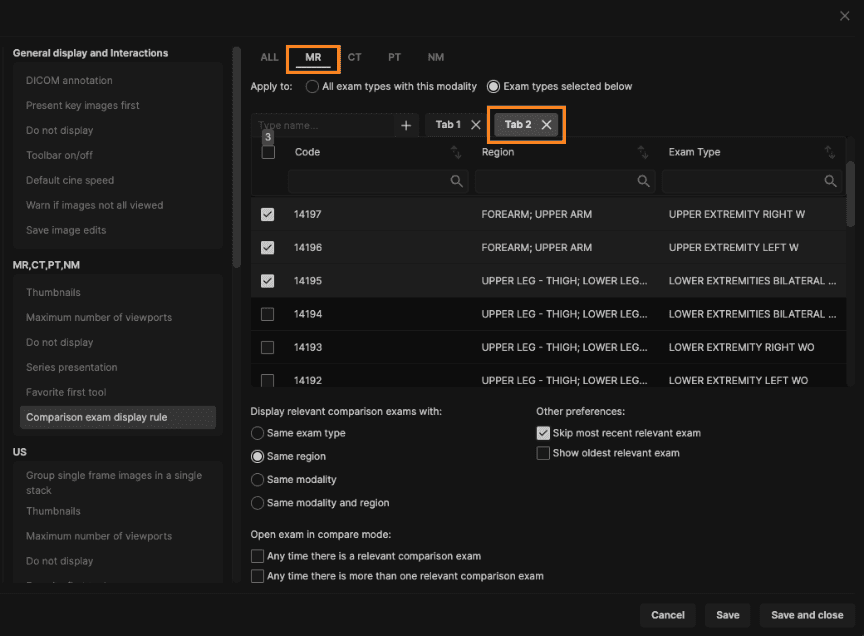
Criteria configured in the ALL tab apply to all modalities in the group unless a specific modality has its own configured criteria, consistent with existing Hanging Protocols logic. If no rule is configured anywhere in a group, the comparison display falls back to showing the most recent relevant comparison exam.
Comparison Report Tab
The Comparison Report tab on the Reporting Screen now reflects whichever comparison exam is selected by the Hanging Protocols rule. If that exam has no associated report, the Comparison Report tab is empty.
User Vocabulary Editor: Macro and Template Names
New features improve speech recognition of macro and template names. The application now suggests likely spoken forms as a name is typed, and those spoken forms are automatically kept in sync with the user's vocabulary editor entries whenever a macro or template is created, renamed, or deleted.
Vocabulary Editor: Auto-Correct and New Terms or Phrases
The Vocabulary Editor dialog on the reporting screen now has two tabs: Auto-correct and New terms or phrases.

Auto-correct (Inverse Text Normalization):
Replaces a term or phrase with another — it does not change what the engine recognizes; it automatically corrects the text that was typed.
The user provides the:
Spoken Form as plain words/letters — no digits, no symbols, no punctuation, single space between tokens.
Written Form: the actual final value to output — can include numbers, symbols, hyphens, and capitalization.Example: Spoken Form: corner artery. Written Form: coronary artery. If the system types corner artery, it is immediately replaced with coronary artery.
New terms or phrases
Works before recognition — it primes the engine with vocabulary it should expect to hear, improving the odds it recognizes the right words in the first place.
Purpose: Give the engine advance knowledge of important words/phrases so it recognizes them correctly from the start.
Mechanism: Supplies a biasing list of terms/phrases (e.g., "Thyroid Biopsy") relevant to the current context, increasing recognition accuracy for domain-specific or uncommon vocabulary.
Example: Loading "Thyroid Biopsy" into context before a dictation session so the engine is primed to recognize it correctly.
The New terms or phrases tab is a searchable table with a free-text field and Save button for adding entries. Duplicate entries are blocked with the message "This term or phrase already exists."
Deleting an entry from either tab now also removes it from the backend database, preventing orphaned records.
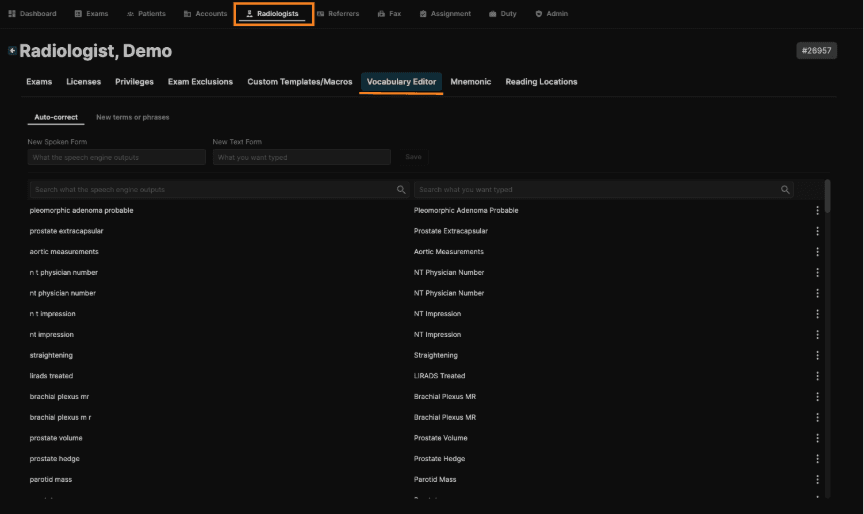
Administrative users can access and manage a reader's Auto-correct and New terms or phrases lists from a new Vocabulary Editor tab in the Radiologist menu.
Numerals and special characters are no longer permitted in Auto-correct spoken forms or New terms or phrases entries, in both the user-level and global-level Vocabulary Editors.
Macro/Template Creation Dialog: Improve Recognition
Macro and template names may no longer include numerals or special characters.
A new "Improve Macro/Template Recognition" section lets users enter up to five alternative spoken forms per macro or template. This is available only for users employing the System Default speech engine.
As a name is typed, the system automatically suggests spoken forms, labeled "Auto-Generated." Acronyms generate both a natural reading and a spelled-out alternative — for example, "AA FAT" suggests "aa fat" and "a a f a t." Suggested entries can be edited, removed, or supplemented with manually entered spoken forms.
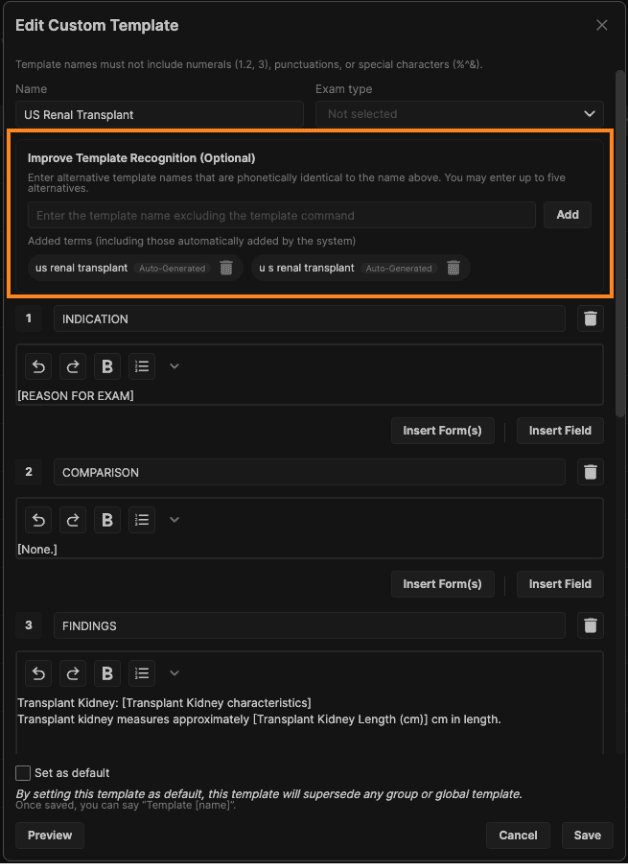
Spoken forms must be unique per macro or template, and a maximum of five entries (auto-generated and manually added, combined) is allowed.
If a macro or template is renamed, auto-generated entries refresh to match the new name, while manually added entries are left untouched. If it is deleted, all associated spoken forms are removed from Auto-correct and New terms or phrases.
Additional Voice Commands for Macros
In addition to the existing "macro" command, macros can now also be inserted by voice using the commands "cue" and "click" followed by the macro name.
Migration of Existing Macros and Templates
Each reading physician's existing macros and templates are automatically added to their own Auto-correct and New terms or phrases lists using the same rules described above. Existing special characters are replaced with spaces and existing numerals are spelled out for this migration; edits to names going forward must comply with the new naming restrictions.
Highlight Assigned Radiologist Name in Exams List
The reader’s name in the Assignee column is now highlighted in green whenever the assigned reader is the currently logged-in user, making it easier to spot and prioritize their own assigned exams at a glance.
Highlight Behavior
In the Exams List table, the Assignee column displays the reading physician's name in green when the assignee is the currently logged-in user. This applies across all Exam menu tabs where the Assignee column is shown, in both the Universal Worklist and the Individual Worklist.
Exams assigned to any other user retain the default text styling.
If an exam is reassigned, the highlight updates to reflect the new assignee, without requiring a full page reload.
Improvements to Exam Priorities and Accounts Page Redesign
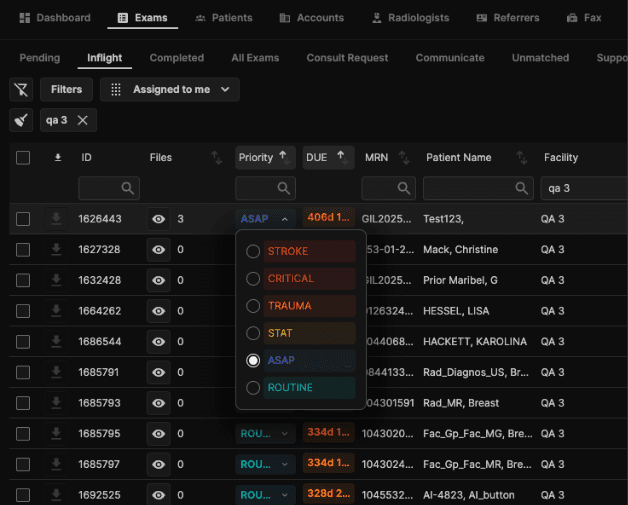
The Accounts page has been redesigned, a new ASAP exam priority has been added, each priority now has a unique color, exam timestamp labels have been clarified, and exam priority can now be updated directly from the Exams list.
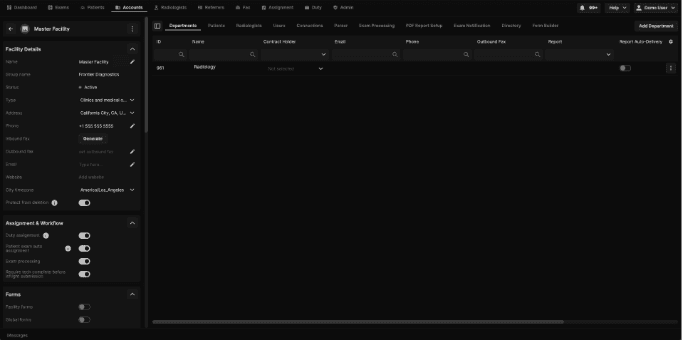
Accounts Page Redesign
The Facility Groups table, Facility settings, Facilities table, and Departments table have been redesigned to match updated UI standards, with no changes to underlying logic.
The Facilities table replaces the general search field with column-level search (ID, Name, Address, Phone) and adds dropdown filters (Status, Type, Sub-group). The Departments table receives the same treatment (column search on ID, Name, Email, Phone, Outbound Fax, Notes; dropdown filters on Contract Holder, Report, CC). Existing sortable columns keep their current sort behavior.
Facility settings are reorganized into collapsible sections — Facility Details, Assignment & Workflow, Forms, Reporting & HL7, Patient & Study Matching, Integrations & Interoperability, Support & Escalation, and SLA & Timing.
New "ASAP" Exam Priority
ASAP is a new exam priority with a default Report Delivery Delay value of 3:00.
ASAP has been added wherever existing priorities appear: exam list filters, the Configure Preset Filters admin tool, the manual exam creation dialog, the Exams table Priority column, and the Reporting Screen Exam Information panel. ASAP is also supported by HL7.
SLA & Timing and Priority Colors
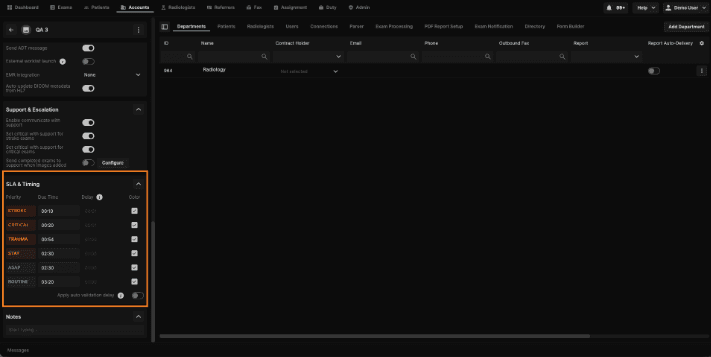
The facility-level "SLA Settings" section has been renamed SLA & Timing and redesigned, with each priority assigned its own distinct color per the updated design.
A Color column lets administrators choose, per facility, whether each priority displays in its assigned color or in white. The color checkbox is selected by default for all priorities, including the new ASAP; unchecking it displays that priority in white for that facility.
Inflight Sort Order
The default sort order in the Inflight tab, for all roles, is now Priority (Stroke, then Critical, then Trauma, then Stat, then ASAP, then Routine) as the primary sort, with SLA (oldest first) as the secondary sort.
Exam Timestamp Column Renames
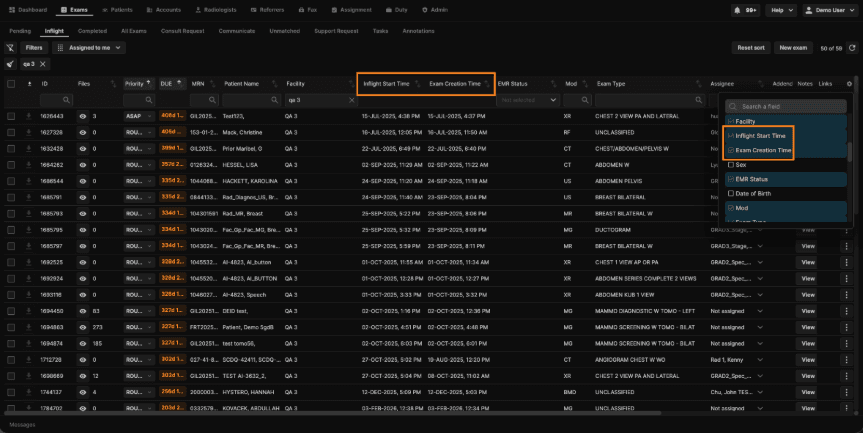
"Ordered date-time (ODT)" has been renamed Inflight Start Time, and "Entered datetime (EDT)" has been renamed Exam Creation Time, across all Exams menu tabs and in the column settings (gear icon).
Editable Priority from the Exams List
The Priority column in the Exams table now includes a dropdown so users can update an exam's priority directly from the list, without opening the exam.
Configurable Report Delivery Delay by Priority
A new Facility Group-level setting, Report Delivery Delay by Priority, allows the delivery delay to be configured independently for each exam priority.
Report Delivery Delay by Priority Setting
Default delay values are: Stroke 15 sec, Critical 15 sec, Trauma 3 min, Stat 3 min, ASAP 3 min, and Routine 3 min.
Users with access to facility group settings can view and edit these values in M:SS format, from a minimum of 0:00 (no delay) up to a maximum of 5:00. An empty field is treated as 0:00.
When a report is signed, the system applies the delivery delay configured for the exam's priority at the facility group level.
Laterality: DICOM Sync to Exam Details
Laterality now stays synchronized in both directions between the DICOM metadata and the Exam Details panel.
Inbound: DICOM to Exam Details
When a DICOM file contains a value in tag (0020,0060), Laterality, the system reads and stores that value and automatically populates the Laterality field in Exam Details on study load.
DICOM values map to the UI as follows: L → Left, R → Right, B → Bi-Lateral. An absent or empty tag leaves Laterality as "Not selected."
If multiple series within the same study contain conflicting Laterality values, Exam Details also shows "Not selected"; no default value is applied when the tag is missing.
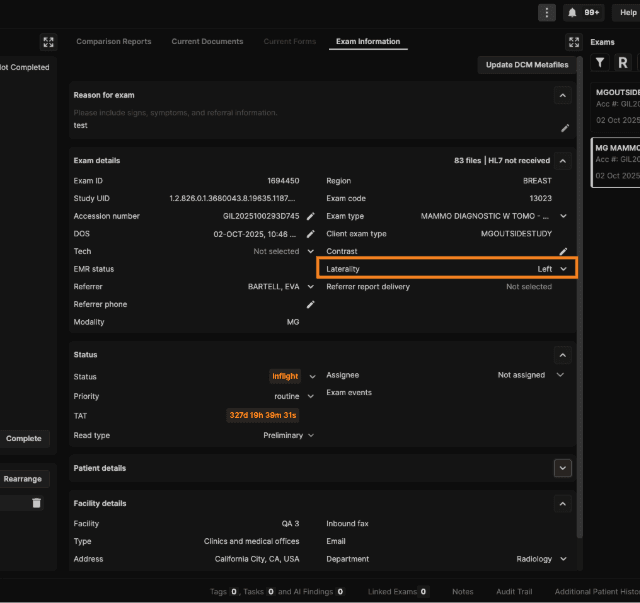
Outbound: Exam Details to DICOM Metafile
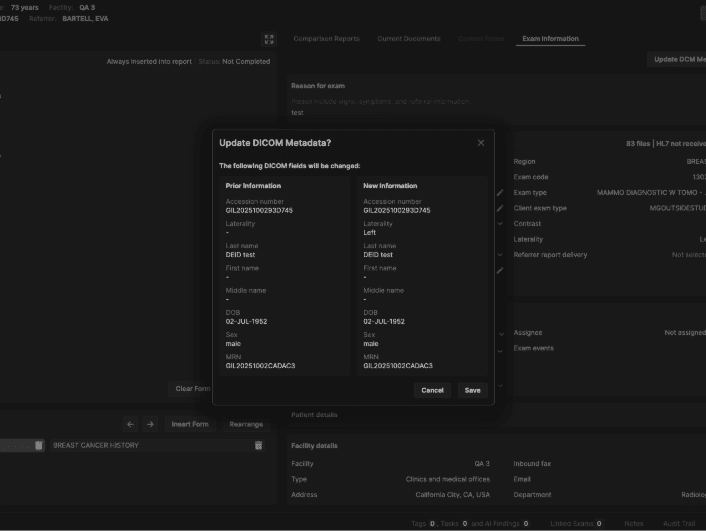
When a user updates Laterality in Exam Details, the Update DICOM Metadata prompt is automatically surfaced on exam exit, consistent with existing DICOM metadata update behavior.
The Update DICOM Metafiles confirmation modal reflects the Laterality change in the Prior Information / New Information comparison before the user confirms the save.
Improvements to Linked Exams and Ability to Link From/To Pending
Exams can now be linked in Pending status, cancelled exams are automatically unlinked from their linked group, and the linking workflow includes clearer warnings, audit trail messages, and a redesigned Link Exam modal.
Linking From/To Pending
Pending exams can now be linked to other Pending, Unmatched, Inflight, and Completed exams, following the same source/target hierarchy already in place for other statuses. The source exam is the one whose information is copied; Pending exams move to the status of the exam they are linked to (Inflight or Completed), consistent with current linking behavior.
Linking a Pending exam to multiple exams is supported using the current multi-selection and Link Exams button, following the same hierarchy rules.
Report, addendums, assignee, empty department fields, exam events, and forms are copied between linked exams following current logic; notes, tags, and tasks are not copied. Existing rules for exams with different image sets also apply to Pending exams — for example, a target exam with no images inherits the source exam's images.
When linking a Pending exam to a Completed exam or an Inflight exam with an addendum request, a warning is shown: "Linking this exam to a completed exam will send the same report to the facility," with Confirm and Cancel options.
Not Allowed Combinations
Pending exams cannot be linked to more than one Completed exam or more than one Inflight exam, and Unmatched exams cannot be linked to more than one Pending exam. Attempting any of these displays a message identifying which combination is not allowed.
Unlinking
Pending exams can be unlinked using the same individual "Unlink Exam" and multi-select "Unlink Exams" options available for other statuses.
When any exam in a linked group is cancelled, it is now automatically unlinked from the group. The remaining active exams stay linked to each other, and reading physicians can sign them without restriction.
Warnings When Linking to Completed Exams
Linking any unread exam (Pending, Unmatched, or Inflight) to a Completed exam now displays the warning: "You are linking an unread exam to a completed exam. The completed report will be applied to this exam and sent to the facility. Are you sure?" This applies for all user roles, for individual and multi-select linking, and regardless of the completed exam's date.
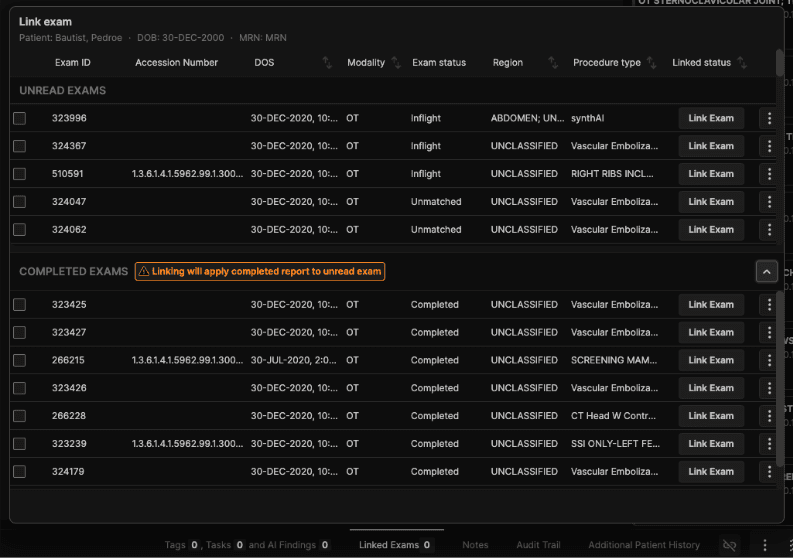
Link Exam Modal: Completed Exams Section
The Link Exam modal now groups exams under an "Unread exams" section and a separate, collapsible "Completed exams" section.
The Completed exams section is collapsed by default and shows a hidden-exam count plus a warning indicator: "Linking will apply completed report to unread exam." Users can expand it by clicking the section header; the collapsed/expanded state resets each time the modal is opened.
Audit Trail and Links Column
Audit trail messages for linking and unlinking have been rewritten for clarity — for example: "This exam was linked to [exam ID 1], [exam ID 2]" on the source exam, and "[exam ID] was linked to this exam" on the target exam.
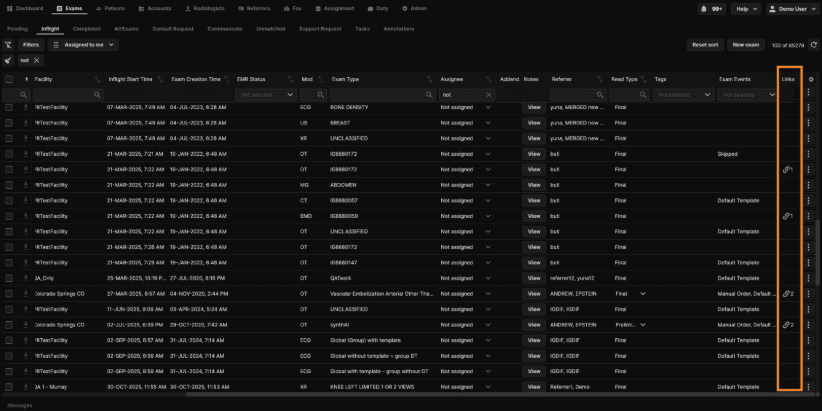
The Links column in the Exams table is now a fixed column next to the actions button, always visible for all roles and no longer available to hide or rearrange from the gear settings. It displays the number of linked exams with a link icon; clicking it shows a tooltip listing the linked exams.
Configurable "Critical with Support" for Stroke and Critical Priority Exams
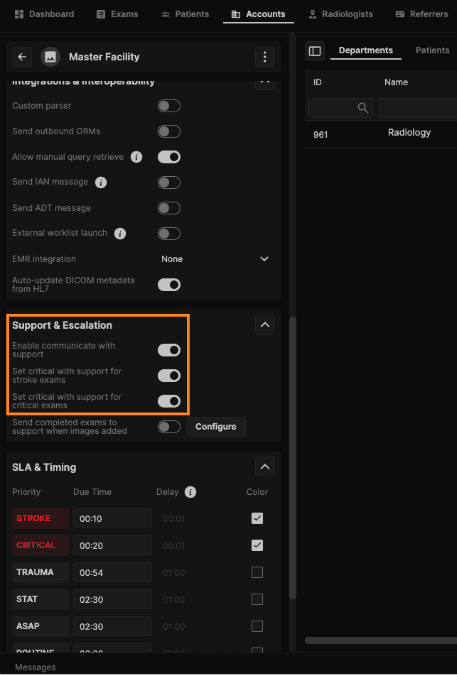
Two new facility-level settings let administrators control whether "With Support" signing options are available at all, and whether Critical with Support is automatically applied to Stroke and Critical priority exams.
Enable Communicate with Support
A new facility-level toggle, "Enable communicate with support," is enabled by default. When disabled, reading physicians see only the Critical Without Support and Confirm Without Support options in the current report and addendum editors; the "With Support" options are hidden.
Automatic "Critical with Support" for Stroke and Critical Exams
Two new facility-level toggles, "Set critical with support for stroke exams" and "Set critical with support for critical exams," are enabled by default and are only selectable while "Enable communicate with support" is enabled.
When enabled, opening a Stroke or Critical priority exam automatically sets Critical with Support as the condition. Users can still change it manually, and the selection is retained if the exam is closed and reopened. If priority increases to Stroke or Critical before signing, the condition automatically switches to Critical with Support; if priority decreases below Stroke or Critical before signing, the condition resets. This applies while an exam is Unmatched, Pending, or Inflight, including prelim orders, and no longer applies once an exam reaches Completed.
When disabled, the system never sets Critical with Support automatically for Stroke or Critical exams, in any status. Reading physicians may still select it manually, and no automatic behavior occurs when priority changes.
Existing exams that already carry a Critical with Support condition keep it. Changing either toggle only affects exams from that point forward — it does not alter conditions already set on existing exams.
EMR Status Field and Exam Submission Guard
EMR Status is now tracked as its own field, visible throughout the platform, and a new facility-level setting can require that the EMR confirm an exam as Completed before it can be submitted to Inflight — while still allowing operational flexibility when needed.
EMR Status Field
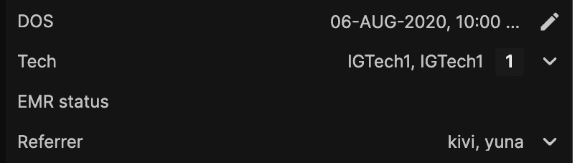
EMR Status is parsed from the ORC-5 segment of inbound HL7 ORM messages (new orders and order updates) and stored on the order record. Only the standard values Scheduled, In Process, Completed, Canceled, and Observations are accepted; any other value received is discarded and logged.
Each order update overwrites EMR Status with the latest ORC-5 value, so only the most recent value is retained. If no ORM message has been received for an order, EMR Status remains blank; if HL7 is received but ORC-5 is blank or unrecognized, EMR Status displays as NA, and submission from Pending to Inflight is permitted in that case.
Worklist and Exam Details Display
A new EMR Status column is available on every tab of the Exams worklist, placed next to the Facility column by default. Like other columns it can be shown, hidden, or rearranged, and it supports sorting.
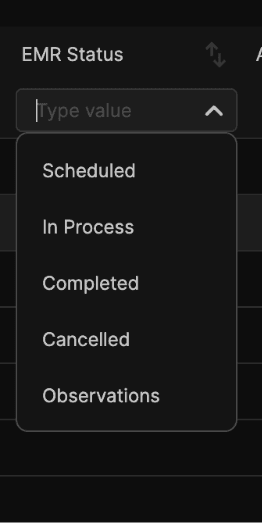
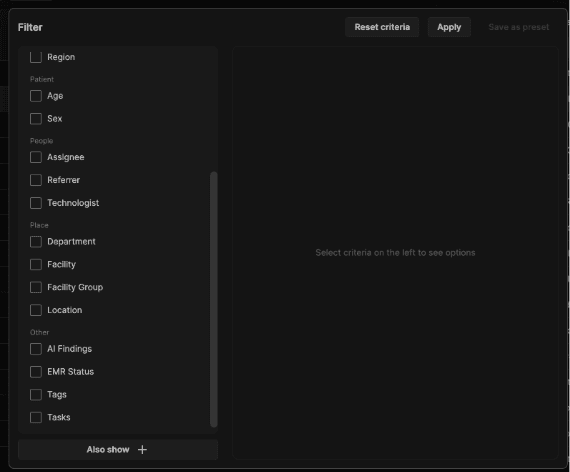
EMR Status is available as a filter in the Other section on every exam tab, including in saved presets and the Configure Presets admin tool. A dropdown in the column header supports multi-selecting Scheduled, In Process, Completed, Canceled, and Observations.
EMR Status is also shown as a separate, read-only field on the Exam Details page, using the same mapped label shown elsewhere (e.g., Completed, In Process). The field is read-only everywhere it appears and cannot be edited or overridden by users.
Facility Submission Guard
A new facility-level setting, “Require Tech Complete Before Inflight Submission,” controls whether EMR Status must be Completed before a technologist can submit an exam from Pending to Inflight. For any existing facilities, the feature flag is turned OFF and for any new facilities that are created after this release, the feature flag will be turned ON. This feature can be enabled and disabled by an admin with the appropriate ACL — for example for DICOM-only facilities or during EMR downtime.

When enabled, submission is allowed if EMR Status is Completed, or if an HL7 ORM has been received but ORC-5 is blank. Submission is blocked if no HL7 ORM has been received at all, or if EMR Status is any other value such as Scheduled, In Process, or Canceled.
This applies to all exam priorities, including Stroke and Critical — no priority-based bypass is granted, since submitting an incomplete high-priority exam risks the resulting report being rejected by the EMR with no notification to the referring provider.
When Auto-Validation is enabled and EMR Status isn't Completed, the exam is automatically routed to Pending instead of Inflight —once the completed status is available, the exam automatically moves to Inflight.
When submission is blocked, the Submit button is greyed out and disabled, with a tooltip reading “EMR Status is not in Completed status.” It becomes available again automatically once an update is received with EMR Status Completed or blank.
Blocked exams can still move to other statuses, such as Completed by external report, Support Request, a manual status change, or applicable OPR rules, and can still be linked to completed exams. To submit a blocked exam, an admin must either wait for a Completed ORM from the RIS or disable the facility setting.
Access Control
A new user permission, Facility setting EMR status, governs visibility and editability of the facility setting. Read and Update together let a user view and toggle the setting; Read alone allows viewing only; without Read, the setting is hidden entirely. Global admins and facility group admins have Read and Update by default.
Patient Middle Name Field
Middle Name is now a first-class, dedicated patient field, supported end-to-end across HL7, DICOM, search, and the UI, with safeguards to prevent existing patient data from being unintentionally overwritten or deleted.
Data Model and Display
Middle Name is stored as its own field, separate from First Name and Last Name, and is optional. Existing records without a middle name remain valid, and no migration is required.
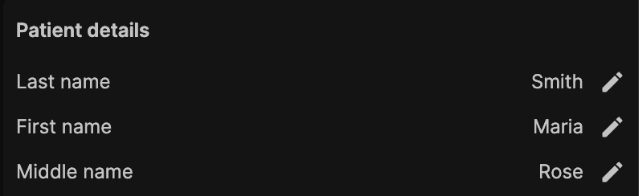
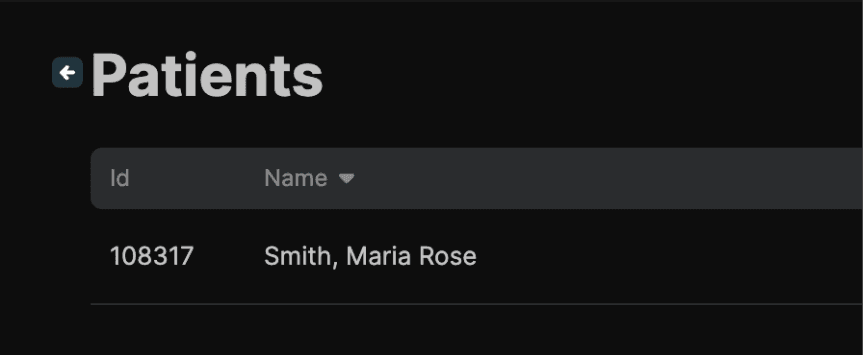
Wherever a patient's First and Last Name are shown — including search results, worklists, exam headers, patient banners, and report headers — Middle Name is now displayed alongside them, using the consistent format Last Name, First Name Middle Name.
On the Exam Details page, name fields display in the order Last Name, First Name, Middle Name, and Middle Name is included in the DICOM Metadata Update window alongside First and Last Name.
For existing patients whose middle name was previously concatenated into First Name (e.g., “John Robert”), the next time an authoritative HL7 or DICOM source provides a middle name, the platform strips it out of First Name and populates the dedicated Middle Name field, updating the displayed name accordingly.
HL7 Integration
PN.3 (Person Name) is parsed as Middle Name, separate from Last Name (PN.1) and First Name (PN.2). HL7 is authoritative when both HL7 and DICOM are present, and DICOM will not overwrite or clear an HL7-derived middle name.
Three scenarios are supported: a populated PN.3 updates Middle Name; an omitted PN.3 makes no change to the existing value; and an explicit empty PN.3 (e.g., SMITH^JOHN^””) clears Middle Name. In short, omitted is never treated as a delete.
If a received Patient Name string does not conform to the HL7 delimiter structure, Middle Name is left unchanged and First and Last Name continue to be handled as they are today.
DICOM Integration
DICOM Patient's Name component 3 maps to Middle Name. A populated value updates Middle Name only when DICOM is the authoritative source; a missing or empty component is treated as “no change” and never clears an existing value.
Compound last names are supported per the DICOM standard — for example, GARCIA LOPEZ^MARIA^JOSE maps to last name “Garcia Lopez,” first name “Maria,” and middle name “Jose.”
Non-conformant Patient Name strings (no caret delimiters, or a non-standard separator) leave Middle Name unchanged and are handled using existing First and Last Name logic.
Search, Matching, and Audit
Patient search now supports Middle Name, with First and Middle Name separated by a space and Last Name separated by a comma; existing First and Last Name search behavior is unchanged.
Patient matching continues to use First Name and Last Name only; Middle Name is not part of the matching key, and fuzzy matching accuracy and behavior are unaffected by its presence or absence.
All updates to Middle Name are recorded in the audit log, showing the change from the old value to the new value, at the same level of detail as First and Last Name updates.
Cross-Facility Propagation
When a patient's Middle Name is updated at one facility, the same update is propagated to all other records sharing the same Master Patient Index (MPI) ID at other facilities. The MPI itself continues to be based on First Name and Last Name only and does not incorporate Middle Name, including after a name is corrected from a legacy concatenated format.
Automatic DICOM Metadata Synchronization
The platform now automatically detects differences between order data and DICOM metadata and prompts the user to confirm the update when exiting an exam, bringing the manual DICOM path closer to the automatic HL7 path while still requiring user confirmation before committing changes.
Manual Update Retained
The Update DICOM Metafiles button remains available on the Exam Information tab as a manual override, and continues to be governed by the existing update_dicom_metafiles permission. When any DICOM-mapped field is edited, the button becomes highlighted to indicate a pending update, as it does today.
Automatic Prompt on Exam Exit
When a user exits an exam — for example by navigating to the Exams list, signing and closing, signing and moving to the next exam, or closing the browser tab or window — the system checks whether the current order data differs from the DICOM metadata for Last Name, First Name, Middle Name, Date of Birth, Sex, MRN, Accession Number, and Laterality (updated across all series in the study).
If a difference is found, the same Update DICOM Metadata confirmation modal used for manual updates is shown automatically before the user leaves the page. The prompt can appear regardless of the exam's current status.
Updated Confirmation Modal
The confirmation modal is now titled “Update DICOM Metadata?” and lists only valid DICOM-mapped fields; Exam Type has been removed since it is an internal platform field with no corresponding DICOM tag.
Selecting Save writes the updated metadata to all files in the study, or to all images in the current exam for order-level changes such as accession number or laterality, and closes the modal. Selecting Cancel or the X applies no DICOM changes.
Audit Trail and Edge Cases
All DICOM metadata update events are logged in the audit trail, including cancellations.
The prompt does not appear if the exam has no DICOM files, or if no difference exists between the order data and the DICOM metadata.
If an HL7 update is received while a user is actively editing a DICOM-mapped field, the incoming HL7 values are ignored for those fields so the user's unsaved edits are preserved; the event is still logged in the audit trail.
Physician Productivity Dashboard (Chrome Extension)
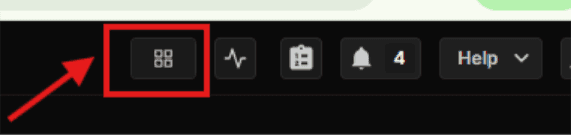
A new Chrome extension, the Physician Productivity Dashboard, is now available for reading physicians. It adds a dashboard button to the platform’s toolbar and opens a side panel showing reading pace, inflight workload, to-do counts, and peer review status, all pulled from the practice reporting system in real time and filtered automatically to the signed-in reading physician.
Important: the dashboard only works for reading physicians.
Installation and Access
Installed from the Chrome Web Store by searching for Synthesis Health Physician Productivity Dashboard, adding the extension, and signing in to the platform with a reading physician account.
Once installed, a dashboard icon appears in the toolbar area at the top of the page. The icon only appears for accounts registered as radiologists and can take a few seconds to appear after sign-in.
Clicking the icon opens the dashboard panel over the current page; clicking it again, or the close button inside the panel, closes it.
Dashboard Panel
The panel lists dashboards grouped by facility group, showing only the folders and dashboards the signed-in reading physician has access to. Selecting Physician Productivity Dashboard loads the sections below.
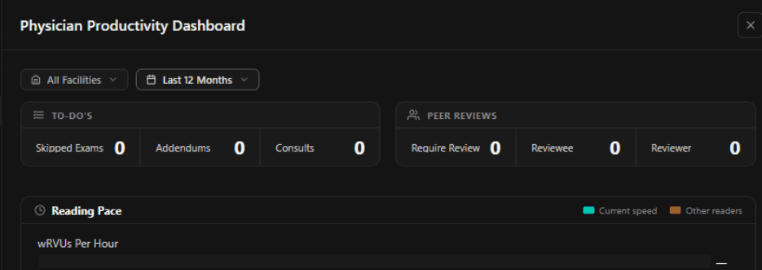
To-do’s and Peer Reviews summary: two summary panels at the top of the panel show outstanding Skipped Exams, Addendums, and Consults, and outstanding Peer Reviews (Require Review, Reviewee, Reviewer), updating automatically for the signed-in reading physician.
Reading Pace: shows wRVUs Per Hour, Exams Read, and wRVUs Read, each displayed as two horizontal bars comparing the signed-in reading physician’s current speed against the average of other readers in the same dataset.
Inflight Workload: shows the reading physician’s active caseload across wRVUs Assigned Inflight, Exams Assigned Inflight, Total wRVUs Inflight, and Total Exams Inflight, broken down by priority (Critical, Stroke, Trauma, Stat, Routine) with color-coded badges and proportional bars.
Filtering and Account Detection
Facility filter: a dropdown with search narrows every section on the dashboard to one or more specific facilities; selecting All Facilities removes the filter.
Date range filter: controls the time window used across the dashboard, with presets for Last 12 Months (default), Today, Last 8 Hours, Last 12 Hours, and Last 16 Hours, plus a custom start/end date and time-of-day range.
Automatic account detection: the dashboard identifies the signed-in reading physician by reading the platform’s sign-in response, so no separate login to the reporting system is required. If the account cannot be matched automatically, a manual override is available on the Settings page.
Alert Notification System (Chrome Extension)
Alert staff previously had to manually refresh the Communicate, Alert Request, and Tasks worklists throughout the day to catch new arrivals.
The Alert Notification System, a Chrome extension built for Alert staff, has been updated to version 2.0.0. It watches the Communicate, Alert Request, and Tasks worklists and alerts the user the moment a new item arrives, removing the need to manually refresh the page. New arrivals trigger a sound and visual cues, and each alert card shows the exam or task name, patient name, accession number, priority, facility, and the date and time the item entered the worklist.
Getting Started
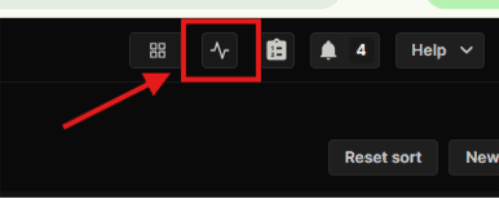
Once signed in, a small pulse icon (a heartbeat line) appears in the top bar next to the Help menu and account name. Clicking it shows or hides the notification panel.
The extension only runs on worklist pages, such as the in-flight orders list. It does not run on individual exam detail pages, the image viewer, or the login page.
Alert Delivery and Alert Cards
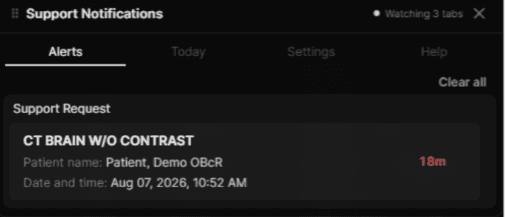
A new arrival triggers three things at once: an audible two-tone beep generated in the browser, a card in the Alerts tab with full item detail, and a native Chrome desktop notification shown outside the browser window if the operating system allows it.
Click-to-open, dismiss, and clear all: clicking an alert card opens the related exam in a new browser tab and counts as handling the item, removing it from the age clock and counting toward daily response statistics. Hovering over a card reveals an “x” to dismiss it without opening the exam, and a Clear all control dismisses every current alert at once.
Aging, Priority, and Task-Type Filtering
Aging and overdue reminders: each alert’s waiting-time label changes from neutral gray to amber after a configurable number of minutes, then to red once overdue. While red, the extension can optionally beep again on a repeating interval.
Priority filtering: the Communicate and Alert Request tabs can each be limited to specific priority levels, read directly from the facility’s own data. Leaving no priority selected means every priority triggers an alert.
Task-type filtering and color coding: the Tasks tab can be limited to specific task types, and each task type can be given its own color, shown as a stripe on the left edge of that type’s alert cards.
Configurable defaults: default values for the poll interval (10 seconds; range 3–60 seconds), amber threshold (5 minutes), red/overdue threshold (15 minutes), and re-beep interval (5 minutes) are starting points that each organization can adjust to match its own workflow.